CREAT A NEW PAGE
You can create any number of pages with content. Our theme includes several page templates to choose from, and you will need to choose the page template that suits your needs. All of this is done in the pages section of your WordPress admin.
If you DID NOT One Click Install demo, you will need to MANUALLY CREATE your Home and other pages. Here’s how to build a new page:
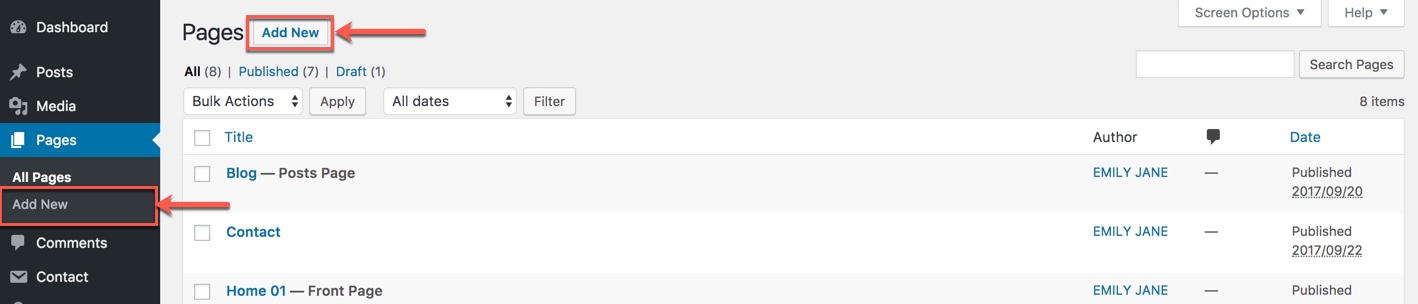
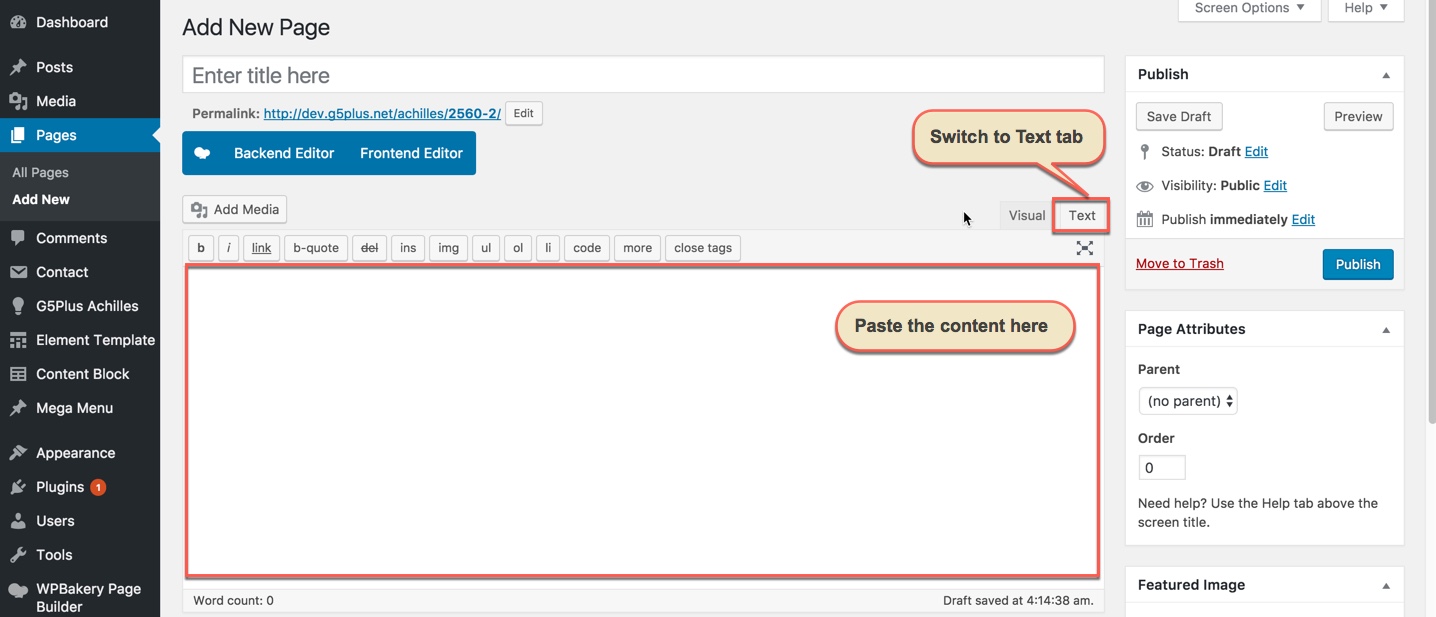
Step 1 – Navigate to Pages in your admin sidebar and click Add New option.
Step 2 – Input a new name for your page, and click BACKEND EDITOR to build page by Visual Composer or click FRONTEND EDITOR to build page by Visual Composer on the frontend (make sure that you have installed Visual Composer plugin).
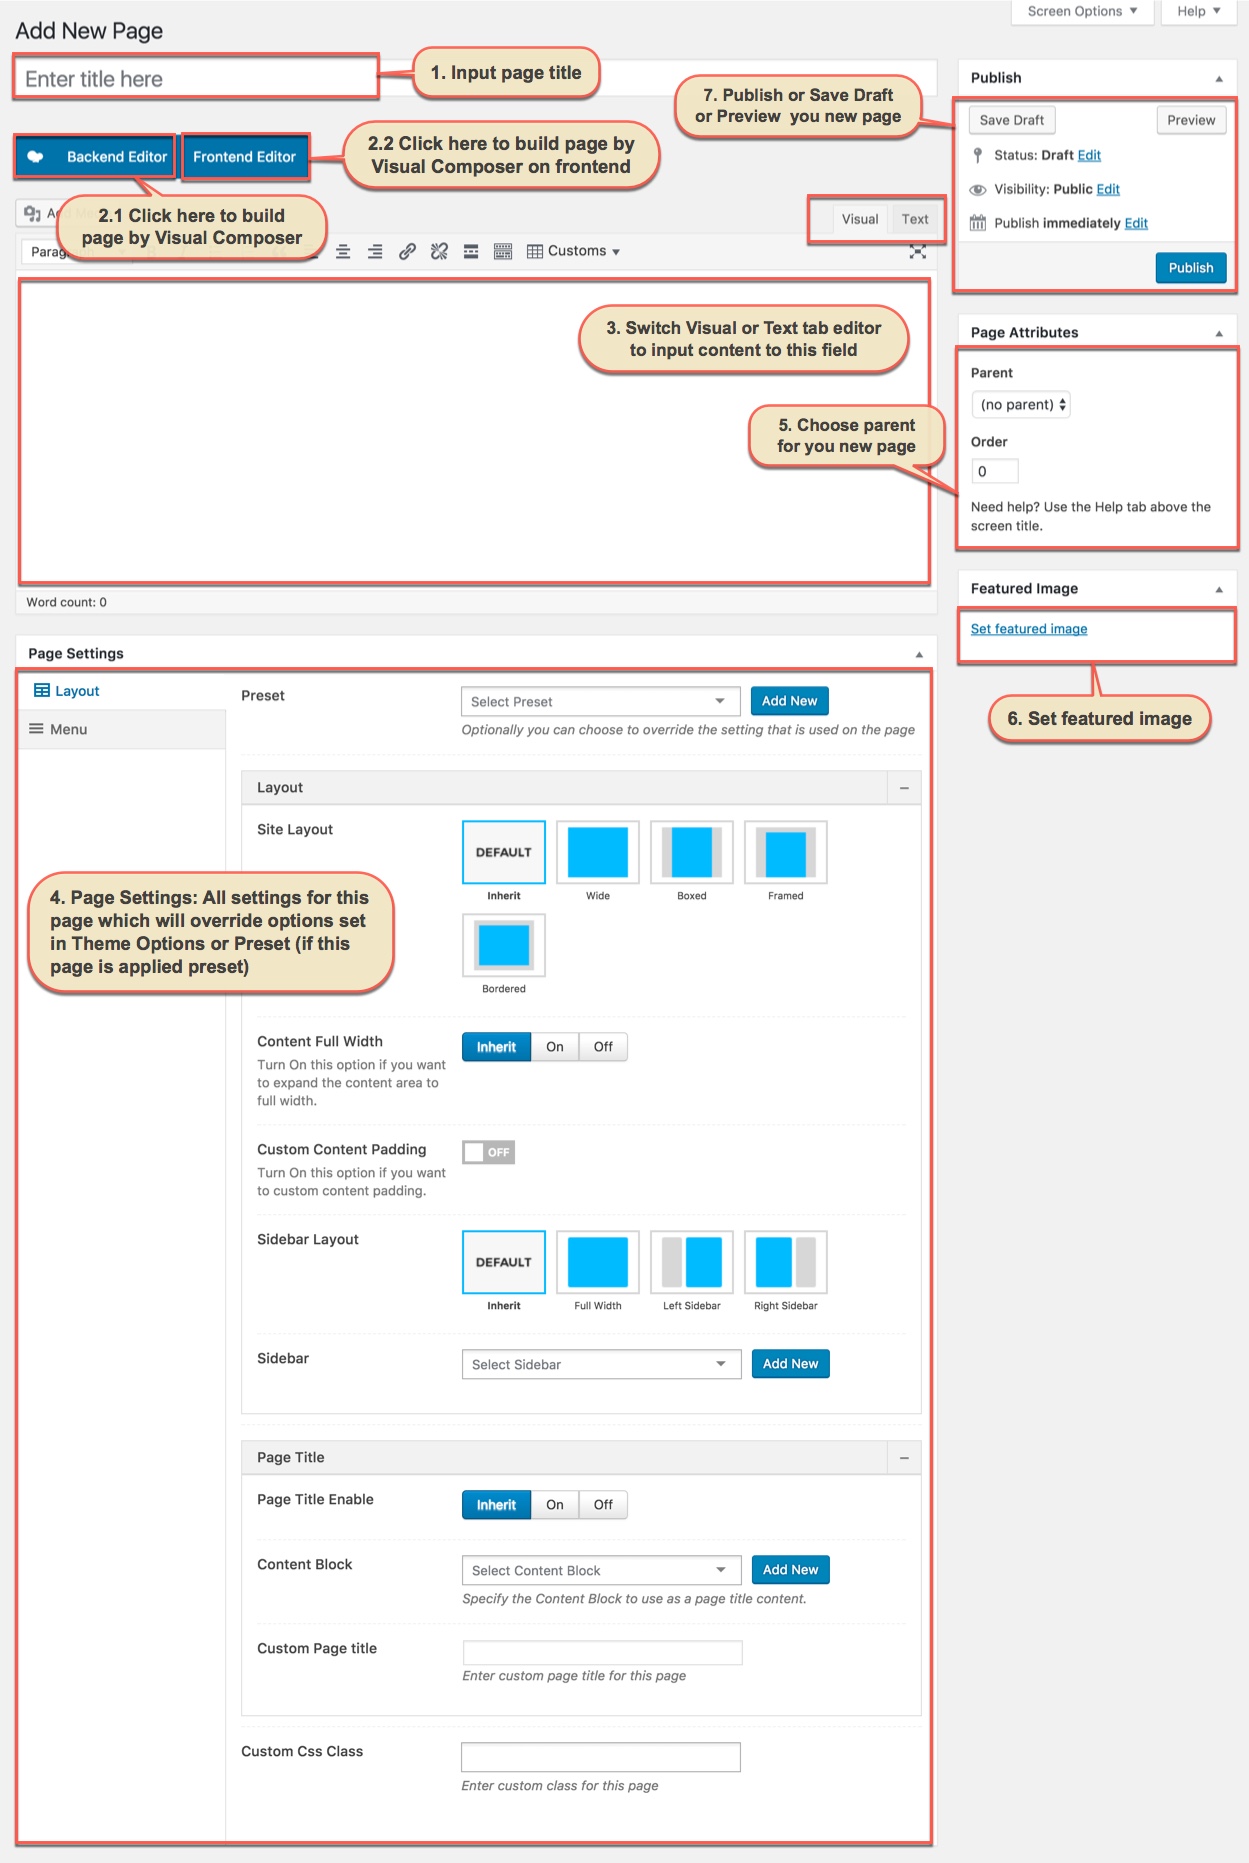
Step 3: Content for your page goes in the editing field, use the Visual or Text editor. With Visual Composer, page content is mainly built using Shortcodes, Template. See the Shortcodes and Templates section for how to use them. You can also use our demo content, see the corresponding section of this document for the demo code of each page.
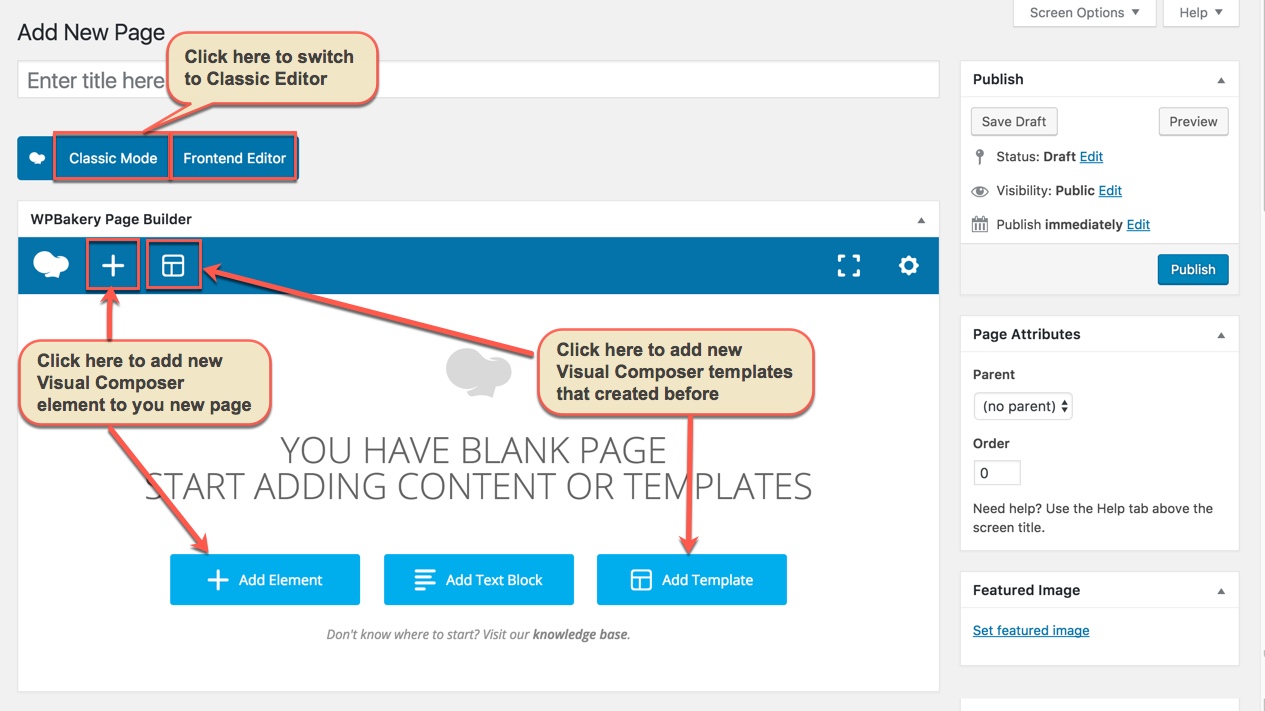
- Don't click BACKEND EDITOR: It means that you could input content to Classic Mode Area, then go to Step 4
- Click BACKEND EDITOR: your screen could be like this
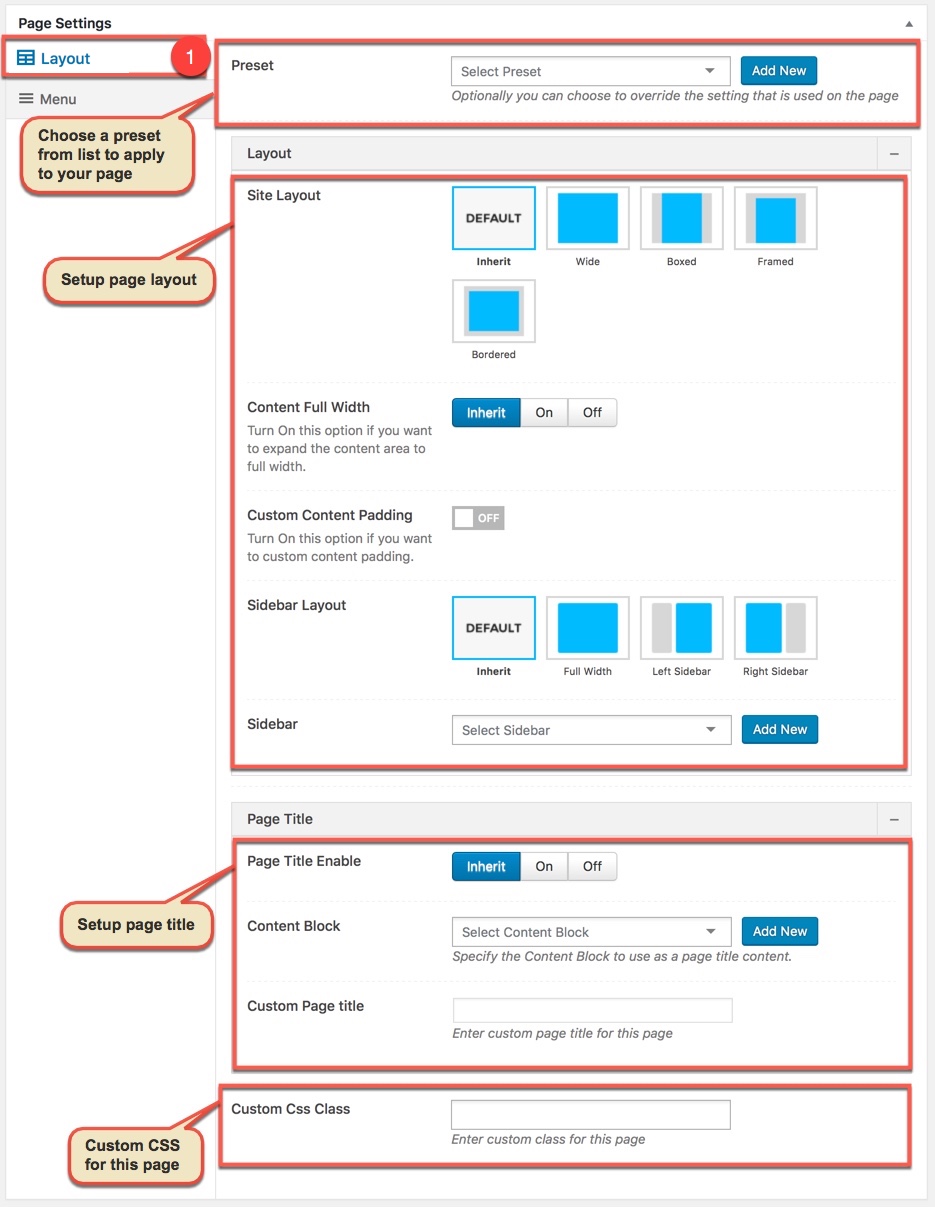
Step 4 – Setup values for Page Settings which will affect to this page only and override options set in the Preset (if this page apply any Preset) or Theme Options. With each page, Page Settings is first priority, next is Preset, then is Theme Options, any change in Page Settings just affect to this page, not entire website.
General Settings:
Menu Settings:
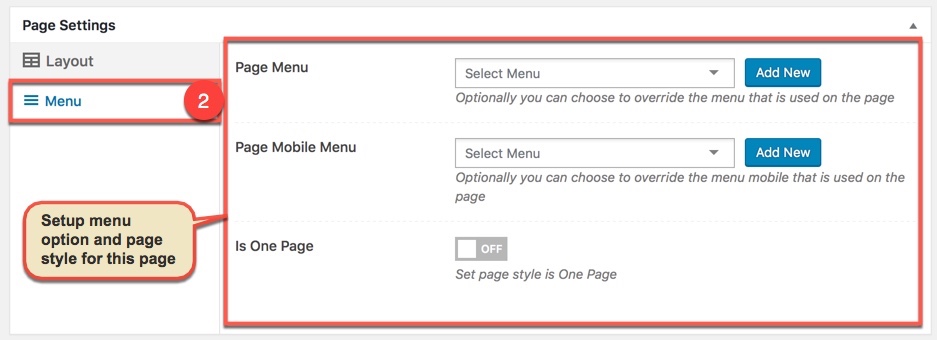
Any option that was set to be Default or was not customized means that it will use the value of equivalence option you have set in Preset (if this page apply any Preset) or Theme Options. Insert a different value to override the Preset/ Theme Option value.
You could consult our guide on How to use Preset for more details on How to apply Preset to a Page/Post
Step 5 – Set your Parent page (It’s usually set to No Parent).
Step 6 – Set featured image for your page (optional)
Step 7 - You can save draft/preview or publish this page and set it as your frontpage. You could consult Settings a static page as Home section.
SIDEBARS AND WIDGETS
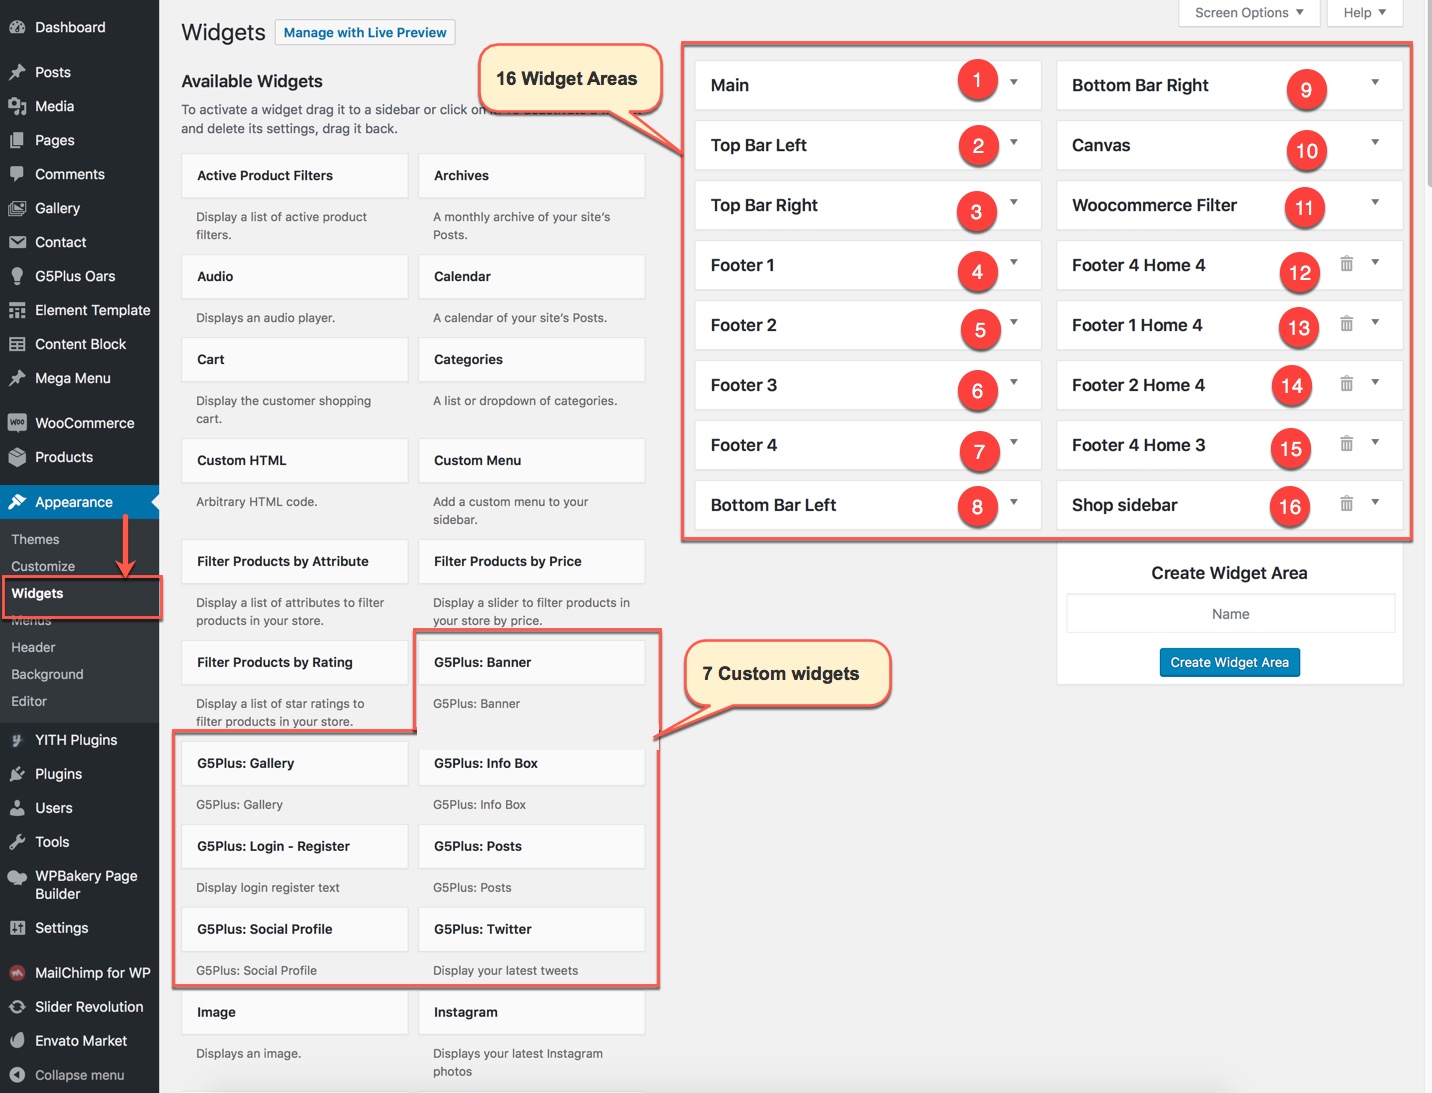
WordPress comes with built-in default widgets for your themes. Apart from these default widgets, OARS comes with 10 custom widgets. In order to use these widgets, from WP dashboard, navigate to Appearance → Widgets.
These screenshots below are list of pre-defined sidebars as well as their locations on a page, so that you will find it easier when pulling out widgets to set up your site.
| Widget Name | Description |
|---|---|
| G5Plus Banner | A widget to display ad banners. |
| G5Plus Payment | A widget to display payment methods. |
| G5Plus: Price Filter List | A widget to display Price Filer in drop-down list style |
| G5Plus: Price Filter List | A widget to display categories of products |
| G5Plus: Product Category Filter | A widget to display a product sorting list. |
| G5Plus: Product Shorting | A widget to display a Filter of products list by attribute |
| G5Plus: Product Filter by Attribute | A widget to display a Filter of products list by attribute |
| G5Plus: Posts | A widget to display posts in 4 custom layout (carousel, mix, small image, list) and 6 post sources: popular, random, recent, oldest, trending, video post |
| G5Plus: Social Profile | A widget to display social profile. |
| G5Plus: Twitter | A widget to display recent twitter |
| G5Plus: Login - Register | A widget to display login - register form |
You can add widgets to widget areas simply by hover the widget then drag-drop to widget area as your liking
Drag-drop widget to widget area
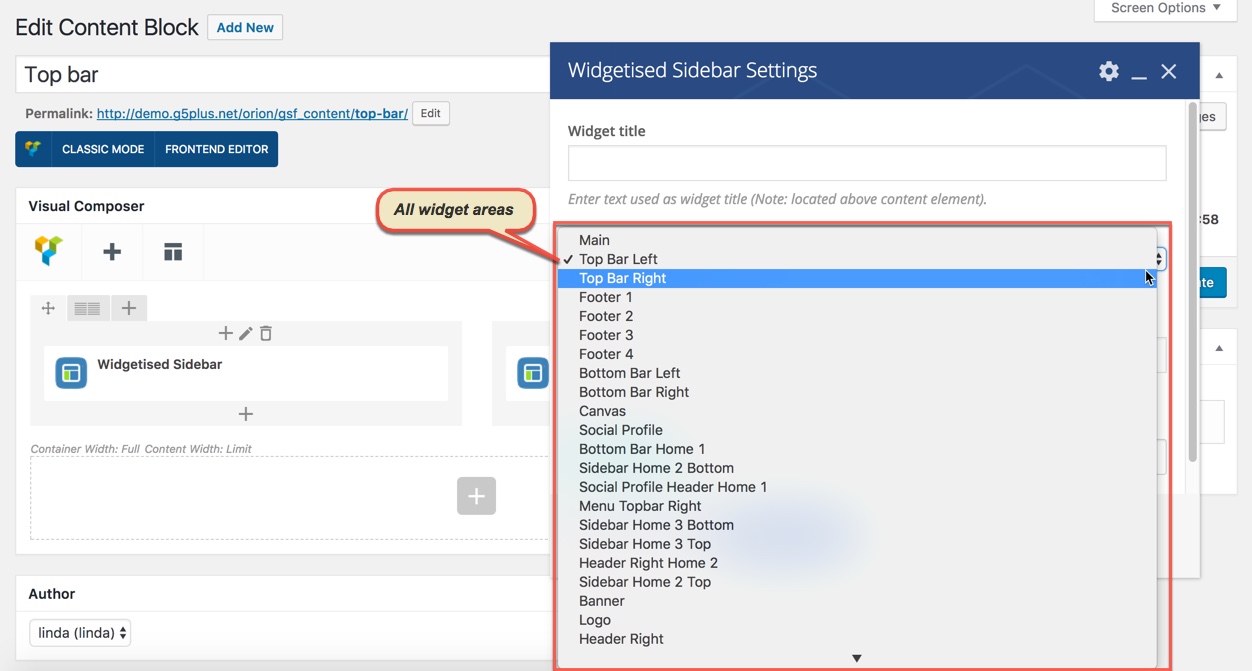
Widgetised Sidebar in WPBakery Page Builder : You can use Widgetised Sidebar element in WPBakery Page Builder to build a Content Block then use this Content Block to display as Top Bar, Top Drawer, Bottom Bar, Footer, 404 Page in Theme Options (or Preset)
And now we will show you some example of How these widgets display on the frontend (except 2-Top Bar Left, 3-Top Bar Right widget area and 10-Canvans widget area have not been available on Pepper demo Data now)
1-Main Sidebar Widget Area on frontend

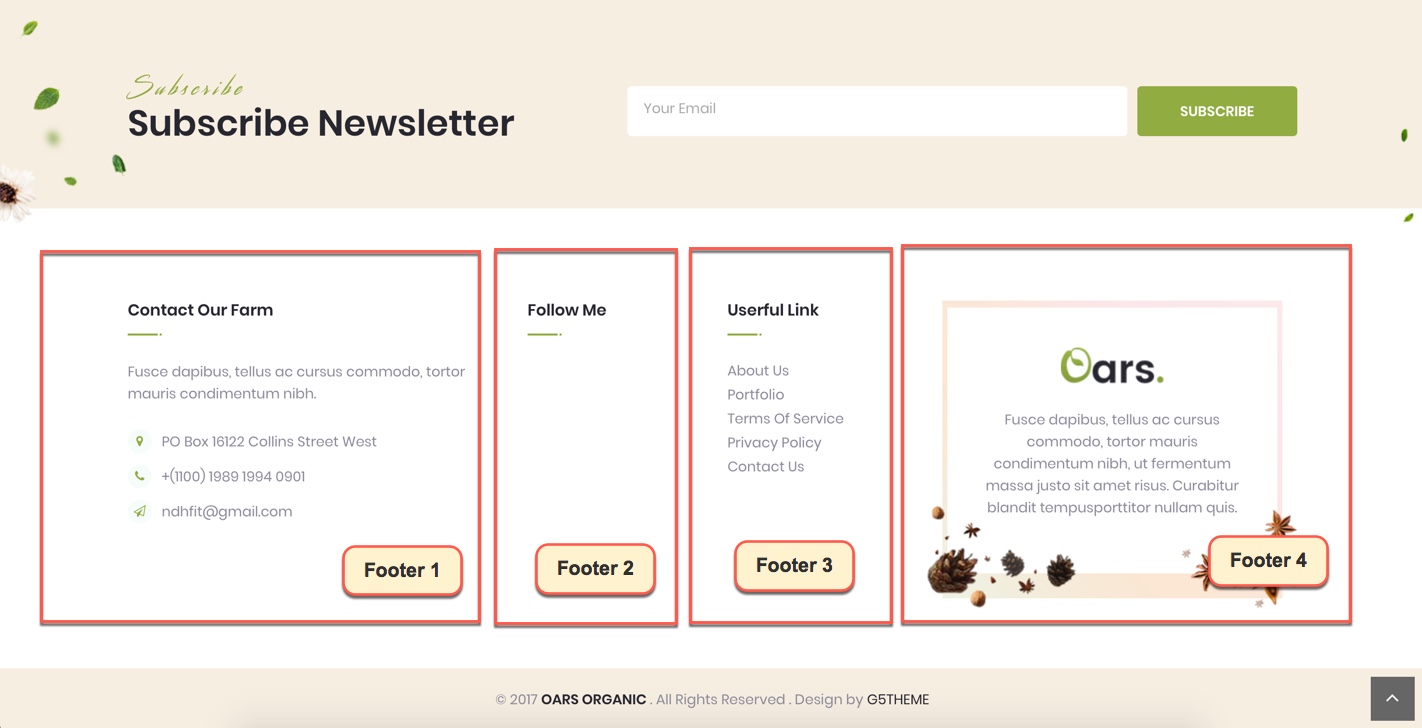
4-Footer 1, 5-Footer 2, 6-Footer 3, 7-Footer 4 Widget Area on frontend
Canvas sidebar Widget Area on frontend (this widget area now is available on demo HOME 6)
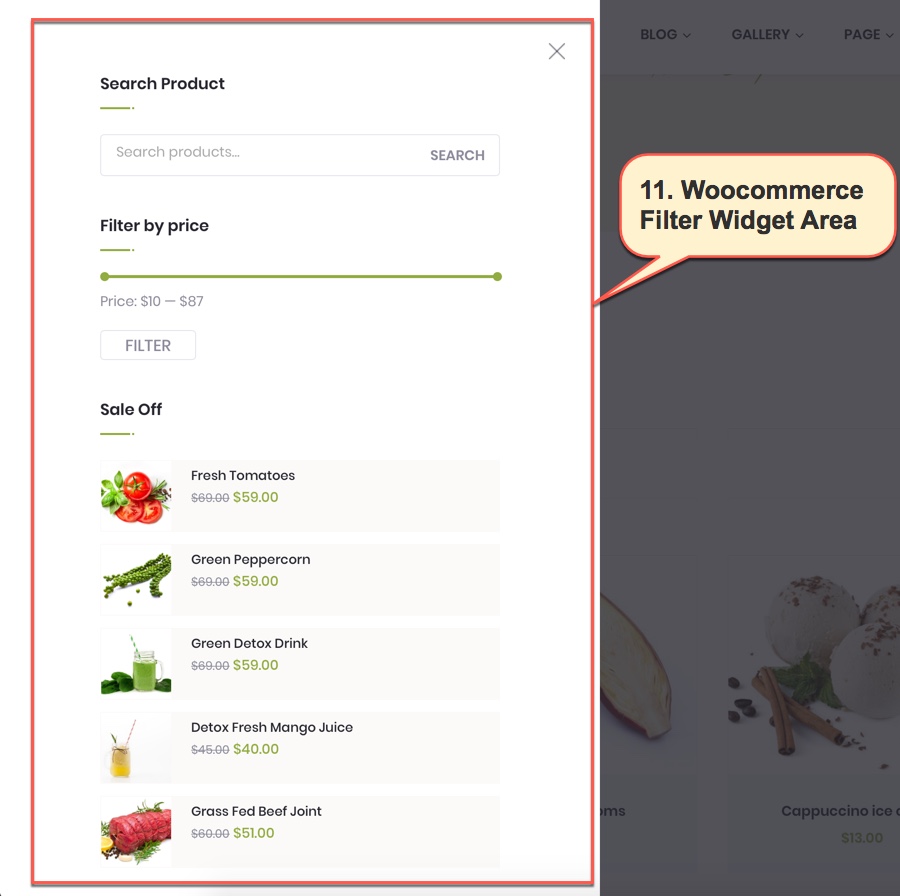
11-Woocommerce Filter Widget Area on frontend
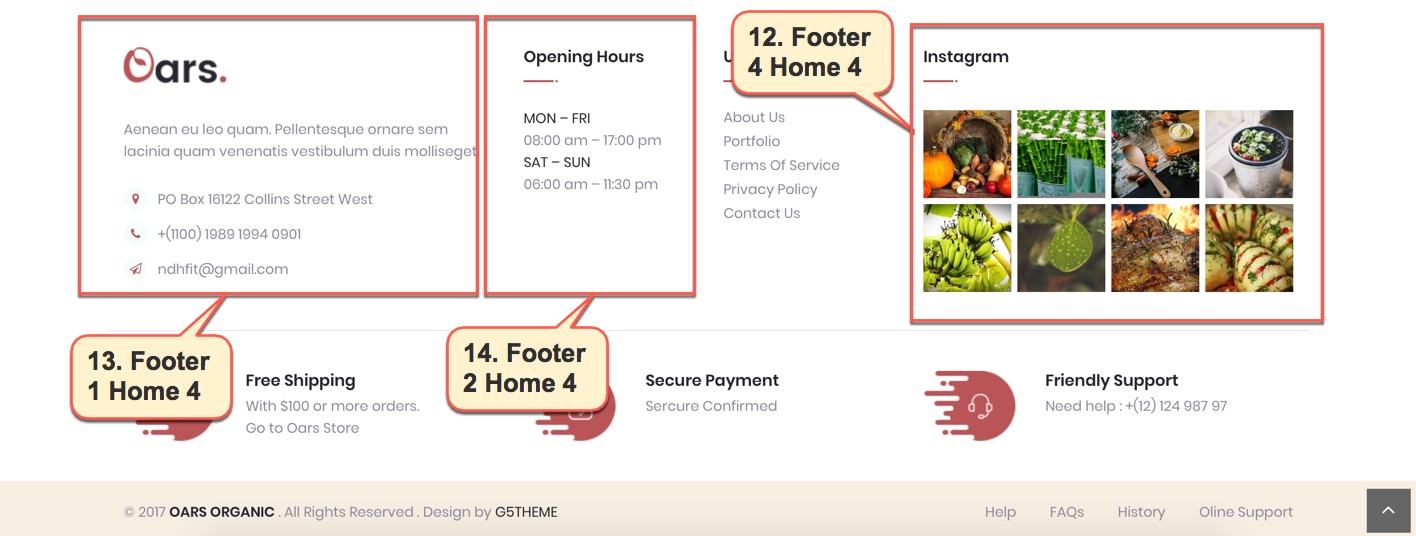
12-Footer 4 Home 4, 13- Footer 1 Home 4, 14- Footer 2 Home 4 Widget Area on frontend
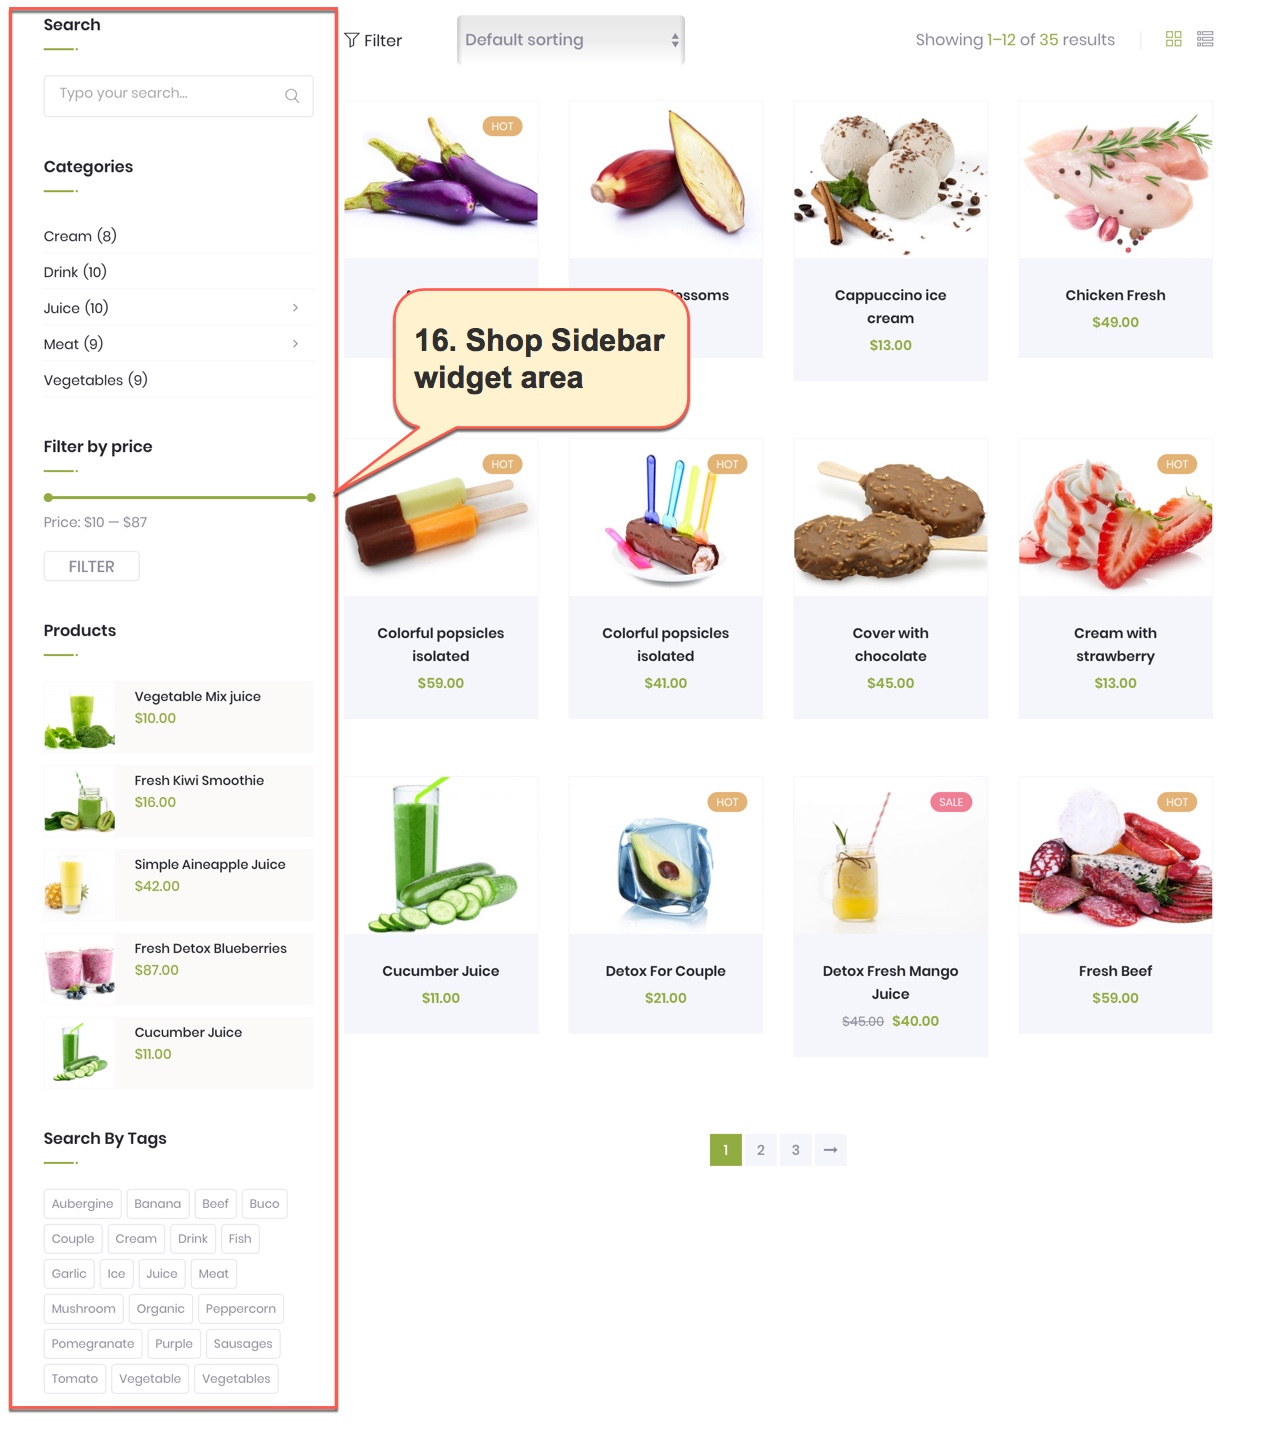
13-Shop Sidebar Widget Area on frontend
DEMO HOMPAGE
Visual Composer is the most powerful and used WP pagebuilder and there is more than 1 million sites that are using that to create homepage. This plugin is included in OARS theme by free to create advanced and complex homepage in simplest way ever has seen!
Now you can start fiddling with Visual Composer to build your home page with any design that you like and also you can read the Visual Composer documentation to learn how to use it HERE
In case you don't have time for experience with it, you can use Classic Mode and switch to the Text tab, then paste this code into the content of your page. It help you build your frontpage based on one of the pre-made home page we offer and create a new page similar to our demo Homepage.
demo HOME 1
[vc_row][vc_column][rev_slider alias="slider-1"][/vc_column][/vc_row][vc_row][vc_column el_class="pd-top-95,pd-bottom-85"][gsf_heading text_align="text-center" title_font_size="36" icon_image="3675" css_animation="left-to-right" el_class="mg-bottom-55" title="Who we are" sub_title="About Us" description="Cras mattis consectetur purus sit amet fermentum. Praesent commodo cursus magna, vel scelerisque nisl consectetur et."][vc_row_inner equal_height="yes"][vc_column_inner width="1/2" offset="vc_col-md-3"][gsf_icon_box title="Natural Farm" description="Lorem ipsum dolor sit amet
consectetur adipiscing elit felis euismod sempe." icon_image="3681" css_animation="bottom-to-top" animation_duration="1s"][/vc_column_inner][vc_column_inner el_class="xs-mg-top-30" width="1/2" offset="vc_col-md-3"][gsf_icon_box title="Healthy Food" description="Lorem ipsum dolor sit amet
consectetur adipiscing elit felis euismod sempe." icon_image="3682" css_animation="bottom-to-top" animation_duration="1.75s"][/vc_column_inner][vc_column_inner el_class="sm-mg-top-30" width="1/2" offset="vc_col-md-3"][gsf_icon_box title="Conserves Biodiversity" description="Lorem ipsum dolor sit amet
consectetur adipiscing elit felis euismod sempe." icon_image="3684" css_animation="bottom-to-top" animation_duration="2.5s"][/vc_column_inner][vc_column_inner el_class="sm-mg-top-30" width="1/2" offset="vc_col-md-3"][gsf_icon_box title="Biologically Safe" description="Lorem ipsum dolor sit amet
consectetur adipiscing elit felis euismod sempe." icon_image="3683" css_animation="bottom-to-top" animation_duration="3.25s"][/vc_column_inner][/vc_row_inner][/vc_column][/vc_row][vc_row equal_height="yes" content_placement="bottom" el_class="pd-top-85,pd-bottom-95" css=".vc_custom_1507704898680{background-color: #f5fcf9 !important;}"][vc_column el_class="col-md-push-7,sm-mg-bottom-30" css_animation="right-to-left" offset="vc_col-md-5"][gsf_heading title_font_size="36" icon_image="3675" title="What is Oars Store?" sub_title="Core Features" description="Cras mattis consectetur purus sit amet fermentum. Praesent vel scelerisque nisl consectetur et." css=".vc_custom_1501582892179{margin-bottom: 58px !important;}"][gsf_icon_box layout_style="ib-left-middle" title="Free Shipping" title_size="title-small" title_below="" description="With $100 or more orders. Go to Oars Store" icon_image="3692" image_width="91px" css=".vc_custom_1505199655799{margin-bottom: 30px !important;}"][gsf_icon_box layout_style="ib-left-middle" title="100% Organic Certified" title_size="title-small" title_below="" description="100% Organic Cerfitifed Food & Textiles" icon_image="3693" image_width="91px" css=".vc_custom_1505199662406{margin-bottom: 30px !important;}"][gsf_icon_box layout_style="ib-left-middle" title="Secure Payment" title_size="title-small" title_below="" description="Sercure Confirmed" icon_image="3694" image_width="91px" css=".vc_custom_1505199669875{margin-bottom: 30px !important;}"][gsf_icon_box layout_style="ib-left-middle" title="Friendly Support" title_size="title-small" title_below="" description="Need help : +(12) 124 987 97" icon_image="3695" image_width="91px"][/vc_column][vc_column el_class="col-md-pull-5" css_animation="left-to-right" offset="vc_col-md-7"][vc_single_image image="5039" img_size="full" alignment="center" el_class="xl-mg-left-neg-190" css=".vc_custom_1507689307354{margin-bottom: 0px !important;}"][/vc_column][/vc_row][vc_row color_skin="skin-dark" content_width="full" equal_height="yes" el_class="gsf-white-text"][vc_column width="1/2" css_animation="bottom-to-top" animation_duration="1s" css=".vc_custom_1507865082999{padding-top: 100px !important;padding-right: 75px !important;padding-bottom: 115px !important;padding-left: 75px !important;background-image: url(http://demo.g5plus.net/test/wp-content/uploads/2017/09/bg-process-1.jpg?id=4246) !important;background-position: center !important;background-repeat: no-repeat !important;background-size: cover !important;}" offset="vc_col-md-3"][gsf_icon_box title="Step 01." title_size="title-large" title_below="" description="Integer posuere erat a ante venenatis dapibus posuere velit aliquet. Morbi leo risus, porta ac consectetur ac, vestibulum at eros." icon_image="4250"][/vc_column][vc_column width="1/2" css_animation="bottom-to-top" animation_duration="1.5s" css=".vc_custom_1507865096099{padding-top: 100px !important;padding-right: 75px !important;padding-bottom: 115px !important;padding-left: 75px !important;background-image: url(http://demo.g5plus.net/test/wp-content/uploads/2017/09/bg-process-2.jpg?id=4247) !important;background-position: center !important;background-repeat: no-repeat !important;background-size: cover !important;}" offset="vc_col-md-3"][gsf_icon_box title="Step 02." title_size="title-large" title_below="" description="Integer posuere erat a ante venenatis dapibus posuere velit aliquet. Morbi leo risus, porta ac consectetur ac, vestibulum at eros." icon_image="4251" css=".vc_custom_1505199712151{background-position: center !important;background-repeat: no-repeat !important;background-size: cover !important;}"][/vc_column][vc_column width="1/2" css_animation="bottom-to-top" animation_duration="2s" css=".vc_custom_1507865103704{padding-top: 100px !important;padding-right: 75px !important;padding-bottom: 115px !important;padding-left: 75px !important;background-image: url(http://demo.g5plus.net/test/wp-content/uploads/2017/09/bg-process-3.jpg?id=4248) !important;background-position: center !important;background-repeat: no-repeat !important;background-size: cover !important;}" offset="vc_col-md-3"][gsf_icon_box title="Step 03." title_size="title-large" title_below="" description="Integer posuere erat a ante venenatis dapibus posuere velit aliquet. Morbi leo risus, porta ac consectetur ac, vestibulum at eros." icon_image="4252" css=".vc_custom_1505199721879{background-position: center !important;background-repeat: no-repeat !important;background-size: cover !important;}"][/vc_column][vc_column width="1/2" css_animation="bottom-to-top" animation_duration="2.5" css=".vc_custom_1507865124595{padding-top: 100px !important;padding-right: 75px !important;padding-bottom: 115px !important;padding-left: 75px !important;background-image: url(http://demo.g5plus.net/test/wp-content/uploads/2017/09/bg-process-4.jpg?id=4249) !important;background-position: center !important;background-repeat: no-repeat !important;background-size: cover !important;}" offset="vc_col-md-3"][gsf_icon_box title="Step 04." title_size="title-large" title_below="" description="Integer posuere erat a ante venenatis dapibus posuere velit aliquet. Morbi leo risus, porta ac consectetur ac, vestibulum at eros." icon_image="4253" css=".vc_custom_1505199733403{background-position: center !important;background-repeat: no-repeat !important;background-size: cover !important;}"][/vc_column][/vc_row][vc_row][vc_column][gsf_space desktop="95" tablet="70" tablet_portrait="60" mobile_landscape="50" mobile="40"][gsf_heading text_align="text-center" title_font_size="36" icon_image="3675" css_animation="right-to-left" title="Feature Products" sub_title="Fresh Food" css=".vc_custom_1507865178956{margin-bottom: 22px !important;}"][gsf_products category="vegetables,juice,fresh-beef-meat,meat" show_category_filter="on" cate_filter_align="cate-filter-center" products_per_page="8" order="ASC" product_animation="bottom-to-top" columns="4" columns_md="3" columns_sm="2" columns_xs="2" columns_mb="1"][gsf_space desktop="33" tablet="20" tablet_portrait="10" mobile_landscape="0" mobile="0"][/vc_column][/vc_row][vc_row css=".vc_custom_1503389689478{background-image: url(http://demo.g5plus.net/test/wp-content/uploads/2017/08/bg-product-deal.jpg?id=3990) !important;background-position: center !important;background-repeat: no-repeat !important;background-size: cover !important;}"][vc_column][gsf_space desktop="180" tablet="150" tablet_portrait="140" mobile_landscape="130" mobile="120"][vc_row_inner equal_height="yes" content_placement="middle"][vc_column_inner el_class="sm-mg-bottom-40" offset="vc_col-md-6"][gsf_heading title_font_size="36" icon_image="3675" css_animation="left-to-right" title="Oars Store Offer 50% Off" sub_title="Deal Of The Day" description="Praesent commodo cursus magna, vel scelerisque nisl consectetur et. Cras mattis consectetur purus sit amet fermentum. Lorem ipsum dolor sit amet, consectetur adipiscing elit. Donec ullamcorper nulla non metus auctor fringilla. Nullam quis risus eget urna mollis ornare vel eu leo. " css=".vc_custom_1507865477775{margin-bottom: 55px !important;}"][gsf_button title="Buy Now" size="lg" css_animation="left-to-right" link="url:http%3A%2F%2Fdemo.g5plus.net%2Ftest%2Fproduct%2Ffresh-ly-son-garlic%2F||target:%20_blank|"][/vc_column_inner][vc_column_inner offset="vc_col-md-6"][gsf_product_deal css_animation="right-to-left" product_ids="3951" images="3994,3952,3881,3880"][/vc_column_inner][/vc_row_inner][gsf_space desktop="180" tablet="150" tablet_portrait="140" mobile_landscape="130" mobile="120"][/vc_column][/vc_row][vc_row][vc_column][gsf_space desktop="85" tablet="70" tablet_portrait="60" mobile_landscape="50" mobile="40"][/vc_column][vc_column css_animation="bottom-to-top" animation_duration="1s" offset="vc_col-lg-offset-0 vc_col-lg-4 vc_col-md-offset-1 vc_col-md-10"][gsf_products_list_minimal show="best-selling" subtitle="Oars Organic" title="Best Seller" category="vegetables,meat" products_per_page="8" is_slider="on" rows="4" product_animation="bottom-to-top"][/vc_column][vc_column el_class="md-mg-top-50" css_animation="bottom-to-top" animation_duration="1.5s" offset="vc_col-lg-offset-0 vc_col-lg-4 vc_col-md-offset-1 vc_col-md-10 vc_col-sm-offset-0"][gsf_products_list_minimal subtitle="Oars Organic" title="New Arrivals " category="vegetables" products_per_page="8" orderby="rand" is_slider="on" rows="4" product_animation="bottom-to-top"][/vc_column][vc_column el_class="md-mg-top-50" css_animation="bottom-to-top" animation_duration="2.0s" offset="vc_col-lg-offset-0 vc_col-lg-4 vc_col-md-offset-1 vc_col-md-10 vc_col-sm-offset-0"][gsf_products_list_minimal show="sale" subtitle="Oars Organic" title="Sale Off" category="meat,vegetables" products_per_page="8" orderby="sales" is_slider="on" rows="4" product_animation="bottom-to-top"][/vc_column][vc_column][gsf_space desktop="90" tablet="70" tablet_portrait="60" mobile_landscape="50" mobile="40"][/vc_column][/vc_row][vc_row css=".vc_custom_1501919391470{background-image: url(http://demo.g5plus.net/test/wp-content/uploads/2017/08/bg-testimonials-1.jpg?id=3820) !important;background-position: center !important;background-repeat: no-repeat !important;background-size: cover !important;}"][vc_column][gsf_space desktop="100" tablet="80" tablet_portrait="70" mobile_landscape="60" mobile="50"][gsf_heading text_align="text-center" title_font_size="36" icon_image="3675" css_animation="left-to-right" title="What Our Customer Saying?" sub_title="Testimonials" description="Cras mattis consectetur purus sit amet fermentum. Praesent commodo cursus magna, vel scelerisque nisl consectetur et." css=".vc_custom_1507865551181{margin-bottom: 50px !important;}"][gsf_testimonials _columns="2" values="%5B%7B%22author_bio%22%3A%22It%20is%20a%20long%20established%20fact%20that%20a%20reader%20will%20be%20distracted%20by%20the%20readable%20content%20of%20a%20page%20when%20looking%20at%20its%20layout.%22%2C%22author_name%22%3A%22Michael%20Walker%22%2C%22author_job%22%3A%22Social%20Marketing%22%2C%22author_avatar%22%3A%223815%22%2C%22author_link%22%3A%22%23%22%7D%2C%7B%22author_bio%22%3A%22It%20is%20a%20long%20established%20fact%20that%20a%20reader%20will%20be%20distracted%20by%20the%20readable%20content%20of%20a%20page%20when%20looking%20at%20its%20layout.%22%2C%22author_name%22%3A%22Mourinho%22%2C%22author_job%22%3A%22Seo%22%2C%22author_avatar%22%3A%223816%22%2C%22author_link%22%3A%22%23%22%7D%2C%7B%22author_bio%22%3A%22It%20is%20a%20long%20established%20fact%20that%20a%20reader%20will%20be%20distracted%20by%20the%20readable%20content%20of%20a%20page%20when%20looking%20at%20its%20layout.%22%2C%22author_name%22%3A%22Albert%20Huynaya%22%2C%22author_job%22%3A%22Smoothie%20Bartender%22%2C%22author_avatar%22%3A%223799%22%7D%2C%7B%22author_bio%22%3A%22It%20is%20a%20long%20established%20fact%20that%20a%20reader%20will%20be%20distracted%20by%20the%20readable%20content%20of%20a%20page%20when%20looking%20at%20its%20layout.%22%2C%22author_name%22%3A%22Cris%20Horwang%22%2C%22author_job%22%3A%22Landscape%22%2C%22author_avatar%22%3A%223817%22%7D%5D" items_rows="2" css_animation="bottom-to-top"][gsf_space desktop="85" tablet="65" tablet_portrait="55" mobile_landscape="45" mobile="40"][gsf_partner css_animation="appear" partners="%5B%7B%22images%22%3A%223706%22%2C%22link%22%3A%22url%3A%2523%7C%7C%7C%22%7D%2C%7B%22images%22%3A%223707%22%2C%22link%22%3A%22url%3A%2523%7C%7C%7C%22%7D%2C%7B%22images%22%3A%223708%22%2C%22link%22%3A%22url%3A%2523%7C%7C%7C%22%7D%2C%7B%22images%22%3A%223709%22%2C%22link%22%3A%22url%3A%2523%7C%7C%7C%22%7D%2C%7B%22images%22%3A%223710%22%2C%22link%22%3A%22url%3A%2523%7C%7C%7C%22%7D%2C%7B%22images%22%3A%223711%22%2C%22link%22%3A%22url%3A%2523%7C%7C%7C%22%7D%5D" css=".vc_custom_1507865587167{border-top-width: 1px !important;border-top-color: #e8dac7 !important;border-top-style: solid !important;}"][/vc_column][/vc_row][vc_row][vc_column][gsf_space desktop="95" tablet="70" tablet_portrait="60" mobile_landscape="50" mobile="40"][gsf_heading text_align="text-center" title_font_size="36" icon_image="3675" css_animation="right-to-left" title="Latest News From Blog" sub_title="Our Blog News" description="Cras mattis consectetur purus sit amet fermentum. Praesent commodo cursus magna, vel scelerisque nisl consectetur et." css=".vc_custom_1507865597682{margin-bottom: 55px !important;}"][gsf_posts source="recent" posts_per_page="6" is_slider="on" post_animation="bottom-to-top" columns="3" columns_md="2" columns_sm="2" columns_xs="1" columns_mb="1"][gsf_space desktop="90" tablet="70" tablet_portrait="60" mobile_landscape="50" mobile="40"][/vc_column][/vc_row][vc_row equal_height="yes" content_placement="bottom" css=".vc_custom_1504842433884{background-color: #f5fcf9 !important;}"][vc_column el_class="col-md-push-7" css_animation="right-to-left" offset="vc_col-md-5"][gsf_space desktop="90" tablet="70" tablet_portrait="60" mobile_landscape="50" mobile="40"][gsf_heading title_font_size="36" icon_image="3675" title="Why we are the best" sub_title="What is Oars Store?" description="Cras mattis consectetur purus sit amet fermentum. Praesent vel scelerisque nisl consectetur et." css=".vc_custom_1504841972792{margin-bottom: 43px !important;}"][vc_tta_accordion color="transparent" gap="15" c_icon="arrows" active_section="1"][vc_tta_section title="Get creative with courgettes" tab_id="1504839949406-0986f5e7-c1932b07-5b00"][vc_column_text el_class="fs-16"]Ut fermentum massa justo sit amet risus tellus ac cursus commodo, tortor mauris condimentum nibh, ut fermentum massa.[/vc_column_text][/vc_tta_section][vc_tta_section title="Italian style meatballs with courgette ‘tagliatelle’" tab_id="1504840516750-f0b2faa6-1bc62b07-5b00"][vc_column_text el_class="fs-16"]Ut fermentum massa justo sit amet risus tellus ac cursus commodo, tortor mauris condimentum nibh, ut fermentum massa.[/vc_column_text][/vc_tta_section][vc_tta_section title="How to fillet round fish (mackerel, trout, etc.)" tab_id="1504840507606-5dd91b77-8c642b07-5b00"][vc_column_text el_class="fs-16"]Ut fermentum massa justo sit amet risus tellus ac cursus commodo, tortor mauris condimentum nibh, ut fermentum massa.[/vc_column_text][/vc_tta_section][vc_tta_section title="Irish fish chowder with soda bread" tab_id="1504840505582-e7ec7ea5-15d22b07-5b00"][vc_column_text el_class="fs-16"]Ut fermentum massa justo sit amet risus tellus ac cursus commodo, tortor mauris condimentum nibh, ut fermentum massa.[/vc_column_text][/vc_tta_section][vc_tta_section title="Equipment you will need for this technique" tab_id="1504840504942-b868ed68-ce7f2b07-5b00"][vc_column_text el_class="fs-16"]Ut fermentum massa justo sit amet risus tellus ac cursus commodo, tortor mauris condimentum nibh, ut fermentum massa.[/vc_column_text][/vc_tta_section][/vc_tta_accordion][gsf_space desktop="107" tablet="90" tablet_portrait="80" mobile_landscape="70" mobile="60"][/vc_column][vc_column el_class="col-md-pull-5" css_animation="left-to-right" offset="vc_col-md-7"][vc_single_image image="4271" img_size="full" css=".vc_custom_1507693549238{margin-bottom: 0px !important;}" el_class="xl-mg-left-neg-45"][/vc_column][/vc_row]
demo HOME 2
[vc_row][vc_column][rev_slider alias="slider-2"][/vc_column][/vc_row][vc_row css=".vc_custom_1504853273430{padding-top: 35px !important;background-image: url(http://demo.g5plus.net/test/wp-content/uploads/2017/09/bg_who-we-are.jpg?id=4285) !important;background-position: center !important;background-repeat: no-repeat !important;background-size: cover !important;}"][vc_column][gsf_heading text_align="text-center" title_font_size="36" icon_image="3675" el_class="mg-bottom-55" title="Who we are" sub_title="About Us" description="Cras mattis consectetur purus sit amet fermentum. Praesent commodo cursus magna, vel scelerisque nisl consectetur et."][vc_row_inner][vc_column_inner width="1/2" offset="vc_col-md-3"][gsf_icon_box title="Natural Farm" description="Lorem ipsum dolor sit amet consectetur adipiscing elit felis euismod sempe." icon_image="4279"][/vc_column_inner][vc_column_inner el_class="xs-mg-top-30" width="1/2" offset="vc_col-md-3"][gsf_icon_box title="Healthy Food" description="Lorem ipsum dolor sit amet consectetur adipiscing elit felis euismod sempe." icon_image="4280"][/vc_column_inner][vc_column_inner el_class="sm-mg-top-30" width="1/2" offset="vc_col-md-3"][gsf_icon_box title="Conserves Biodiversity" description="Lorem ipsum dolor sit amet consectetur adipiscing elit felis euismod sempe." icon_image="4281"][/vc_column_inner][vc_column_inner el_class="sm-mg-top-30" width="1/2" offset="vc_col-md-3"][gsf_icon_box title="Natural Farm" description="Lorem ipsum dolor sit amet consectetur adipiscing elit felis euismod sempe." icon_image="4282"][/vc_column_inner][/vc_row_inner][vc_row_inner][vc_column_inner][gsf_space desktop="90" tablet="70" tablet_portrait="60" mobile_landscape="60" mobile="60"][/vc_column_inner][/vc_row_inner][vc_row_inner equal_height="yes" content_placement="middle"][vc_column_inner width="5/12"][gsf_heading title_font_size="36" icon_image="3675" title="100% Made With Fruits" sub_title="Fresh Smoothie" description="Lorem ipsum dolor sit amet, consectetur adipiscing elit. Sed posuere consectetur est at lobortis. Aenean eu leo quam. Pellentesque ornare sem lacinia quam venenatis vestibulum. Nullam id dolor id nibh ultricies vehicula ut id elit."][gsf_button title="Shop Now" size="lg" align="left" link="url:http%3A%2F%2Fdemo.g5plus.net%2Ftest%2Fshop%2F|||" css=".vc_custom_1504853528774{margin-top: 35px !important;}"][/vc_column_inner][vc_column_inner el_class="xs-mg-top-30" width="7/12"][vc_single_image image="4288" img_size="full" el_class="box-shadow-dark"][/vc_column_inner][/vc_row_inner][gsf_space desktop="90" tablet="70" tablet_portrait="60" mobile_landscape="50" mobile="40"][/vc_column][/vc_row][vc_row css=".vc_custom_1504863671481{background-image: url(http://demo.g5plus.net/test/wp-content/uploads/2017/09/bg-product-preview-1.jpg?id=4295) !important;background-position: center !important;background-repeat: no-repeat !important;background-size: cover !important;}"][vc_column][gsf_space desktop="100" tablet="80" tablet_portrait="70" mobile_landscape="60" mobile="50"][gsf_heading text_align="text-center" title_font_size="36" icon_image="3675" title="Recipe Detox Smoothie" sub_title="Fresh Smoothie" description="Cras mattis consectetur purus sit amet fermentum. Praesent commodo cursus magna, vel scelerisque nisl consectetur et." css=".vc_custom_1504863772414{margin-bottom: 55px !important;}"][vc_row_inner equal_height="yes" content_placement="middle"][vc_column_inner el_class="z-index-2" width="1/2" offset="vc_col-md-5 vc_col-xs-12"][gsf_icon_box layout_style="ib-right-middle" title="Cucumber" title_size="title-small" title_below="" description="Maecenas faucibus mollis interdum. Aenean eu leo quam." icon_image="4299" image_width="104px" el_class="pd-bottom-85,lg-pd-left-70,md-pd-right-20,sm-pd-bottom-30"][gsf_icon_box layout_style="ib-right-middle" title="Cucumber" title_size="title-small" title_below="" description="Maecenas faucibus mollis interdum. Aenean eu leo quam." icon_image="4298" image_width="104px" el_class="pd-bottom-30,md-pd-right-60"][/vc_column_inner][vc_column_inner el_class="z-index-2,col-md-push-2" width="1/2" offset="vc_col-md-5 vc_col-xs-12"][gsf_icon_box layout_style="ib-left-middle" title="Lemon" title_size="title-small" title_below="" description="Maecenas faucibus mollis interdum. Aenean eu leo quam." icon_image="4296" image_width="104px" el_class="pd-bottom-90,lg-pd-right-70,md-pd-left-20,sm-pd-bottom-30"][gsf_icon_box layout_style="ib-left-middle" title="Lemon" title_size="title-small" title_below="" description="Maecenas faucibus mollis interdum. Aenean eu leo quam." icon_image="4297" image_width="104px" el_class="pd-bottom-30,md-pd-left-60"][/vc_column_inner][vc_column_inner el_class="col-md-pull-5" offset="vc_col-md-2"][vc_single_image image="4300" img_size="full" alignment="center" el_class="md-mg-left-neg-190 md-mg-right-neg-190 sm-display-none"][gsf_button title="view all recipe" size="lg" align="center" el_class="md-mg-left-neg-190,md-mg-right-neg-190" css=".vc_custom_1508378920012{margin-top: 30px !important;}" link="url:http%3A%2F%2Fdemo.g5plus.net%2Ftest%2Fproduct%2Ffresh-kiwi-smoothie%2F|title:Fresh%20kiwi||"][/vc_column_inner][/vc_row_inner][gsf_space desktop="90" tablet="70" tablet_portrait="60" mobile_landscape="50" mobile="40"][/vc_column][/vc_row][vc_row][vc_column][gsf_space desktop="95" tablet="70" tablet_portrait="60" mobile_landscape="50" mobile="40"][gsf_heading text_align="text-center" title_font_size="36" icon_image="3675" title="Feature Products" sub_title="Fresh Food" css=".vc_custom_1503385005636{margin-bottom: 22px !important;}"][gsf_products category="smoothie,juice,drink,vegetables" show_category_filter="on" cate_filter_align="cate-filter-center" products_per_page="8" product_animation="bottom-to-top" columns="4" columns_md="3" columns_sm="2" columns_xs="2" columns_mb="1"][gsf_space desktop="33" tablet="20" tablet_portrait="10" mobile_landscape="0" mobile="0"][/vc_column][/vc_row][vc_row equal_height="yes" content_placement="middle" css=".vc_custom_1501745079025{background-image: url(http://demo.g5plus.net/test/wp-content/uploads/2017/08/bg-our-history.jpg?id=3777) !important;background-position: center !important;background-repeat: no-repeat !important;background-size: cover !important;}"][vc_column][gsf_space desktop="95" tablet="70" tablet_portrait="60" mobile_landscape="50" mobile="40"][vc_row_inner css=".vc_custom_1503629203273{padding-bottom: 60px !important;}"][vc_column_inner offset="vc_col-md-5"][gsf_heading title_font_size="36" icon_image="3675" title="What is Oars Smoothie" sub_title="Our History" description="Praesent commodo cursus magna, vel scelerisque nisl consectetur et. Cras mattis consectetur purus sit amet fermentum. Lorem ipsum dolor sit amet, consectetur adipiscing elit. Donec ullamcorper nulla non metus auctor fringilla. Nullam quis risus eget urna mollis ornare vel eu leo. " css=".vc_custom_1501745041146{margin-bottom: 35px !important;}"][gsf_button title="view more" size="lg" align="left" link="url:http%3A%2F%2Fdemo.g5plus.net%2Ftest%2Fblog%2F|||"][/vc_column_inner][vc_column_inner el_class="sm-mg-top-40" offset="vc_col-md-7"][gsf_time_line values="%5B%7B%22year%22%3A%222012%22%2C%22description%22%3A%22Curabitur%20blandit%20tempus.%5CnMaecenas%20sed%20diam%20eget%20risus%20varius%20blandit%20sit%20porta%20felis%20euismod%20semper.%22%7D%2C%7B%22year%22%3A%222013%22%2C%22description%22%3A%22Curabitur%20blandit%20tempus.%5CnMaecenas%20sed%20diam%20eget%20risus%20varius%20blandit%20sit%20porta%20felis%20euismod%20semper.%22%7D%2C%7B%22year%22%3A%222014%22%2C%22description%22%3A%22Curabitur%20blandit%20tempus.%5CnMaecenas%20sed%20diam%20eget%20risus%20varius%20blandit%20sit%20porta%20felis%20euismod%20semper.%22%7D%2C%7B%22year%22%3A%222015%22%2C%22description%22%3A%22Curabitur%20blandit%20tempus.%5CnMaecenas%20sed%20diam%20eget%20risus%20varius%20blandit%20sit%20porta%20felis%20euismod%20semper.%22%7D%2C%7B%22year%22%3A%222016%22%2C%22description%22%3A%22Curabitur%20blandit%20tempus.%5CnMaecenas%20sed%20diam%20eget%20risus%20varius%20blandit%20sit%20porta%20felis%20euismod%20semper.%22%7D%2C%7B%22year%22%3A%222017%22%2C%22description%22%3A%22Curabitur%20blandit%20tempus.%5CnMaecenas%20sed%20diam%20eget%20risus%20varius%20blandit%20sit%20porta%20felis%20euismod%20semper.%22%7D%5D" items="3" items_md="3" items_sm="3" items_xs="3" items_mb="1"][/vc_column_inner][/vc_row_inner][vc_row_inner css=".vc_custom_1503629220561{border-top-width: 1px !important;padding-top: 60px !important;border-top-color: #e2eae6 !important;border-top-style: solid !important;}"][vc_column_inner width="1/4"][gsf_counter icon_image="4064" end="7" title="Year of experiences"][/vc_column_inner][vc_column_inner width="1/4"][gsf_counter icon_image="4065" end="115" suffix="k" title="Detox Smoothies"][/vc_column_inner][vc_column_inner width="1/4"][gsf_counter icon_image="4066" end="22" suffix="k" title="Happy Customers"][/vc_column_inner][vc_column_inner width="1/4"][gsf_counter icon_image="4067" end="115" suffix="k" title="100% Satisfaction"][/vc_column_inner][/vc_row_inner][gsf_space desktop="120" tablet="100" tablet_portrait="90" mobile_landscape="80" mobile="70"][/vc_column][/vc_row][vc_row][vc_column][gsf_space desktop="95" tablet="70" tablet_portrait="60" mobile_landscape="50" mobile="40"][gsf_heading text_align="text-center" title_font_size="36" icon_image="3675" title="Latest News From Blog" sub_title="Our Blog News" description="Cras mattis consectetur purus sit amet fermentum. Praesent commodo cursus magna, vel scelerisque nisl consectetur et." css=".vc_custom_1503559144517{margin-bottom: 55px !important;}"][gsf_posts source="recent" posts_per_page="6" is_slider="on" columns="3" columns_md="2" columns_sm="2" columns_xs="1" columns_mb="1"][gsf_space desktop="90" tablet="70" tablet_portrait="60" mobile_landscape="50" mobile="40"][/vc_column][/vc_row][vc_row equal_height="yes" content_placement="bottom" css=".vc_custom_1504864358014{background-color: #f7eee2 !important;}"][vc_column el_class="col-md-push-7" offset="vc_col-md-5"][gsf_space desktop="90" tablet="70" tablet_portrait="60" mobile_landscape="50" mobile="40"][gsf_heading title_font_size="36" icon_image="3675" title="Oars Application" sub_title="Pay Vie iPhone App" description="Cras mattis consectetur purus sit amet fermentum. Praesent vel scelerisque nisl consectetur et." css=".vc_custom_1504864424338{margin-bottom: 43px !important;}"][vc_tta_accordion color="transparent" gap="15" c_icon="arrows" active_section="1"][vc_tta_section title="Get creative with courgettes" tab_id="1504839949406-0986f5e7-c193cf05-bebbc426-5ace"][vc_column_text el_class="fs-16"]Ut fermentum massa justo sit amet risus tellus ac cursus commodo, tortor mauris condimentum nibh, ut fermentum massa.[/vc_column_text][/vc_tta_section][vc_tta_section title="Italian style meatballs with courgette ‘tagliatelle’" tab_id="1504840516750-f0b2faa6-1bc6cf05-bebbc426-5ace"][vc_column_text el_class="fs-16"]Ut fermentum massa justo sit amet risus tellus ac cursus commodo, tortor mauris condimentum nibh, ut fermentum massa.[/vc_column_text][/vc_tta_section][vc_tta_section title="How to fillet round fish (mackerel, trout, etc.)" tab_id="1504840507606-5dd91b77-8c64cf05-bebbc426-5ace"][vc_column_text el_class="fs-16"]Ut fermentum massa justo sit amet risus tellus ac cursus commodo, tortor mauris condimentum nibh, ut fermentum massa.[/vc_column_text][/vc_tta_section][/vc_tta_accordion][gsf_button title="download the app" color="gray" size="md" icon_font="fa fa-apple" css=".vc_custom_1504864643098{margin-top: 20px !important;}"][gsf_space desktop="150" tablet="130" tablet_portrait="120" mobile_landscape="110" mobile="100"][/vc_column][vc_column el_class="col-md-pull-5" offset="vc_col-md-7"][vc_single_image image="4318" img_size="full" css=".vc_custom_1507694138977{margin-bottom: 0px !important;}" el_class="xl-mg-left-neg-165"][/vc_column][/vc_row][vc_row][vc_column][gsf_space desktop="100" tablet="80" tablet_portrait="70" mobile_landscape="60" mobile="50"][gsf_heading text_align="text-center" title_font_size="36" icon_image="3675" title="What Our Customer Saying?" sub_title="Testimonials" description="Cras mattis consectetur purus sit amet fermentum. Praesent commodo cursus magna, vel scelerisque nisl consectetur et." css=".vc_custom_1501917317197{margin-bottom: 55px !important;}"][gsf_testimonials layout_style="style-02" columns="3" item_gap="30" values="%5B%7B%22author_bio%22%3A%22Aenean%20lacinia%20bibendum%20nulla%20sed%20consectetur.%20Vestibulum%20id%20ligula%20porta%20felis%20euismod%20semper.%20Fusce%20dapibus%2C%20tellus%20ac%20cursus%20commodo%2C%20tortor%20mauris%20condimentum%20nibh%2C%22%2C%22author_name%22%3A%22Zin%E2%80%99s%20Nguyen%22%2C%22author_job%22%3A%22Smoothie%20Bartender%22%2C%22author_avatar%22%3A%223800%22%7D%2C%7B%22author_bio%22%3A%22Aenean%20lacinia%20bibendum%20nulla%20sed%20consectetur.%20Vestibulum%20id%20ligula%20porta%20felis%20euismod%20semper.%20Fusce%20dapibus%2C%20tellus%20ac%20cursus%20commodo%2C%20tortor%20mauris%20condimentum%20nibh%2C%22%2C%22author_name%22%3A%22Vinfrank%20Ceaser%22%2C%22author_job%22%3A%22Farmer%20Store%22%2C%22author_avatar%22%3A%223810%22%7D%2C%7B%22author_bio%22%3A%22Aenean%20lacinia%20bibendum%20nulla%20sed%20consectetur.%20Vestibulum%20id%20ligula%20porta%20felis%20euismod%20semper.%20Fusce%20dapibus%2C%20tellus%20ac%20cursus%20commodo%2C%20tortor%20mauris%20condimentum%20nibh%2C%22%2C%22author_name%22%3A%22Will%20DogTooh%22%2C%22author_job%22%3A%22Smoothie%20Bartender%22%2C%22author_avatar%22%3A%223811%22%7D%5D" items_rows="1" items_md="3" items_sm="2" items_xs="1" items_mb="1" dots="on"][gsf_partner partners="%5B%7B%22images%22%3A%223706%22%2C%22link%22%3A%22url%3A%2523%7C%7C%7C%22%7D%2C%7B%22images%22%3A%223707%22%2C%22link%22%3A%22url%3A%2523%7C%7C%7C%22%7D%2C%7B%22images%22%3A%223708%22%2C%22link%22%3A%22url%3A%2523%7C%7C%7C%22%7D%2C%7B%22images%22%3A%223709%22%2C%22link%22%3A%22url%3A%2523%7C%7C%7C%22%7D%2C%7B%22images%22%3A%223710%22%2C%22link%22%3A%22url%3A%2523%7C%7C%7C%22%7D%2C%7B%22images%22%3A%223711%22%2C%22link%22%3A%22url%3A%2523%7C%7C%7C%22%7D%5D" css=".vc_custom_1504865795977{margin-top: 35px !important;border-top-width: 1px !important;border-top-color: #e8dac7 !important;border-top-style: solid !important;}"][gsf_space desktop="90" tablet="70" tablet_portrait="60" mobile_landscape="50" mobile="40"][/vc_column][/vc_row][vc_row content_width="full"][vc_column css=".vc_custom_1501655716249{padding-right: 0px !important;padding-left: 0px !important;}"][gsf_google_map markers="%5B%7B%22lat%22%3A%2240.7432768%22%2C%22lng%22%3A%22-74.3667421%22%2C%22title%22%3A%22My%20Store%22%2C%22icon%22%3A%223670%22%7D%2C%7B%22lat%22%3A%2240.7852705%22%2C%22lng%22%3A%22-74.6508684%22%2C%22title%22%3A%22My%20Store%202%22%2C%22icon%22%3A%223670%22%7D%5D" map_height="520px" map_zoom="10" scroll_wheel="on"][/vc_column][/vc_row]
demo HOME 3
[vc_row][vc_column][rev_slider alias="slider-3" order="6,7"][/vc_column][/vc_row][vc_row color_skin="skin-dark" content_width="full" equal_height="yes" content_placement="top"][vc_column width="1/2" css=".vc_custom_1505093261411{padding-top: 155px !important;padding-right: 60px !important;padding-bottom: 100px !important;padding-left: 60px !important;background-image: url(http://demo.g5plus.net/test/wp-content/uploads/2017/09/bg-product-cat-1.jpg?id=4334) !important;background-position: center !important;background-repeat: no-repeat !important;background-size: cover !important;}" offset="vc_col-md-3"][vc_column_text el_class="gsf-white-text"]
<h4 style="max-width: 265px;">Fresh Vegetables</h4>
<p style="max-width: 265px;">Integer posuere erat a ante venenatis dapibus posuere velit aliquet.
	Morbi leo risus, porta ac consectetur ac, vestibulum at eros.

	[/vc_column_text][gsf_button title="Shop Now" color="gray" size="lg"][/vc_column][vc_column width="1/2" css=".vc_custom_1505093269024{padding-top: 155px !important;padding-right: 60px !important;padding-bottom: 100px !important;padding-left: 60px !important;background-image: url(http://demo.g5plus.net/test/wp-content/uploads/2017/09/bg-product-cat-2.jpg?id=4335) !important;background-position: center !important;background-repeat: no-repeat !important;background-size: cover !important;}" offset="vc_col-md-3"][vc_column_text el_class="gsf-white-text"]
<h4 style="max-width: 265px;">Smoothies</h4>
<p style="max-width: 265px;">Integer posuere erat a ante venenatis dapibus posuere velit aliquet.
	Morbi leo risus, porta ac consectetur ac, vestibulum at eros.

	[/vc_column_text][gsf_button title="Shop Now" color="gray" size="lg"][/vc_column][vc_column width="1/2" css=".vc_custom_1505093276871{padding-top: 155px !important;padding-right: 60px !important;padding-bottom: 100px !important;padding-left: 60px !important;background-image: url(http://demo.g5plus.net/test/wp-content/uploads/2017/09/bg-product-cat-3.jpg?id=4336) !important;background-position: center !important;background-repeat: no-repeat !important;background-size: cover !important;}" offset="vc_col-md-3"][vc_column_text el_class="gsf-white-text"]
<h4 style="max-width: 265px;">Fresh Raw Meats</h4>
<p style="max-width: 265px;">Integer posuere erat a ante venenatis dapibus posuere velit aliquet.
	Morbi leo risus, porta ac consectetur ac, vestibulum at eros.

	[/vc_column_text][gsf_button title="Shop Now" color="gray" size="lg"][/vc_column][vc_column width="1/2" css=".vc_custom_1505093285685{padding-top: 155px !important;padding-right: 60px !important;padding-bottom: 100px !important;padding-left: 60px !important;background-image: url(http://demo.g5plus.net/test/wp-content/uploads/2017/09/bg-product-cat-4.jpg?id=4337) !important;background-position: center !important;background-repeat: no-repeat !important;background-size: cover !important;}" offset="vc_col-md-3"][vc_column_text el_class="gsf-white-text"]
<h4 style="max-width: 265px;">Fruits</h4>
<p style="max-width: 265px;">Integer posuere erat a ante venenatis dapibus posuere velit aliquet.
	Morbi leo risus, porta ac consectetur ac, vestibulum at eros.

	[/vc_column_text][gsf_button title="Shop Now" color="gray" size="lg"][/vc_column][/vc_row][vc_row][vc_column][gsf_space desktop="95" tablet="75" tablet_portrait="65" mobile_landscape="55" mobile="45"][gsf_heading text_align="text-center" title_font_size="36" icon_image="3675" title="Natural Taste From The Farm!" sub_title="Best Organic Store" description="Cras mattis consectetur purus sit amet fermentum. Praesent commodo cursus magna, vel scelerisque nisl consectetur et." css=".vc_custom_1505093589655{margin-bottom: 55px !important;}"][vc_row_inner][vc_column_inner offset="vc_col-md-4"][gsf_icon_box layout_style="ib-left-top" title="100% Natural" title_size="title-small" title_below="" description="Maecenas sed diam eget risus varius blandit sit amet non magna lorem ipsum dolor." icon_image="3693" image_width="91px" el_class="mg-bottom-20"][gsf_icon_box layout_style="ib-left-top" title="Free Shipping" title_size="title-small" title_below="" description="Maecenas sed diam eget risus varius blandit sit amet non magna lorem ipsum dolor." icon_image="3692" image_width="91px" el_class="sm-mg-bottom-20"][/vc_column_inner][vc_column_inner offset="vc_col-md-4"][gsf_icon_box layout_style="ib-left-top" title="Healthy Food" title_size="title-small" title_below="" description="Maecenas sed diam eget risus varius blandit sit amet non magna lorem ipsum dolor." icon_image="4351" image_width="91px" el_class="mg-bottom-20"][gsf_icon_box layout_style="ib-left-top" title="Secure Payment" title_size="title-small" title_below="" description="Maecenas sed diam eget risus varius blandit sit amet non magna lorem ipsum dolor." icon_image="3694" image_width="91px" el_class="sm-mg-bottom-20"][/vc_column_inner][vc_column_inner offset="vc_col-md-4"][gsf_icon_box layout_style="ib-left-top" title="Always Fresh" title_size="title-small" title_below="" description="Maecenas sed diam eget risus varius blandit sit amet non magna lorem ipsum dolor." icon_image="4352" image_width="91px" el_class="mg-bottom-20"][gsf_icon_box layout_style="ib-left-top" title="Friendly Support" title_size="title-small" title_below="" description="Maecenas sed diam eget risus varius blandit sit amet non magna lorem ipsum dolor." icon_image="3695" image_width="91px"][/vc_column_inner][/vc_row_inner][gsf_space desktop="85" tablet="75" tablet_portrait="65" mobile_landscape="45" mobile="40"][/vc_column][/vc_row][vc_row content_width="full"][vc_column][vc_single_image image="4350" img_size="full" css=".vc_custom_1505097863862{margin-bottom: 0px !important;}"][/vc_column][/vc_row][vc_row css=".vc_custom_1503389689478{background-image: url(http://demo.g5plus.net/test/wp-content/uploads/2017/08/bg-product-deal.jpg?id=3990) !important;background-position: center !important;background-repeat: no-repeat !important;background-size: cover !important;}"][vc_column][gsf_space desktop="180" tablet="150" tablet_portrait="140" mobile_landscape="130" mobile="120"][vc_row_inner equal_height="yes" content_placement="middle"][vc_column_inner el_class="sm-mg-bottom-40" offset="vc_col-md-6"][gsf_heading title_font_size="36" icon_image="3675" title="Oars Store Offer 50% Off" sub_title="Deal Of The Day" description="Praesent commodo cursus magna, vel scelerisque nisl consectetur et. Cras mattis consectetur purus sit amet fermentum. Lorem ipsum dolor sit amet, consectetur adipiscing elit. Donec ullamcorper nulla non metus auctor fringilla. Nullam quis risus eget urna mollis ornare vel eu leo. " css=".vc_custom_1503389915311{margin-bottom: 55px !important;}"][gsf_button title="Buy Now" size="lg" link="url:http%3A%2F%2Fdemo.g5plus.net%2Ftest%2Fproduct%2Ffresh-ly-son-garlic%2F||target:%20_blank|"][/vc_column_inner][vc_column_inner offset="vc_col-md-6"][gsf_product_deal product_ids="3951" images="3994,3952,3881,3880"][/vc_column_inner][/vc_row_inner][gsf_space desktop="180" tablet="150" tablet_portrait="140" mobile_landscape="130" mobile="120"][/vc_column][/vc_row][vc_row][vc_column][gsf_space desktop="95" tablet="70" tablet_portrait="60" mobile_landscape="50" mobile="40"][gsf_heading text_align="text-center" title_font_size="36" icon_image="3675" title="Feature Products" sub_title="Fresh Food" css=".vc_custom_1503385005636{margin-bottom: 22px !important;}"][gsf_products category="vegetables,juice,fresh-pork-neck,meat" show_category_filter="on" cate_filter_align="cate-filter-center" products_per_page="8" order="ASC" product_animation="bottom-to-top" columns="4" columns_md="3" columns_sm="2" columns_xs="2" columns_mb="1"][gsf_space desktop="33" tablet="20" tablet_portrait="10" mobile_landscape="0" mobile="0"][/vc_column][/vc_row][vc_row equal_height="yes" content_placement="middle" css=".vc_custom_1503478323147{background-image: url(http://demo.g5plus.net/test/wp-content/uploads/2017/08/bg-product-exclusive-.jpg?id=4037) !important;background-position: center !important;background-repeat: no-repeat !important;background-size: cover !important;}"][vc_column offset="vc_col-lg-7 vc_col-md-6"][gsf_space desktop="90" tablet="70" tablet_portrait="60" mobile_landscape="50" mobile="40"][vc_single_image image="4038" img_size="full" alignment="center" el_class="xl-mg-left-neg-160" css=".vc_custom_1507694326073{margin-bottom: 0px !important;}"][/vc_column][vc_column offset="vc_col-lg-5 vc_col-md-6"][gsf_space desktop="95" tablet="70" tablet_portrait="60" mobile_landscape="50" mobile="40"][gsf_heading title_font_size="36" icon_image="3675" title="Exclusive Products" sub_title="Only On Oars Store" description="Cras mattis consectetur purus sit amet fermentum. Praesent vel scelerisque nisl consectetur et." css=".vc_custom_1503477970913{margin-bottom: 55px !important;}"][gsf_products_exclusive product_ids="3951, 3931, 3923, 3928"][gsf_space desktop="88" tablet="70" tablet_portrait="60" mobile_landscape="50" mobile="40"][/vc_column][/vc_row][vc_row][vc_column][gsf_space desktop="95" tablet="75" tablet_portrait="65" mobile_landscape="55" mobile="45"][gsf_heading text_align="text-center" title_font_size="36" icon_image="3675" title="Do You Know About Teams?" sub_title="Meet Our Team" description="Cras mattis consectetur purus sit amet fermentum. Praesent commodo cursus magna, vel scelerisque nisl consectetur et." css=".vc_custom_1501916685464{margin-bottom: 55px !important;}"][vc_row_inner][vc_column_inner width="1/2" offset="vc_col-md-3"][gsf_our_team ourteam_avatar="3799" ourteam_position="Smoothie Bartender" socials="%5B%7B%22icon_font%22%3A%22fa%20fa-facebook%22%2C%22social_link%22%3A%22url%3A%2523%7C%7C%7C%22%7D%2C%7B%22icon_font%22%3A%22fa%20fa-twitter%22%2C%22social_link%22%3A%22url%3A%2523%7C%7C%7C%22%7D%2C%7B%22icon_font%22%3A%22fa%20fa-pinterest-p%22%2C%22social_link%22%3A%22url%3A%2523%7C%7C%7C%22%7D%2C%7B%22icon_font%22%3A%22fa%20fa-behance%22%2C%22social_link%22%3A%22url%3A%2523%7C%7C%7C%22%7D%2C%7B%22icon_font%22%3A%22fa%20fa-instagram%22%2C%22social_link%22%3A%22url%3A%2523%7C%7C%7C%22%7D%5D" ourteam_name="Veronica Anluz"][/vc_column_inner][vc_column_inner el_class="xs-mg-top-30" width="1/2" offset="vc_col-md-3"][gsf_our_team ourteam_avatar="3800" ourteam_position="Founder Oars Store" socials="%5B%7B%22icon_font%22%3A%22fa%20fa-facebook%22%2C%22social_link%22%3A%22url%3A%2523%7C%7C%7C%22%7D%2C%7B%22icon_font%22%3A%22fa%20fa-twitter%22%2C%22social_link%22%3A%22url%3A%2523%7C%7C%7C%22%7D%2C%7B%22icon_font%22%3A%22fa%20fa-pinterest-p%22%2C%22social_link%22%3A%22url%3A%2523%7C%7C%7C%22%7D%2C%7B%22icon_font%22%3A%22fa%20fa-behance%22%2C%22social_link%22%3A%22url%3A%2523%7C%7C%7C%22%7D%2C%7B%22icon_font%22%3A%22fa%20fa-instagram%22%2C%22social_link%22%3A%22url%3A%2523%7C%7C%7C%22%7D%5D" ourteam_name="Jonny Miller"][/vc_column_inner][vc_column_inner el_class="sm-mg-top-30" width="1/2" offset="vc_col-md-3"][gsf_our_team ourteam_avatar="3801" ourteam_position="Senior UI/UX Design" socials="%5B%7B%22icon_font%22%3A%22fa%20fa-facebook%22%2C%22social_link%22%3A%22url%3A%2523%7C%7C%7C%22%7D%2C%7B%22icon_font%22%3A%22fa%20fa-twitter%22%2C%22social_link%22%3A%22url%3A%2523%7C%7C%7C%22%7D%2C%7B%22icon_font%22%3A%22fa%20fa-pinterest-p%22%2C%22social_link%22%3A%22url%3A%2523%7C%7C%7C%22%7D%2C%7B%22icon_font%22%3A%22fa%20fa-behance%22%2C%22social_link%22%3A%22url%3A%2523%7C%7C%7C%22%7D%2C%7B%22icon_font%22%3A%22fa%20fa-instagram%22%2C%22social_link%22%3A%22url%3A%2523%7C%7C%7C%22%7D%5D" ourteam_name="Karren gillan"][/vc_column_inner][vc_column_inner el_class="sm-mg-top-30" width="1/2" offset="vc_col-md-3"][gsf_our_team ourteam_avatar="3802" ourteam_position="Developer" socials="%5B%7B%22icon_font%22%3A%22fa%20fa-facebook%22%2C%22social_link%22%3A%22url%3A%2523%7C%7C%7C%22%7D%2C%7B%22icon_font%22%3A%22fa%20fa-twitter%22%2C%22social_link%22%3A%22url%3A%2523%7C%7C%7C%22%7D%2C%7B%22icon_font%22%3A%22fa%20fa-pinterest-p%22%2C%22social_link%22%3A%22url%3A%2523%7C%7C%7C%22%7D%2C%7B%22icon_font%22%3A%22fa%20fa-behance%22%2C%22social_link%22%3A%22url%3A%2523%7C%7C%7C%22%7D%2C%7B%22icon_font%22%3A%22fa%20fa-instagram%22%2C%22social_link%22%3A%22url%3A%2523%7C%7C%7C%22%7D%5D" ourteam_name="dominic pursay"][/vc_column_inner][/vc_row_inner][gsf_space desktop="90" tablet="70" tablet_portrait="60" mobile_landscape="50" mobile="40"][/vc_column][/vc_row][vc_row color_skin="skin-dark" bg_overlay_mode="color" bg_overlay_color="rgba(33,33,33,0.8)" css=".vc_custom_1501914843013{background-image: url(http://demo.g5plus.net/test/wp-content/uploads/2017/08/bg-testimonials-3.jpg?id=3792) !important;background-position: center !important;background-repeat: no-repeat !important;background-size: cover !important;}"][vc_column][gsf_space desktop="100" tablet="80" tablet_portrait="70" mobile_landscape="60" mobile="50"][gsf_heading text_align="text-center" title_font_size="36" icon_image="3675" title="What Our Customer Saying?" sub_title="Testimonials" description="Cras mattis consectetur purus sit amet fermentum. Praesent commodo cursus magna, vel scelerisque nisl consectetur et." css=".vc_custom_1501914517001{margin-bottom: 50px !important;}"][gsf_testimonials layout_style="style-03" _columns="2" values="%5B%7B%22author_bio%22%3A%22It%20is%20a%20long%20established%20fact%20that%20a%20reader%20will%20be%20distracted%20by%20the%20readable%20content%20of%20a%20page%20when%20looking%20at%20its%20layout.%22%2C%22author_name%22%3A%22Michael%20Walker%22%2C%22author_job%22%3A%22Social%20Marketing%22%2C%22author_avatar%22%3A%223787%22%2C%22author_link%22%3A%22%23%22%7D%2C%7B%22author_bio%22%3A%22It%20is%20a%20long%20established%20fact%20that%20a%20reader%20will%20be%20distracted%20by%20the%20readable%20content%20of%20a%20page%20when%20looking%20at%20its%20layout.%22%2C%22author_name%22%3A%22Mourinho%22%2C%22author_job%22%3A%22Seo%22%2C%22author_avatar%22%3A%223788%22%2C%22author_link%22%3A%22%23%22%7D%2C%7B%22author_bio%22%3A%22It%20is%20a%20long%20established%20fact%20that%20a%20reader%20will%20be%20distracted%20by%20the%20readable%20content%20of%20a%20page%20when%20looking%20at%20its%20layout.%22%2C%22author_name%22%3A%22Albert%20Huynaya%22%2C%22author_job%22%3A%22Smoothie%20Bartender%22%2C%22author_avatar%22%3A%223789%22%7D%2C%7B%22author_bio%22%3A%22It%20is%20a%20long%20established%20fact%20that%20a%20reader%20will%20be%20distracted%20by%20the%20readable%20content%20of%20a%20page%20when%20looking%20at%20its%20layout.%22%2C%22author_name%22%3A%22Cris%20Horwang%22%2C%22author_job%22%3A%22Landscape%22%2C%22author_avatar%22%3A%223790%22%7D%2C%7B%22author_bio%22%3A%22It%20is%20a%20long%20established%20fact%20that%20a%20reader%20will%20be%20distracted%20by%20the%20readable%20content%20of%20a%20page%20when%20looking%20at%20its%20layout.%22%2C%22author_name%22%3A%22Michael%20Walker%22%2C%22author_job%22%3A%22Social%20Marketing%22%2C%22author_avatar%22%3A%223787%22%2C%22author_link%22%3A%22%23%22%7D%2C%7B%22author_bio%22%3A%22It%20is%20a%20long%20established%20fact%20that%20a%20reader%20will%20be%20distracted%20by%20the%20readable%20content%20of%20a%20page%20when%20looking%20at%20its%20layout.%22%2C%22author_name%22%3A%22Albert%20Huynaya%22%2C%22author_job%22%3A%22Smoothie%20Bartender%22%2C%22author_avatar%22%3A%223789%22%7D%2C%7B%22author_bio%22%3A%22It%20is%20a%20long%20established%20fact%20that%20a%20reader%20will%20be%20distracted%20by%20the%20readable%20content%20of%20a%20page%20when%20looking%20at%20its%20layout.%22%2C%22author_name%22%3A%22Mourinho%22%2C%22author_job%22%3A%22Seo%22%2C%22author_avatar%22%3A%223788%22%2C%22author_link%22%3A%22%23%22%7D%2C%7B%22author_bio%22%3A%22It%20is%20a%20long%20established%20fact%20that%20a%20reader%20will%20be%20distracted%20by%20the%20readable%20content%20of%20a%20page%20when%20looking%20at%20its%20layout.%22%2C%22author_name%22%3A%22Cris%20Horwang%22%2C%22author_job%22%3A%22Landscape%22%2C%22author_avatar%22%3A%223790%22%7D%5D" items_rows="2" dots="on"][gsf_space desktop="100" tablet="80" tablet_portrait="70" mobile_landscape="60" mobile="50"][/vc_column][/vc_row][vc_row][vc_column][gsf_space desktop="95" tablet="70" tablet_portrait="60" mobile_landscape="50" mobile="40"][gsf_heading text_align="text-center" title_font_size="36" icon_image="3675" title="Latest News From Blog" sub_title="Our Blog News" description="Cras mattis consectetur purus sit amet fermentum. Praesent commodo cursus magna, vel scelerisque nisl consectetur et." css=".vc_custom_1503559144517{margin-bottom: 55px !important;}"][gsf_posts source="recent" posts_per_page="6" is_slider="on" columns="3" columns_md="2" columns_sm="2" columns_xs="1" columns_mb="1"][gsf_space desktop="90" tablet="70" tablet_portrait="60" mobile_landscape="50" mobile="40"][/vc_column][/vc_row][vc_row equal_height="yes" content_placement="middle" css=".vc_custom_1505097259830{border-bottom-width: 1px !important;padding-top: 103px !important;padding-bottom: 62px !important;background-image: url(http://demo.g5plus.net/test/wp-content/uploads/2017/09/bg-subcribe-2.png?id=4373) !important;background-position: center !important;background-repeat: no-repeat !important;background-size: cover !important;border-bottom-color: #e8dac7 !important;border-bottom-style: solid !important;}"][vc_column offset="vc_col-lg-5 vc_col-md-6"][gsf_heading title_font_size="36" heading_below="none" el_class="sm-mg-bottom-20" title="Subscribe Newsletter" sub_title="Subscribe"][/vc_column][vc_column offset="vc_col-lg-7 vc_col-md-6"][vc_column_text css=".vc_custom_1501743674603{margin-bottom: 0px !important;}"][mc4wp_form id="3766"][/vc_column_text][/vc_column][/vc_row][vc_row equal_height="yes" content_placement="bottom" css=".vc_custom_1504842433884{background-color: #f5fcf9 !important;}"][vc_column el_class="col-md-push-7" offset="vc_col-md-5"][gsf_space desktop="90" tablet="70" tablet_portrait="60" mobile_landscape="50" mobile="40"][gsf_heading title_font_size="36" icon_image="3675" title="Why we are the best" sub_title="What is Oars Store?" description="Cras mattis consectetur purus sit amet fermentum. Praesent vel scelerisque nisl consectetur et." css=".vc_custom_1504841972792{margin-bottom: 43px !important;}"][vc_tta_accordion color="transparent" gap="15" c_icon="arrows" active_section="1"][vc_tta_section title="Get creative with courgettes" tab_id="1504839949406-0986f5e7-c193dfb3-a012"][vc_column_text el_class="fs-16"]Ut fermentum massa justo sit amet risus tellus ac cursus commodo, tortor mauris condimentum nibh, ut fermentum massa.[/vc_column_text][/vc_tta_section][vc_tta_section title="Italian style meatballs with courgette ‘tagliatelle’" tab_id="1504840516750-f0b2faa6-1bc6dfb3-a012"][vc_column_text el_class="fs-16"]Ut fermentum massa justo sit amet risus tellus ac cursus commodo, tortor mauris condimentum nibh, ut fermentum massa.[/vc_column_text][/vc_tta_section][vc_tta_section title="How to fillet round fish (mackerel, trout, etc.)" tab_id="1504840507606-5dd91b77-8c64dfb3-a012"][vc_column_text el_class="fs-16"]Ut fermentum massa justo sit amet risus tellus ac cursus commodo, tortor mauris condimentum nibh, ut fermentum massa.[/vc_column_text][/vc_tta_section][vc_tta_section title="Irish fish chowder with soda bread" tab_id="1504840505582-e7ec7ea5-15d2dfb3-a012"][vc_column_text el_class="fs-16"]Ut fermentum massa justo sit amet risus tellus ac cursus commodo, tortor mauris condimentum nibh, ut fermentum massa.[/vc_column_text][/vc_tta_section][vc_tta_section title="Equipment you will need for this technique" tab_id="1504840504942-b868ed68-ce7fdfb3-a012"][vc_column_text el_class="fs-16"]Ut fermentum massa justo sit amet risus tellus ac cursus commodo, tortor mauris condimentum nibh, ut fermentum massa.[/vc_column_text][/vc_tta_section][/vc_tta_accordion][gsf_space desktop="107" tablet="90" tablet_portrait="80" mobile_landscape="70" mobile="60"][/vc_column][vc_column el_class="col-md-pull-5" offset="vc_col-md-7"][vc_single_image image="4271" img_size="full" css=".vc_custom_1507792957598{margin-bottom: 0px !important;}" el_class="xl-mg-left-neg-45"][/vc_column][/vc_row]
demo HOME 4
[[vc_row css=".vc_custom_1505112697998{background-image: url(http://demo.g5plus.net/test/wp-content/uploads/2017/09/bg-block1-home4.jpg?id=4418) !important;background-position: center !important;background-repeat: no-repeat !important;background-size: cover !important;}"][vc_column width="5/6" offset="vc_col-sm-offset-1"][gsf_space desktop="200" tablet="180" tablet_portrait="170" mobile_landscape="160" mobile="100"][vc_column_text el_class="text-center,mg-bottom-0"]
<h4 class="fs-24 uppercase mg-bottom-30" style="letter-spacing: 0.2em;">Oars Meats Store</h4>
<p class="fs-24 xs-fs-14" style="line-height: 1.41;">Cras mattis consectetur purus sit amet fermentum. Aenean eu leo quam. lacinia quam venenatis vestibulum. Vivamus sagittis lacus vel augue laoreet rutrum faucibus dolor auctor. Duis mollis, est non commodo luctus, nisi erat porttitor ligula, eget lacinia odio sem nec elit.</p>
[/vc_column_text][gsf_space desktop="203" tablet="180" tablet_portrait="170" mobile_landscape="160" mobile="100"][/vc_column][/vc_row][vc_row content_width="full" css=".vc_custom_1507794139764{padding-top: 20px !important;padding-right: 20px !important;padding-left: 20px !important;}"][vc_column el_class="sm-mg-bottom-15,sm-inner-pd-left-0,sm-inner-pd-right-0" css=".vc_custom_1507794951419{padding-top: 0px !important;}"][gsf_shop_category category="fresh-beef-meat,fresh-pork-neck,meat,fed-sliced-beef,fresh-lamb" layout_style="metro-02" image_size="395x440" columns_gutter="20" cat_animation="none" cat_paging="pagination" cat_per_page="" height_mode="custom" height="895px" image="3877"][/vc_column][/vc_row][vc_row][vc_column][gsf_space desktop="95" tablet="70" tablet_portrait="60" mobile_landscape="50" mobile="40"][gsf_heading text_align="text-center" title_font_size="36" icon_image="3824" title="Feature Products" sub_title="Fresh Meats" css=".vc_custom_1505183354273{margin-bottom: 55px !important;}" description="Cras mattis consectetur purus sit amet fermentum. Praesent commodo cursus magna, vel scelerisque nisl consectetur et."][gsf_products category="fish,fresh-beef-meat,fresh-pork-neck,meat" products_per_page="8" orderby="rand" product_animation="bottom-to-top" columns="4" columns_md="2" columns_sm="2" columns_xs="1" columns_mb="1"][gsf_space desktop="33" tablet="20" tablet_portrait="10" mobile_landscape="0" mobile="0"][/vc_column][/vc_row][vc_row content_width="full" equal_height="yes" content_placement="middle"][vc_column css=".vc_custom_1501922419971{padding-right: 0px !important;padding-left: 0px !important;background-color: #f7eee2 !important;}" offset="vc_col-lg-6 vc_col-md-12"][vc_row_inner el_class="xl-pd-left-100,xl-pd-right-100,lg-pd-right-50,lg-pd-left-50,xs-pd-left-0,xs-pd-right-0"][vc_column_inner][gsf_space desktop="95" tablet="80" tablet_portrait="70" mobile_landscape="60" mobile="50"][gsf_heading text_align="text-center" title_font_size="36" icon_image="3824" title="What Our Customer Saying?" sub_title="Testimonials" css=".vc_custom_1505117035066{margin-bottom: 30px !important;}" description="Cras mattis consectetur purus sit amet fermentum. Praesent commodo cursus magna, vel scelerisque nisl consectetur et."][gsf_testimonials layout_style="style-04" item_active="5" values="%5B%7B%22author_bio%22%3A%22Lorem%20ipsum%20dolor%20sit%20amet%2C%20consectetur%20adipiscing%20elit.%20Curabitur%20blandit%20tempus%20porttitor.%20Vestibulum%20id%20ligula%20porta%20felis%20euismod%20semper.%20Duis%20mollis%2C%20est%20non%20commodo%20luctus%2C%20nisi%20erat%20porttitor%20ligula%2C%20eget%20lacinia%20odio%20sem%20nec%20elit.%22%2C%22author_name%22%3A%22Michael%20Walker%22%2C%22author_job%22%3A%22Social%20Marketing%22%2C%22author_avatar%22%3A%223815%22%2C%22author_link%22%3A%22%23%22%7D%2C%7B%22author_bio%22%3A%22Lorem%20ipsum%20dolor%20sit%20amet%2C%20consectetur%20adipiscing%20elit.%20Curabitur%20blandit%20tempus%20porttitor.%20Vestibulum%20id%20ligula%20porta%20felis%20euismod%20semper.%20Duis%20mollis%2C%20est%20non%20commodo%20luctus%2C%20nisi%20erat%20porttitor%20ligula%2C%20eget%20lacinia%20odio%20sem%20nec%20elit.%22%2C%22author_name%22%3A%22Mourinho%22%2C%22author_job%22%3A%22Seo%22%2C%22author_avatar%22%3A%223816%22%2C%22author_link%22%3A%22%23%22%7D%2C%7B%22author_bio%22%3A%22Lorem%20ipsum%20dolor%20sit%20amet%2C%20consectetur%20adipiscing%20elit.%20Curabitur%20blandit%20tempus%20porttitor.%20Vestibulum%20id%20ligula%20porta%20felis%20euismod%20semper.%20Duis%20mollis%2C%20est%20non%20commodo%20luctus%2C%20nisi%20erat%20porttitor%20ligula%2C%20eget%20lacinia%20odio%20sem%20nec%20elit.%22%2C%22author_name%22%3A%22Albert%20Huynaya%22%2C%22author_job%22%3A%22Smoothie%20Bartender%22%2C%22author_avatar%22%3A%223799%22%7D%2C%7B%22author_bio%22%3A%22Lorem%20ipsum%20dolor%20sit%20amet%2C%20consectetur%20adipiscing%20elit.%20Curabitur%20blandit%20tempus%20porttitor.%20Vestibulum%20id%20ligula%20porta%20felis%20euismod%20semper.%20Duis%20mollis%2C%20est%20non%20commodo%20luctus%2C%20nisi%20erat%20porttitor%20ligula%2C%20eget%20lacinia%20odio%20sem%20nec%20elit.%22%2C%22author_name%22%3A%22Cris%20Horwang%22%2C%22author_job%22%3A%22Landscape%22%2C%22author_avatar%22%3A%223817%22%7D%2C%7B%22author_bio%22%3A%22Lorem%20ipsum%20dolor%20sit%20amet%2C%20consectetur%20adipiscing%20elit.%20Curabitur%20blandit%20tempus%20porttitor.%20Vestibulum%20id%20ligula%20porta%20felis%20euismod%20semper.%20Duis%20mollis%2C%20est%20non%20commodo%20luctus%2C%20nisi%20erat%20porttitor%20ligula%2C%20eget%20lacinia%20odio%20sem%20nec%20elit.%22%2C%22author_name%22%3A%22Zin's%20Nguyen%22%2C%22author_job%22%3A%22Farm%20Store%22%2C%22author_avatar%22%3A%223800%22%7D%5D"][gsf_space desktop="83" tablet="65" tablet_portrait="55" mobile_landscape="45" mobile="40"][/vc_column_inner][/vc_row_inner][/vc_column][vc_column css=".vc_custom_1501921161111{background-image: url(http://demo.g5plus.net/test/wp-content/uploads/2017/08/bg-video-1.jpg?id=3827) !important;background-position: center !important;background-repeat: no-repeat !important;background-size: cover !important;}" offset="vc_col-lg-6 vc_col-md-12"][gsf_space desktop="" tablet="200" tablet_portrait="180" mobile_landscape="160" mobile="150"][gsf_video link="https://www.youtube.com/watch?v=sctLR5AgeJY" icon_bg_color="rgba(185,85,86,0.9)" icon_color="#ffffff" css=".vc_custom_1508385590503{margin-bottom: 28px !important;}"][vc_single_image image="3841" img_size="full" alignment="center" css=".vc_custom_1502069418834{margin-bottom: 0px !important;}"][gsf_space desktop="" tablet="200" tablet_portrait="180" mobile_landscape="160" mobile="150"][/vc_column][/vc_row][vc_row content_width="full"][vc_column css=".vc_custom_1501639201172{padding-right: 0px !important;padding-left: 0px !important;}"][gsf_partner items="10" opacity="50" partners="%5B%7B%22images%22%3A%223715%22%2C%22link%22%3A%22url%3A%2523%7C%7C%7C%22%7D%2C%7B%22images%22%3A%223716%22%2C%22link%22%3A%22url%3A%2523%7C%7C%7C%22%7D%2C%7B%22images%22%3A%223717%22%2C%22link%22%3A%22url%3A%2523%7C%7C%7C%22%7D%2C%7B%22images%22%3A%223718%22%2C%22link%22%3A%22url%3A%2523%7C%7C%7C%22%7D%2C%7B%22images%22%3A%223719%22%2C%22link%22%3A%22url%3A%2523%7C%7C%7C%22%7D%2C%7B%22images%22%3A%223720%22%2C%22link%22%3A%22url%3A%2523%7C%7C%7C%22%7D%2C%7B%22images%22%3A%223721%22%2C%22link%22%3A%22url%3A%2523%7C%7C%7C%22%7D%2C%7B%22images%22%3A%223722%22%2C%22link%22%3A%22url%3A%2523%7C%7C%7C%22%7D%2C%7B%22images%22%3A%223723%22%2C%22link%22%3A%22url%3A%2523%7C%7C%7C%22%7D%2C%7B%22images%22%3A%223714%22%2C%22link%22%3A%22url%3A%2523%7C%7C%7C%22%7D%5D" border="on"][/vc_column][/vc_row][vc_row][vc_column][gsf_space desktop="95" tablet="70" tablet_portrait="60" mobile_landscape="50" mobile="40"][gsf_heading text_align="text-center" title_font_size="36" icon_image="3824" title="Latest News From Blog" sub_title="Our Blog News" description="Cras mattis consectetur purus sit amet fermentum. Praesent commodo cursus magna, vel scelerisque nisl consectetur et." css=".vc_custom_1505115085606{margin-bottom: 55px !important;}"][gsf_posts source="recent" posts_per_page="6" is_slider="on" columns="3" columns_md="2" columns_sm="2" columns_xs="1" columns_mb="1"][gsf_space desktop="90" tablet="70" tablet_portrait="60" mobile_landscape="50" mobile="40"][/vc_column][/vc_row][vc_row content_width="full" equal_height="yes" content_placement="middle"][vc_column css=".vc_custom_1505111670355{padding-right: 0px !important;padding-left: 0px !important;}" offset="vc_col-lg-8 vc_col-md-7"][gsf_banner height_mode="custom" height="780px" title_color="#ffffff" image="4386"][/vc_column][vc_column css=".vc_custom_1505111680927{padding-right: 0px !important;padding-left: 0px !important;background-image: url(http://demo.g5plus.net/test/wp-content/uploads/2017/09/bg-subscibe-3.jpg?id=4390) !important;background-position: center !important;background-repeat: no-repeat !important;background-size: cover !important;}" offset="vc_col-lg-4 vc_col-md-5"][vc_column_text el_class="mailchimp-block,xl-pd-left-100,xl-pd-right-100,lg-pd-right-50,lg-pd-left-50,pd-top-100,pd-bottom-100" css=".vc_custom_1505111590998{margin-bottom: 0px !important;}"]
<h3 class="fs-36 mg-bottom-10">Get 20% Discount Off</h3>
<p class="fs-16 mg-bottom-55">Cras mattis consectetur purus sit amet fermentum. Praesent vel scelerisque nisl consectetur et.</p>
[mc4wp_form id="3766"][/vc_column_text][/vc_column][/vc_row]
demo HOME 5
[vc_row][vc_column][rev_slider alias="home-video"][/vc_column][/vc_row][vc_row equal_height="yes" content_placement="middle" css=".vc_custom_1507695801683{background-image: url(http://demo.g5plus.net/test/wp-content/uploads/2017/09/bg-meat-store-home5.jpg?id=5180) !important;background-position: center !important;background-repeat: no-repeat !important;background-size: cover !important;}"][vc_column el_class="col-sm-push-7" width="1/2" offset="vc_col-md-5"][gsf_space desktop="283" tablet="260" tablet_portrait="250" mobile_landscape="240" mobile="230"][vc_column_text css=".vc_custom_1505185165789{margin-bottom: 0px !important;}"]
<h4 class="fs-24 uppercase mg-bottom-30" style="line-height: 1; letter-spacing: 0..2em;">Oars Meats Store</h4>
<p class="fs-24 xs-fs-14" style="line-hight: 1.42;">Cras mattis consectetur purus sit amet fermentum. Aenean eu leo quam. lacinia quam venenatis vestibulum. Vivamus sagittis lacus vel augue laoreet rutrum faucibus dolor auctor. Duis mollis, est non commodo luctus, nisi erat porttitor ligula, eget lacinia odio sem nec elit.</p>
[/vc_column_text][vc_single_image image="4457" img_size="full" css=".vc_custom_1505185234462{margin-top: 28px !important;}"][gsf_space desktop="250" tablet="230" tablet_portrait="120" mobile_landscape="50" mobile="40"][/vc_column][vc_column el_class="col-sm-pull-5" width="1/2" offset="vc_col-md-7"][vc_single_image image="5181" img_size="full" el_class="xl-mg-left-neg-170" css=".vc_custom_1507695827584{margin-bottom: 0px !important;}"][gsf_space desktop="0" tablet="0" tablet_portrait="0" mobile_landscape="100" mobile="90"][/vc_column][/vc_row][vc_row css=".vc_custom_1505189189915{background-color: #f7eee2 !important;background-position: center !important;background-repeat: no-repeat !important;background-size: cover !important;}"][vc_column el_class="container"][vc_single_image image="4465" img_size="full" el_class="pos-absolute right-neg-375 top-neg-155 sm-display-none" css=".vc_custom_1505190124509{margin-bottom: 0px !important;}"][gsf_space desktop="95" tablet="75" tablet_portrait="65" mobile_landscape="55" mobile="45"][gsf_heading text_align="text-center" title_font_size="36" icon_image="3824" el_class="mg-bottom-55" title="Who we are" sub_title="About Us" description="Cras mattis consectetur purus sit amet fermentum. Praesent commodo cursus magna, vel scelerisque nisl consectetur et."][vc_row_inner][vc_column_inner width="1/2" offset="vc_col-md-3"][gsf_icon_box title="Fresh Meat" description="Lorem ipsum dolor sit amet
consectetur adipiscing elit felis euismod sempe." icon_image="4485"][/vc_column_inner][vc_column_inner el_class="xs-mg-top-30" width="1/2" offset="vc_col-md-3"][gsf_icon_box title="No Preservatives" description="Lorem ipsum dolor sit amet
consectetur adipiscing elit felis euismod sempe." icon_image="4486"][/vc_column_inner][vc_column_inner el_class="sm-mg-top-30" width="1/2" offset="vc_col-md-3"][gsf_icon_box title="No Artificial Colours" description="Lorem ipsum dolor sit amet
consectetur adipiscing elit felis euismod sempe." icon_image="4487"][/vc_column_inner][vc_column_inner el_class="sm-mg-top-30" width="1/2" offset="vc_col-md-3"][gsf_icon_box title="Natural Farm" description="Lorem ipsum dolor sit amet
consectetur adipiscing elit felis euismod sempe." icon_image="4282"][/vc_column_inner][/vc_row_inner][vc_row_inner][vc_column_inner][gsf_space desktop="115" tablet="95" tablet_portrait="85" mobile_landscape="75" mobile="65"][/vc_column_inner][/vc_row_inner][vc_single_image image="4481" img_size="full" el_class="pos-absolute left-neg-375 bottom-0 sm-display-none" css=".vc_custom_1505190118269{margin-bottom: 0px !important;}"][/vc_column][/vc_row][vc_row][vc_column][gsf_space desktop="95" tablet="70" tablet_portrait="60" mobile_landscape="50" mobile="40"][gsf_heading text_align="text-center" title_font_size="36" icon_image="3824" title="Feature Products" sub_title="Fresh Food" css=".vc_custom_1508491892258{margin-bottom: 57px !important;}" description="Cras mattis consectetur purus sit amet fermentum. Praesent commodo cursus magna, vel scelerisque nisl consectetur et."][vc_row_inner][vc_column_inner offset="vc_col-md-6"][gsf_products category="meat" products_per_page="4" orderby="rand" product_animation="bottom-to-top" columns="2" columns_md="2" columns_sm="2" columns_xs="1" columns_mb="1"][/vc_column_inner][vc_column_inner offset="vc_col-md-6"][gsf_product_singular product_ids="3934"][/vc_column_inner][/vc_row_inner][gsf_space desktop="33" tablet="20" tablet_portrait="10" mobile_landscape="0" mobile="0"][/vc_column][/vc_row][vc_row css=".vc_custom_1505190537478{background-color: #f8f8f8 !important;}"][vc_column][gsf_space desktop="95" tablet="75" tablet_portrait="65" mobile_landscape="55" mobile="45"][gsf_heading text_align="text-center" title_font_size="36" icon_image="3824" title="Delivery Process" sub_title="How to buy on Oars" description="Cras mattis consectetur purus sit amet fermentum. Praesent commodo cursus magna, vel scelerisque nisl consectetur et." css=".vc_custom_1505190843957{margin-bottom: 55px !important;}"][vc_row_inner equal_height="yes" content_placement="middle"][vc_column_inner css=".vc_custom_1505200980181{padding-right: 35px !important;}" offset="vc_col-md-4"][gsf_icon_box layout_style="ib-right-middle" title="01. Choose Product" title_size="title-small" title_below="" description="Integer posuere erat a ante venenatis aliquet. " icon_image="4492" image_width="70px" el_class="mg-bottom-55"][gsf_icon_box layout_style="ib-right-middle" title="03. Share Location" title_size="title-small" title_below="" description="Integer posuere erat a ante venenatis aliquet. " icon_image="4493" image_width="70px"][/vc_column_inner][vc_column_inner offset="vc_col-md-4"][vc_single_image image="4491" img_size="full" alignment="center" el_class="mg-bottom-0 sm-mg-bottom-30 sm-mg-top-30"][/vc_column_inner][vc_column_inner css=".vc_custom_1505200998717{padding-left: 35px !important;}" offset="vc_col-md-4"][gsf_icon_box layout_style="ib-left-middle" title="02. Choose Store" title_size="title-small" title_below="" description="Integer posuere erat a ante venenatis aliquet. " icon_image="4494" image_width="70px" el_class="mg-bottom-55"][gsf_icon_box layout_style="ib-left-middle" title="04. Check & Payment" title_size="title-small" title_below="" description="Integer posuere erat a ante venenatis aliquet. " icon_image="4495" image_width="70px"][/vc_column_inner][/vc_row_inner][gsf_space desktop="110" tablet="90" tablet_portrait="80" mobile_landscape="70" mobile="60"][/vc_column][/vc_row][vc_row][vc_column][gsf_space desktop="95" tablet="75" tablet_portrait="65" mobile_landscape="55" mobile="45"][gsf_heading text_align="text-center" title_font_size="36" icon_image="3824" title="What Our Customer Saying?" sub_title="Testimonials" description="Cras mattis consectetur purus sit amet fermentum. Praesent commodo cursus magna, vel scelerisque nisl consectetur et." css=".vc_custom_1505201710150{margin-bottom: 55px !important;}"][gsf_testimonials layout_style="style-02" columns="3" item_gap="30" values="%5B%7B%22author_bio%22%3A%22Aenean%20lacinia%20bibendum%20nulla%20sed%20consectetur.%20Vestibulum%20id%20ligula%20porta%20felis%20euismod%20semper.%20Fusce%20dapibus%2C%20tellus%20ac%20cursus%20commodo%2C%20tortor%20mauris%20condimentum%20nibh%2C%22%2C%22author_name%22%3A%22Zin%E2%80%99s%20Nguyen%22%2C%22author_job%22%3A%22Smoothie%20Bartender%22%2C%22author_avatar%22%3A%223800%22%7D%2C%7B%22author_bio%22%3A%22Aenean%20lacinia%20bibendum%20nulla%20sed%20consectetur.%20Vestibulum%20id%20ligula%20porta%20felis%20euismod%20semper.%20Fusce%20dapibus%2C%20tellus%20ac%20cursus%20commodo%2C%20tortor%20mauris%20condimentum%20nibh%2C%22%2C%22author_name%22%3A%22Vinfrank%20Ceaser%22%2C%22author_job%22%3A%22Farmer%20Store%22%2C%22author_avatar%22%3A%223810%22%7D%2C%7B%22author_bio%22%3A%22Aenean%20lacinia%20bibendum%20nulla%20sed%20consectetur.%20Vestibulum%20id%20ligula%20porta%20felis%20euismod%20semper.%20Fusce%20dapibus%2C%20tellus%20ac%20cursus%20commodo%2C%20tortor%20mauris%20condimentum%20nibh%2C%22%2C%22author_name%22%3A%22Will%20DogTooh%22%2C%22author_job%22%3A%22Smoothie%20Bartender%22%2C%22author_avatar%22%3A%223811%22%7D%5D" items_rows="1" items_md="3" items_sm="2" items_xs="1" items_mb="1" dots="on"][/vc_column][/vc_row][vc_row container_width="limit" css=".vc_custom_1505202726962{margin-top: 35px !important;margin-bottom: 50px !important;border-top-width: 1px !important;border-top-color: #e8dac7 !important;border-top-style: solid !important;}"][vc_column css=".vc_custom_1501639201172{padding-right: 0px !important;padding-left: 0px !important;}"][gsf_partner opacity="50" partners="%5B%7B%22images%22%3A%224514%22%2C%22link%22%3A%22url%3A%2523%7C%7C%7C%22%7D%2C%7B%22images%22%3A%224515%22%2C%22link%22%3A%22url%3A%2523%7C%7C%7C%22%7D%2C%7B%22images%22%3A%224516%22%2C%22link%22%3A%22url%3A%2523%7C%7C%7C%22%7D%2C%7B%22images%22%3A%224517%22%2C%22link%22%3A%22url%3A%2523%7C%7C%7C%22%7D%2C%7B%22images%22%3A%224518%22%2C%22link%22%3A%22url%3A%2523%7C%7C%7C%22%7D%2C%7B%22images%22%3A%224519%22%2C%22link%22%3A%22url%3A%2523%7C%7C%7C%22%7D%5D"][/vc_column][/vc_row][vc_row content_width="full" equal_height="yes" content_placement="middle"][vc_column css=".vc_custom_1505111670355{padding-right: 0px !important;padding-left: 0px !important;}" offset="vc_col-lg-8 vc_col-md-7"][gsf_banner height_mode="custom" height="780px" title_color="#ffffff" image="4386"][/vc_column][vc_column css=".vc_custom_1505111680927{padding-right: 0px !important;padding-left: 0px !important;background-image: url(http://demo.g5plus.net/test/wp-content/uploads/2017/09/bg-subscibe-3.jpg?id=4390) !important;background-position: center !important;background-repeat: no-repeat !important;background-size: cover !important;}" offset="vc_col-lg-4 vc_col-md-5"][vc_column_text el_class="mailchimp-block,xl-pd-left-100,xl-pd-right-100,lg-pd-right-50,lg-pd-left-50,pd-top-100,pd-bottom-100" css=".vc_custom_1505111590998{margin-bottom: 0px !important;}"]
<h3 class="fs-36 mg-bottom-10">Get 20% Discount Off</h3>
<p class="fs-16 mg-bottom-55">Cras mattis consectetur purus sit amet fermentum. Praesent vel scelerisque nisl consectetur et.</p>
[mc4wp_form id="3766"][/vc_column_text][/vc_column][/vc_row]
demo HOME 6
[vc_row][vc_column][rev_slider alias="slider-61"][/vc_column][/vc_row]
demo HOME 7
[vc_row content_width="full" el_class="sm-pd-left-0,sm-pd-right-0,md-pd-left-40,md-pd-right-40"][vc_column offset="vc_col-lg-7 vc_col-md-12"][vc_single_image image="4551" img_size="full" el_class="mg-bottom-0 sm-mg-bottom-30"][/vc_column][vc_column offset="vc_col-lg-5 vc_col-md-12"][gsf_products category="cream" products_per_page="4" order="ASC" product_animation="bottom-to-top" columns="2" columns_md="2" columns_sm="2" columns_xs="2" columns_mb="1"][/vc_column][/vc_row][vc_row css=".vc_custom_1505269430403{margin-right: 0px !important;margin-left: 0px !important;background-image: url(http://demo.g5plus.net/test/wp-content/uploads/2017/09/bg-block-home-7.png?id=4557) !important;background-position: center !important;background-repeat: no-repeat !important;background-size: cover !important;}"][vc_column][gsf_space desktop="235" tablet="210" tablet_portrait="200" mobile_landscape="190" mobile="180"][vc_column_text el_class="text-center,mg-bottom-0"]
<h3 class="fs-42" style="max-width: 535px; margin-left: auto; margin-right: auto; line-height: 52px;">Stepping into 15th years of sharing smiles</h3>
<p style="max-width: 873px; margin: auto; margin-bottom: 55px;">Praesent commodo cursus magna, vel scelerisque nisl consectetur et. Cras mattis consectetur purus sit amet fermentum. Lorem ipsum dolor sit amet, consectetur adipiscing elit. Donec ullamcorper nulla non metus auctor fringilla. Nullam quis risus eget urna mollis ornare vel eu leo.</p>
<a class="btn btn-primary btn-lg" href="#">About Oars store</a>[/vc_column_text][gsf_space desktop="265" tablet="245" tablet_portrait="235" mobile_landscape="225" mobile="215"][/vc_column][/vc_row][vc_row content_width="full" el_class="sm-pd-left-0,sm-pd-right-0,md-pd-left-40,md-pd-right-40" css=".vc_custom_1505272189821{margin-bottom: 33px !important;}"][vc_column el_class="col-lg-push-5" offset="vc_col-lg-7 vc_col-md-12" css=".vc_custom_1505270452865{padding-top: 15px !important;}"][vc_single_image image="4552" img_size="full" el_class="mg-bottom-0 sm-mg-bottom-30"][/vc_column][vc_column el_class="col-lg-pull-7" offset="vc_col-lg-5 vc_col-md-12" css=".vc_custom_1508403146933{padding-top: 15px !important;}"][gsf_products category="cream" products_per_page="4" product_animation="bottom-to-top" columns="2" columns_md="2" columns_sm="2" columns_xs="2" columns_mb="1"][/vc_column][/vc_row][vc_row css=".vc_custom_1505270780005{background-color: #f7778e !important;}"][vc_column][gsf_partner opacity="50" partners="%5B%7B%22images%22%3A%223714%22%7D%2C%7B%22images%22%3A%223715%22%7D%2C%7B%22images%22%3A%223716%22%7D%2C%7B%22images%22%3A%223717%22%7D%2C%7B%22images%22%3A%223718%22%7D%2C%7B%22images%22%3A%223720%22%7D%5D"][/vc_column][/vc_row]
demo HOME 8
[vc_row][vc_column][rev_slider alias="slider-3" order="7,6"][/vc_column][/vc_row][vc_row color_skin="skin-dark" content_width="full" equal_height="yes" content_placement="top"][vc_column width="1/2" css=".vc_custom_1505093261411{padding-top: 155px !important;padding-right: 60px !important;padding-bottom: 100px !important;padding-left: 60px !important;background-image: url(http://demo.g5plus.net/test/wp-content/uploads/2017/09/bg-product-cat-1.jpg?id=4334) !important;background-position: center !important;background-repeat: no-repeat !important;background-size: cover !important;}" offset="vc_col-md-3"][vc_column_text el_class="gsf-white-text"]
<h4 style="max-width: 265px;">Fresh Vegetables</h4>
<p style="max-width: 265px;">Integer posuere erat a ante venenatis dapibus posuere velit aliquet.
	Morbi leo risus, porta ac consectetur ac, vestibulum at eros.</p>
[/vc_column_text][gsf_button title="Shop Now" color="gray" size="lg"][/vc_column][vc_column width="1/2" css=".vc_custom_1505093269024{padding-top: 155px !important;padding-right: 60px !important;padding-bottom: 100px !important;padding-left: 60px !important;background-image: url(http://demo.g5plus.net/test/wp-content/uploads/2017/09/bg-product-cat-2.jpg?id=4335) !important;background-position: center !important;background-repeat: no-repeat !important;background-size: cover !important;}" offset="vc_col-md-3"][vc_column_text el_class="gsf-white-text"]
<h4 style="max-width: 265px;">Smoothies</h4>
<p style="max-width: 265px;">Integer posuere erat a ante venenatis dapibus posuere velit aliquet.
	Morbi leo risus, porta ac consectetur ac, vestibulum at eros.</p>
[/vc_column_text][gsf_button title="Shop Now" color="gray" size="lg"][/vc_column][vc_column width="1/2" css=".vc_custom_1505093276871{padding-top: 155px !important;padding-right: 60px !important;padding-bottom: 100px !important;padding-left: 60px !important;background-image: url(http://demo.g5plus.net/test/wp-content/uploads/2017/09/bg-product-cat-3.jpg?id=4336) !important;background-position: center !important;background-repeat: no-repeat !important;background-size: cover !important;}" offset="vc_col-md-3"][vc_column_text el_class="gsf-white-text"]
<h4 style="max-width: 265px;">Fresh Raw Meats</h4>
<p style="max-width: 265px;">Integer posuere erat a ante venenatis dapibus posuere velit aliquet.
	Morbi leo risus, porta ac consectetur ac, vestibulum at eros.</p>
[/vc_column_text][gsf_button title="Shop Now" color="gray" size="lg"][/vc_column][vc_column width="1/2" css=".vc_custom_1505093285685{padding-top: 155px !important;padding-right: 60px !important;padding-bottom: 100px !important;padding-left: 60px !important;background-image: url(http://demo.g5plus.net/test/wp-content/uploads/2017/09/bg-product-cat-4.jpg?id=4337) !important;background-position: center !important;background-repeat: no-repeat !important;background-size: cover !important;}" offset="vc_col-md-3"][vc_column_text el_class="gsf-white-text"]
<h4 style="max-width: 265px;">Fruits</h4>
<p style="max-width: 265px;">Integer posuere erat a ante venenatis dapibus posuere velit aliquet.
	Morbi leo risus, porta ac consectetur ac, vestibulum at eros.</p>
[/vc_column_text][gsf_button title="Shop Now" color="gray" size="lg"][/vc_column][/vc_row][vc_row][vc_column][gsf_space desktop="95" tablet="75" tablet_portrait="65" mobile_landscape="55" mobile="45"][gsf_heading text_align="text-center" title_font_size="36" icon_image="3675" title="Natural Taste From The Farm!" sub_title="Best Organic Store" description="Cras mattis consectetur purus sit amet fermentum. Praesent commodo cursus magna, vel scelerisque nisl consectetur et." css=".vc_custom_1505093589655{margin-bottom: 55px !important;}"][vc_row_inner][vc_column_inner offset="vc_col-md-4"][gsf_icon_box layout_style="ib-left-top" title="100% Natural" title_size="title-small" description="Maecenas sed diam eget risus varius blandit sit amet non magna lorem ipsum dolor." icon_image="3693" image_width="91px" el_class="mg-bottom-20"][gsf_icon_box layout_style="ib-left-top" title="Free Shipping" title_size="title-small" description="Maecenas sed diam eget risus varius blandit sit amet non magna lorem ipsum dolor." icon_image="3692" image_width="91px" el_class="sm-mg-bottom-20"][/vc_column_inner][vc_column_inner offset="vc_col-md-4"][gsf_icon_box layout_style="ib-left-top" title="Healthy Food" title_size="title-small" description="Maecenas sed diam eget risus varius blandit sit amet non magna lorem ipsum dolor." icon_image="4351" image_width="91px" el_class="mg-bottom-20"][gsf_icon_box layout_style="ib-left-top" title="Secure Payment" title_size="title-small" description="Maecenas sed diam eget risus varius blandit sit amet non magna lorem ipsum dolor." icon_image="3694" image_width="91px" el_class="sm-mg-bottom-20"][/vc_column_inner][vc_column_inner offset="vc_col-md-4"][gsf_icon_box layout_style="ib-left-top" title="Always Fresh" title_size="title-small" description="Maecenas sed diam eget risus varius blandit sit amet non magna lorem ipsum dolor." icon_image="4352" image_width="91px" el_class="mg-bottom-20"][gsf_icon_box layout_style="ib-left-top" title="Friendly Support" title_size="title-small" description="Maecenas sed diam eget risus varius blandit sit amet non magna lorem ipsum dolor." icon_image="3695" image_width="91px"][/vc_column_inner][/vc_row_inner][gsf_space desktop="85" tablet="75" tablet_portrait="65" mobile_landscape="45" mobile="40"][/vc_column][/vc_row][vc_row color_skin="skin-light" css=".vc_custom_1507022893122{background-image: url(http://demo.g5plus.net/test/wp-content/uploads/2017/08/bg-product-deal.jpg?id=3990) !important;background-position: center !important;background-repeat: no-repeat !important;background-size: cover !important;}"][vc_column][gsf_space desktop="180" tablet="150" tablet_portrait="140" mobile_landscape="130" mobile="120"][vc_row_inner equal_height="yes" content_placement="middle"][vc_column_inner el_class="sm-mg-bottom-40" offset="vc_col-md-6"][gsf_heading title_font_size="36" icon_image="3675" title="Oars Store Offer 50% Off" sub_title="Deal Of The Day" description="Praesent commodo cursus magna, vel scelerisque nisl consectetur et. Cras mattis consectetur purus sit amet fermentum. Lorem ipsum dolor sit amet, consectetur adipiscing elit. Donec ullamcorper nulla non metus auctor fringilla. Nullam quis risus eget urna mollis ornare vel eu leo. " css=".vc_custom_1503389915311{margin-bottom: 55px !important;}"][gsf_button title="Add To Cart" size="lg" link="url:http%3A%2F%2Fdemo.g5plus.net%2Ftest%2Fproduct%2Ffresh-ly-son-garlic%2F||target:%20_blank|"][/vc_column_inner][vc_column_inner offset="vc_col-md-6"][gsf_product_deal product_ids="3951" images="3994,3952,3881,3880"][/vc_column_inner][/vc_row_inner][gsf_space desktop="180" tablet="150" tablet_portrait="140" mobile_landscape="130" mobile="120"][/vc_column][/vc_row][vc_row][vc_column][gsf_space desktop="95" tablet="70" tablet_portrait="60" mobile_landscape="50" mobile="40"][gsf_heading text_align="text-center" title_font_size="36" icon_image="3675" title="Feature Products" sub_title="Fresh Food" css=".vc_custom_1503385005636{margin-bottom: 22px !important;}"][gsf_products show="featured" category="vegetables,juice,fresh-pork-neck,meat" show_category_filter="on" cate_filter_align="cate-filter-center" products_per_page="8" product_animation="bottom-to-top" columns="4" columns_md="3" columns_sm="2" columns_xs="1" columns_mb="1"][gsf_space desktop="33" tablet="20" tablet_portrait="10" mobile_landscape="0" mobile="0"][/vc_column][/vc_row][vc_row color_skin="skin-light" equal_height="yes" content_placement="middle" css=".vc_custom_1507022899010{background-image: url(http://demo.g5plus.net/test/wp-content/uploads/2017/08/bg-product-exclusive-.jpg?id=4037) !important;background-position: center !important;background-repeat: no-repeat !important;background-size: cover !important;}"][vc_column offset="vc_col-md-7"][gsf_space desktop="90" tablet="70" tablet_portrait="60" mobile_landscape="50" mobile="40"][vc_single_image image="4038" img_size="full" alignment="center" el_class="md-mg-left-neg-160"][/vc_column][vc_column offset="vc_col-md-5"][gsf_space desktop="95" tablet="70" tablet_portrait="60" mobile_landscape="50" mobile="40"][gsf_heading title_font_size="36" icon_image="3675" title="Exclusive Products" sub_title="Only On Oars Store" description="Cras mattis consectetur purus sit amet fermentum. Praesent vel scelerisque nisl consectetur et." css=".vc_custom_1503477970913{margin-bottom: 55px !important;}"][gsf_products_exclusive product_ids="3951, 3931, 3923, 3928"][gsf_space desktop="88" tablet="70" tablet_portrait="60" mobile_landscape="50" mobile="40"][/vc_column][/vc_row][vc_row][vc_column][gsf_space desktop="95" tablet="75" tablet_portrait="65" mobile_landscape="55" mobile="45"][gsf_heading text_align="text-center" title_font_size="36" icon_image="3675" title="Do You Know About Teams?" sub_title="Meet Our Team" description="Cras mattis consectetur purus sit amet fermentum. Praesent commodo cursus magna, vel scelerisque nisl consectetur et." css=".vc_custom_1501916685464{margin-bottom: 55px !important;}"][vc_row_inner][vc_column_inner width="1/2" offset="vc_col-md-3"][gsf_our_team ourteam_avatar="3799" ourteam_position="Smoothie Bartender" socials="%5B%7B%22icon_font%22%3A%22fa%20fa-facebook%22%2C%22social_link%22%3A%22url%3A%2523%7C%7C%7C%22%7D%2C%7B%22icon_font%22%3A%22fa%20fa-twitter%22%2C%22social_link%22%3A%22url%3A%2523%7C%7C%7C%22%7D%2C%7B%22icon_font%22%3A%22fa%20fa-pinterest-p%22%2C%22social_link%22%3A%22url%3A%2523%7C%7C%7C%22%7D%2C%7B%22icon_font%22%3A%22fa%20fa-behance%22%2C%22social_link%22%3A%22url%3A%2523%7C%7C%7C%22%7D%2C%7B%22icon_font%22%3A%22fa%20fa-instagram%22%2C%22social_link%22%3A%22url%3A%2523%7C%7C%7C%22%7D%5D" ourteam_name="Veronica Anluz"][/vc_column_inner][vc_column_inner el_class="xs-mg-top-30" width="1/2" offset="vc_col-md-3"][gsf_our_team ourteam_avatar="3800" ourteam_position="Founder Oars Store" socials="%5B%7B%22icon_font%22%3A%22fa%20fa-facebook%22%2C%22social_link%22%3A%22url%3A%2523%7C%7C%7C%22%7D%2C%7B%22icon_font%22%3A%22fa%20fa-twitter%22%2C%22social_link%22%3A%22url%3A%2523%7C%7C%7C%22%7D%2C%7B%22icon_font%22%3A%22fa%20fa-pinterest-p%22%2C%22social_link%22%3A%22url%3A%2523%7C%7C%7C%22%7D%2C%7B%22icon_font%22%3A%22fa%20fa-behance%22%2C%22social_link%22%3A%22url%3A%2523%7C%7C%7C%22%7D%2C%7B%22icon_font%22%3A%22fa%20fa-instagram%22%2C%22social_link%22%3A%22url%3A%2523%7C%7C%7C%22%7D%5D" ourteam_name="Jonny Miller"][/vc_column_inner][vc_column_inner el_class="sm-mg-top-30" width="1/2" offset="vc_col-md-3"][gsf_our_team ourteam_avatar="3801" ourteam_position="Senior UI/UX Design" socials="%5B%7B%22icon_font%22%3A%22fa%20fa-facebook%22%2C%22social_link%22%3A%22url%3A%2523%7C%7C%7C%22%7D%2C%7B%22icon_font%22%3A%22fa%20fa-twitter%22%2C%22social_link%22%3A%22url%3A%2523%7C%7C%7C%22%7D%2C%7B%22icon_font%22%3A%22fa%20fa-pinterest-p%22%2C%22social_link%22%3A%22url%3A%2523%7C%7C%7C%22%7D%2C%7B%22icon_font%22%3A%22fa%20fa-behance%22%2C%22social_link%22%3A%22url%3A%2523%7C%7C%7C%22%7D%2C%7B%22icon_font%22%3A%22fa%20fa-instagram%22%2C%22social_link%22%3A%22url%3A%2523%7C%7C%7C%22%7D%5D" ourteam_name="Karren gillan"][/vc_column_inner][vc_column_inner el_class="sm-mg-top-30" width="1/2" offset="vc_col-md-3"][gsf_our_team ourteam_avatar="3802" ourteam_position="Developer" socials="%5B%7B%22icon_font%22%3A%22fa%20fa-facebook%22%2C%22social_link%22%3A%22url%3A%2523%7C%7C%7C%22%7D%2C%7B%22icon_font%22%3A%22fa%20fa-twitter%22%2C%22social_link%22%3A%22url%3A%2523%7C%7C%7C%22%7D%2C%7B%22icon_font%22%3A%22fa%20fa-pinterest-p%22%2C%22social_link%22%3A%22url%3A%2523%7C%7C%7C%22%7D%2C%7B%22icon_font%22%3A%22fa%20fa-behance%22%2C%22social_link%22%3A%22url%3A%2523%7C%7C%7C%22%7D%2C%7B%22icon_font%22%3A%22fa%20fa-instagram%22%2C%22social_link%22%3A%22url%3A%2523%7C%7C%7C%22%7D%5D" ourteam_name="dominic pursay"][/vc_column_inner][/vc_row_inner][gsf_space desktop="90" tablet="70" tablet_portrait="60" mobile_landscape="50" mobile="40"][/vc_column][/vc_row][vc_row color_skin="skin-dark" bg_overlay_mode="color" bg_overlay_color="rgba(33,33,33,0.8)" css=".vc_custom_1501914843013{background-image: url(http://demo.g5plus.net/test/wp-content/uploads/2017/08/bg-testimonials-3.jpg?id=3792) !important;background-position: center !important;background-repeat: no-repeat !important;background-size: cover !important;}"][vc_column][gsf_space desktop="100" tablet="80" tablet_portrait="70" mobile_landscape="60" mobile="50"][gsf_heading text_align="text-center" title_font_size="36" icon_image="3675" title="What Our Customer Saying?" sub_title="Testimonials" description="Cras mattis consectetur purus sit amet fermentum. Praesent commodo cursus magna, vel scelerisque nisl consectetur et." css=".vc_custom_1501914517001{margin-bottom: 50px !important;}"][gsf_testimonials layout_style="style-03" _columns="2" values="%5B%7B%22author_bio%22%3A%22It%20is%20a%20long%20established%20fact%20that%20a%20reader%20will%20be%20distracted%20by%20the%20readable%20content%20of%20a%20page%20when%20looking%20at%20its%20layout.%22%2C%22author_name%22%3A%22Michael%20Walker%22%2C%22author_job%22%3A%22Social%20Marketing%22%2C%22author_avatar%22%3A%223787%22%2C%22author_link%22%3A%22%23%22%7D%2C%7B%22author_bio%22%3A%22It%20is%20a%20long%20established%20fact%20that%20a%20reader%20will%20be%20distracted%20by%20the%20readable%20content%20of%20a%20page%20when%20looking%20at%20its%20layout.%22%2C%22author_name%22%3A%22Mourinho%22%2C%22author_job%22%3A%22Seo%22%2C%22author_avatar%22%3A%223788%22%2C%22author_link%22%3A%22%23%22%7D%2C%7B%22author_bio%22%3A%22It%20is%20a%20long%20established%20fact%20that%20a%20reader%20will%20be%20distracted%20by%20the%20readable%20content%20of%20a%20page%20when%20looking%20at%20its%20layout.%22%2C%22author_name%22%3A%22Albert%20Huynaya%22%2C%22author_job%22%3A%22Smoothie%20Bartender%22%2C%22author_avatar%22%3A%223789%22%7D%2C%7B%22author_bio%22%3A%22It%20is%20a%20long%20established%20fact%20that%20a%20reader%20will%20be%20distracted%20by%20the%20readable%20content%20of%20a%20page%20when%20looking%20at%20its%20layout.%22%2C%22author_name%22%3A%22Cris%20Horwang%22%2C%22author_job%22%3A%22Landscape%22%2C%22author_avatar%22%3A%223790%22%7D%2C%7B%22author_bio%22%3A%22It%20is%20a%20long%20established%20fact%20that%20a%20reader%20will%20be%20distracted%20by%20the%20readable%20content%20of%20a%20page%20when%20looking%20at%20its%20layout.%22%2C%22author_name%22%3A%22Michael%20Walker%22%2C%22author_job%22%3A%22Social%20Marketing%22%2C%22author_avatar%22%3A%223787%22%2C%22author_link%22%3A%22%23%22%7D%2C%7B%22author_bio%22%3A%22It%20is%20a%20long%20established%20fact%20that%20a%20reader%20will%20be%20distracted%20by%20the%20readable%20content%20of%20a%20page%20when%20looking%20at%20its%20layout.%22%2C%22author_name%22%3A%22Albert%20Huynaya%22%2C%22author_job%22%3A%22Smoothie%20Bartender%22%2C%22author_avatar%22%3A%223789%22%7D%2C%7B%22author_bio%22%3A%22It%20is%20a%20long%20established%20fact%20that%20a%20reader%20will%20be%20distracted%20by%20the%20readable%20content%20of%20a%20page%20when%20looking%20at%20its%20layout.%22%2C%22author_name%22%3A%22Mourinho%22%2C%22author_job%22%3A%22Seo%22%2C%22author_avatar%22%3A%223788%22%2C%22author_link%22%3A%22%23%22%7D%2C%7B%22author_bio%22%3A%22It%20is%20a%20long%20established%20fact%20that%20a%20reader%20will%20be%20distracted%20by%20the%20readable%20content%20of%20a%20page%20when%20looking%20at%20its%20layout.%22%2C%22author_name%22%3A%22Cris%20Horwang%22%2C%22author_job%22%3A%22Landscape%22%2C%22author_avatar%22%3A%223790%22%7D%5D" items_rows="2" dots="on"][gsf_space desktop="100" tablet="80" tablet_portrait="70" mobile_landscape="60" mobile="50"][/vc_column][/vc_row][vc_row][vc_column][gsf_space desktop="95" tablet="70" tablet_portrait="60" mobile_landscape="50" mobile="40"][gsf_heading text_align="text-center" title_font_size="36" icon_image="3675" title="Latest News From Blog" sub_title="Our Blog News" description="Cras mattis consectetur purus sit amet fermentum. Praesent commodo cursus magna, vel scelerisque nisl consectetur et." css=".vc_custom_1503559144517{margin-bottom: 55px !important;}"][gsf_posts source="recent" posts_per_page="6" is_slider="on" columns="3" columns_md="2" columns_sm="2" columns_xs="1" columns_mb="1"][gsf_space desktop="90" tablet="70" tablet_portrait="60" mobile_landscape="50" mobile="40"][/vc_column][/vc_row][vc_row color_skin="skin-light" equal_height="yes" content_placement="middle" css=".vc_custom_1507023500756{border-bottom-width: 1px !important;padding-top: 50px !important;padding-bottom: 62px !important;background-image: url(http://demo.g5plus.net/test/wp-content/uploads/2017/09/bg-subcribe-2.png?id=4373) !important;background-position: center !important;background-repeat: no-repeat !important;background-size: cover !important;border-bottom-color: #e8dac7 !important;border-bottom-style: solid !important;}"][vc_column width="5/12"][gsf_heading title_font_size="36" heading_below="none" el_class="xs-mg-bottom-20" title="Subscribe Newsletter" sub_title="Subscribe"][/vc_column][vc_column width="7/12"][vc_column_text css=".vc_custom_1501743674603{margin-bottom: 0px !important;}"][mc4wp_form id="3766"][/vc_column_text][/vc_column][/vc_row][vc_row color_skin="skin-light" equal_height="yes" content_placement="bottom" css=".vc_custom_1507022436782{background-color: #f5fcf9 !important;}"][vc_column el_class="col-md-push-7" offset="vc_col-md-5"][gsf_space desktop="90" tablet="70" tablet_portrait="60" mobile_landscape="50" mobile="40"][gsf_heading title_font_size="36" icon_image="3675" title="Why we are the best" sub_title="What is Oars Store?" description="Cras mattis consectetur purus sit amet fermentum. Praesent vel scelerisque nisl consectetur et." css=".vc_custom_1504841972792{margin-bottom: 43px !important;}"][vc_tta_accordion color="transparent" gap="15" c_icon="arrows" active_section="1"][vc_tta_section title="Get creative with courgettes" tab_id="1504839949406-0986f5e7-c193dfb3-a012"][vc_column_text el_class="fs-16"]Ut fermentum massa justo sit amet risus tellus ac cursus commodo, tortor mauris condimentum nibh, ut fermentum massa.[/vc_column_text][/vc_tta_section][vc_tta_section title="Italian style meatballs with courgette ‘tagliatelle’" tab_id="1504840516750-f0b2faa6-1bc6dfb3-a012"][vc_column_text el_class="fs-16"]Ut fermentum massa justo sit amet risus tellus ac cursus commodo, tortor mauris condimentum nibh, ut fermentum massa.[/vc_column_text][/vc_tta_section][vc_tta_section title="How to fillet round fish (mackerel, trout, etc.)" tab_id="1504840507606-5dd91b77-8c64dfb3-a012"][vc_column_text el_class="fs-16"]Ut fermentum massa justo sit amet risus tellus ac cursus commodo, tortor mauris condimentum nibh, ut fermentum massa.[/vc_column_text][/vc_tta_section][vc_tta_section title="Irish fish chowder with soda bread" tab_id="1504840505582-e7ec7ea5-15d2dfb3-a012"][vc_column_text el_class="fs-16"]Ut fermentum massa justo sit amet risus tellus ac cursus commodo, tortor mauris condimentum nibh, ut fermentum massa.[/vc_column_text][/vc_tta_section][vc_tta_section title="Equipment you will need for this technique" tab_id="1504840504942-b868ed68-ce7fdfb3-a012"][vc_column_text el_class="fs-16"]Ut fermentum massa justo sit amet risus tellus ac cursus commodo, tortor mauris condimentum nibh, ut fermentum massa.[/vc_column_text][/vc_tta_section][/vc_tta_accordion][gsf_space desktop="107" tablet="90" tablet_portrait="80" mobile_landscape="70" mobile="60"][/vc_column][vc_column el_class="col-md-pull-5" offset="vc_col-md-7"][vc_single_image image="4271" img_size="full" css=".vc_custom_1504842470882{margin-bottom: 0px !important;margin-left: -45px !important;}"][/vc_column][/vc_row]
BUILDING ONEPAGE
Home OnePage aims to focus the user's attention to the content that they want. When you choose an item on Main Menu of OnePage, it immediately navigates to the section that you've chosen.
If you want to build your Home OnePage please consult our guide below:
Step 1 - You just have to create a Menu with Links as items.
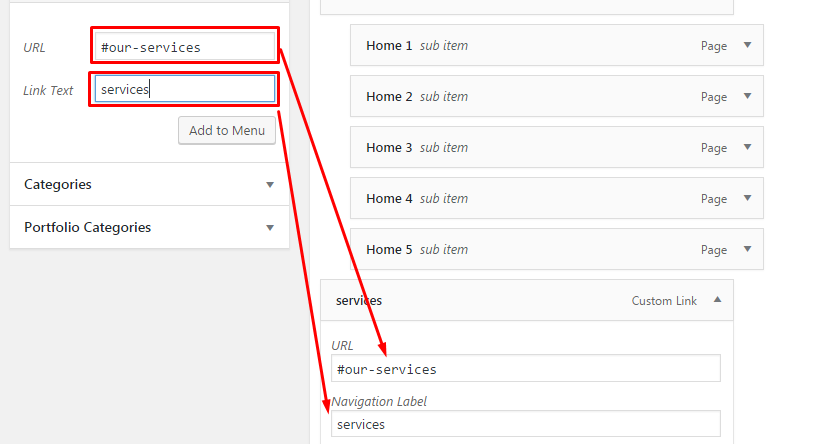
Step 2 - Go to your homepage, anywhere you want the menu item to navigate to section, please edit row by Visual Composer and type id on field: Row ID (make sure that the Row ID is the same as menu item URL)
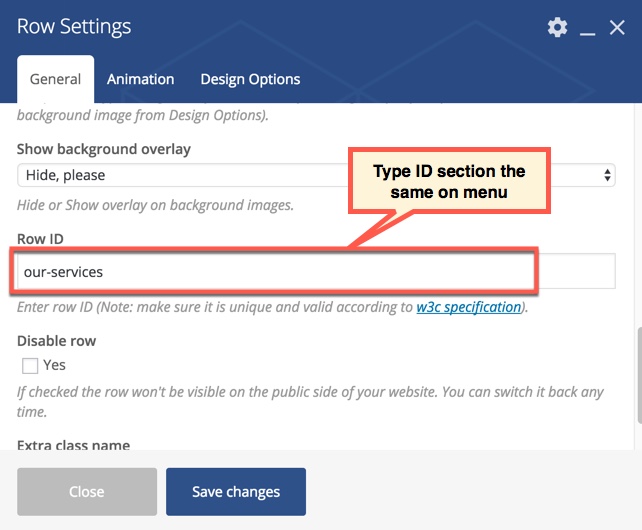
Step 3 - After building content to your Homepage, scroll down to Page Settings area to choose style of page is OnePage
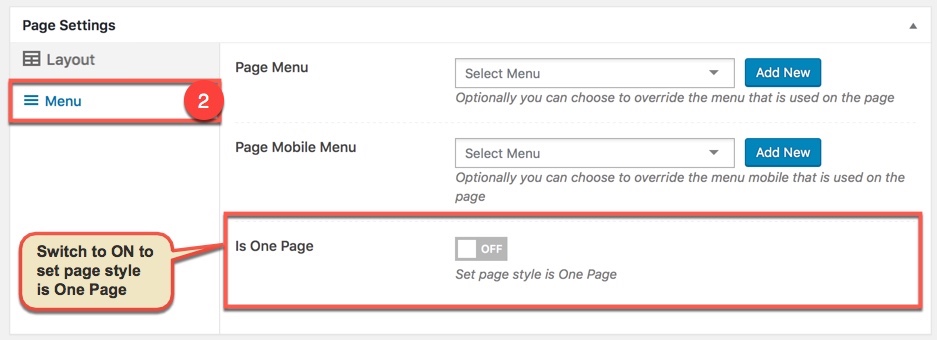
You could please consult our video guide on How to build OnePage (We use ORSON theme for example but this process is similar to the process of building OnePage on OARS theme).
Video guide on How to build one page (Ex: ORSON Theme)
BUILD AN EXAMPLE HOMEPAGE
THIS IS STEP BY STEP GUIDE ON HOW TO BUILD HOMEPAGE MANUALLY FOR HOME 1
Note: You need Wordpress, OARS theme & all required plugins are already. Building other homepages process are similar.
I. OVERVIEW ELEMENTS AREA ON PAGE
You can setup options in Theme Options (which will affect to entire website) or create a new Preset and apply to any page. Please consult this video guide on How to build Header Area. This process is similar to building Header Area on OARS theme.
The screenshot below is an header area:
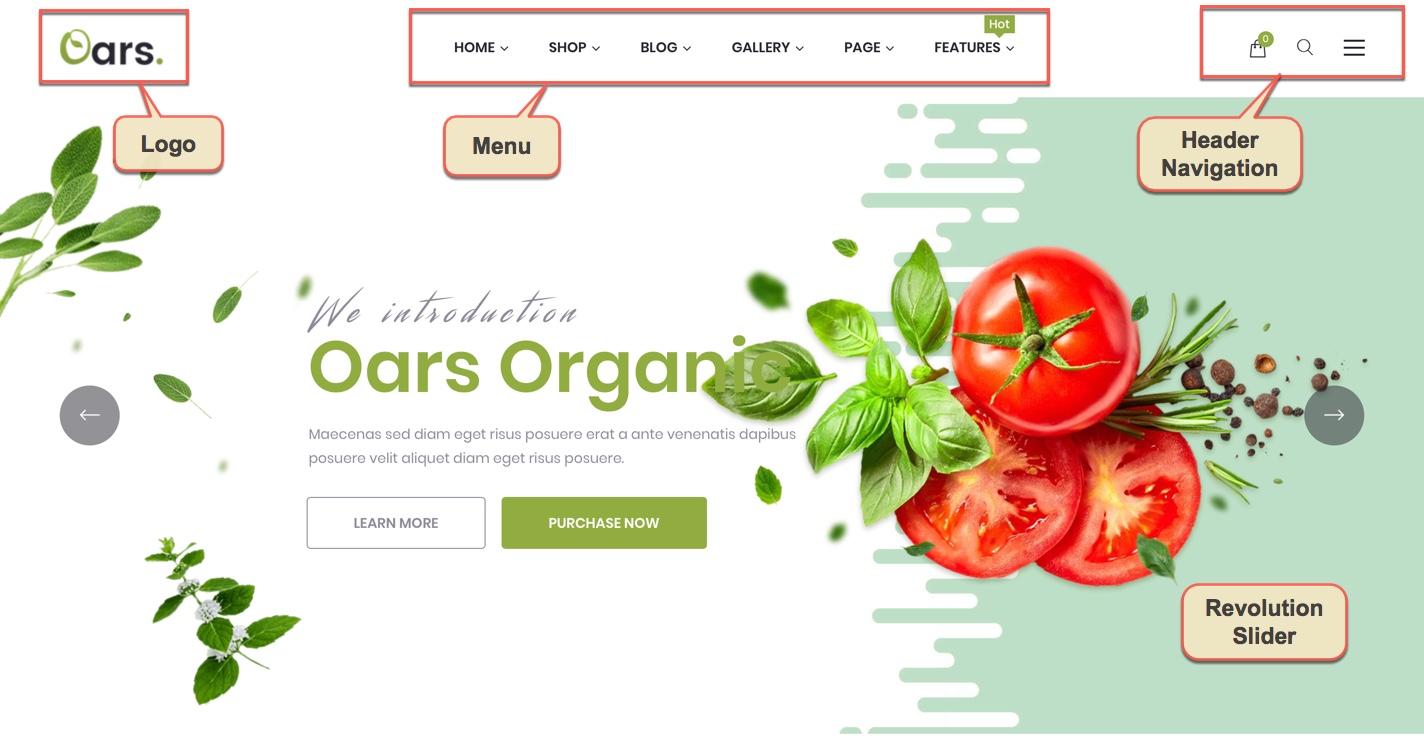
II. BUILD HEADER AREA
You can setup options in Theme Options (which will affect to entire website) or create a new Preset and apply to any page. Please consult this video guide on How to build Header Area. This process is similar to building Header Area on OARS theme.
The screenshot below is an header area:
Canvas Sidebar on the frontend
1.1 Setting header
If you want apply this header to all your pages, setup by going to Theme Options → Header tab, In case you only want to apply this header for some pages/posts such as homepage, please create a new Preset then setup options for Header Area as your liking as below. (You can consult Preset Options section for more details in use Preset)

Canvas Sidebar on the frontend
1.2 Add widget to Canvans Sidebar
As you see in Header Options we has choose Canvans Menu to display in Header Navigation, so in this section we will show you how to build Canvas sidebar.
Header Options tab in Preset
From WP dashboard, go to Appearance → Widgets
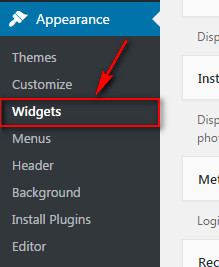
Header Options tab in Preset
Drag and drop widgets as below to Canvas Sidebar area:
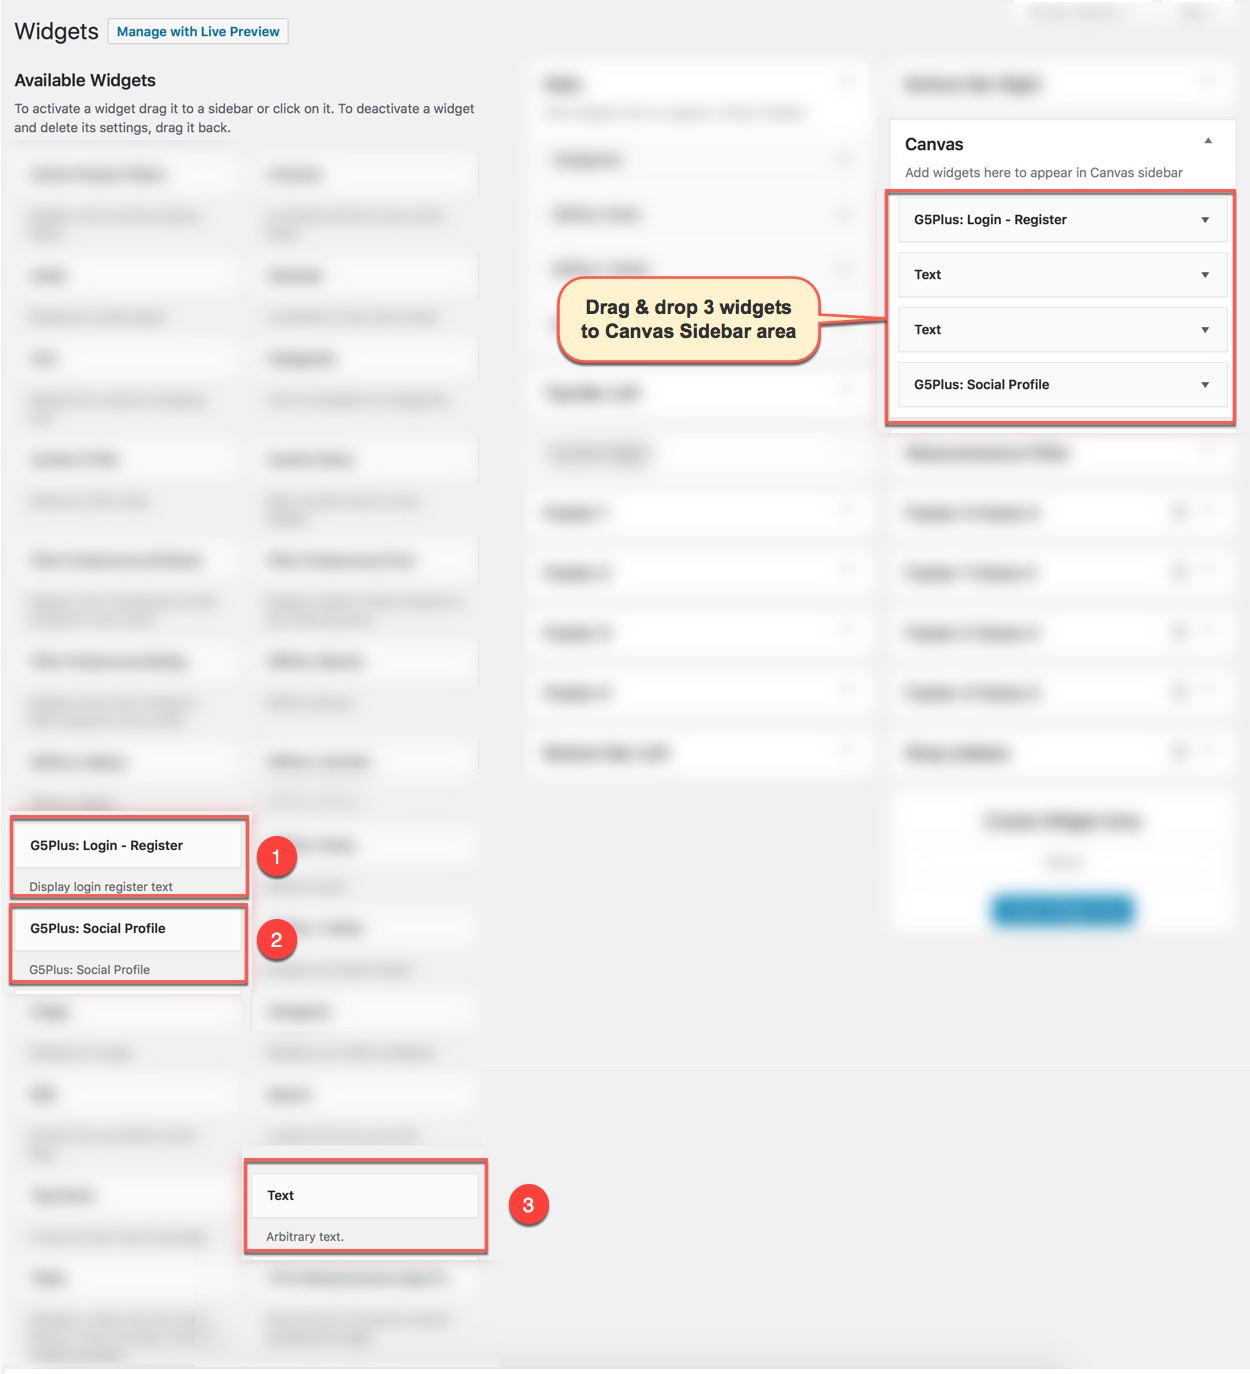
Add widgets to Canvas Sidebar
Update content to these widget as below:
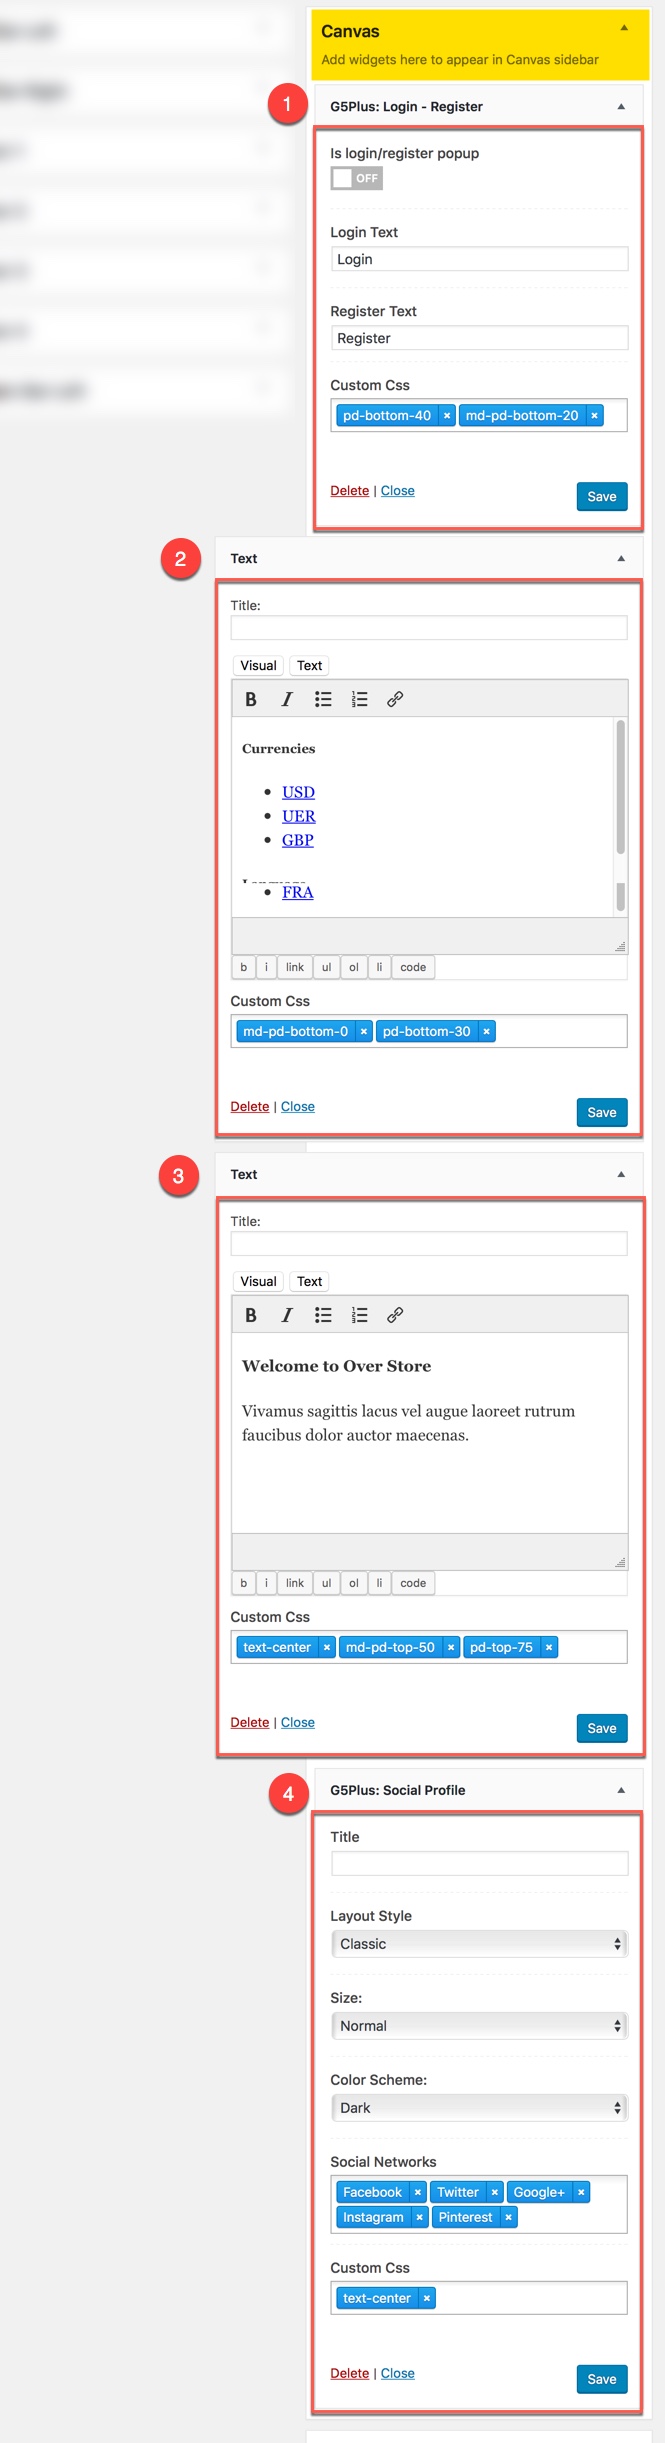
Setup for widgets in Canvas Sidebar widget area
1.3 Upload logo
Go to Theme Options → Logo tab, then change logo (please read detailed description below each item before upload):
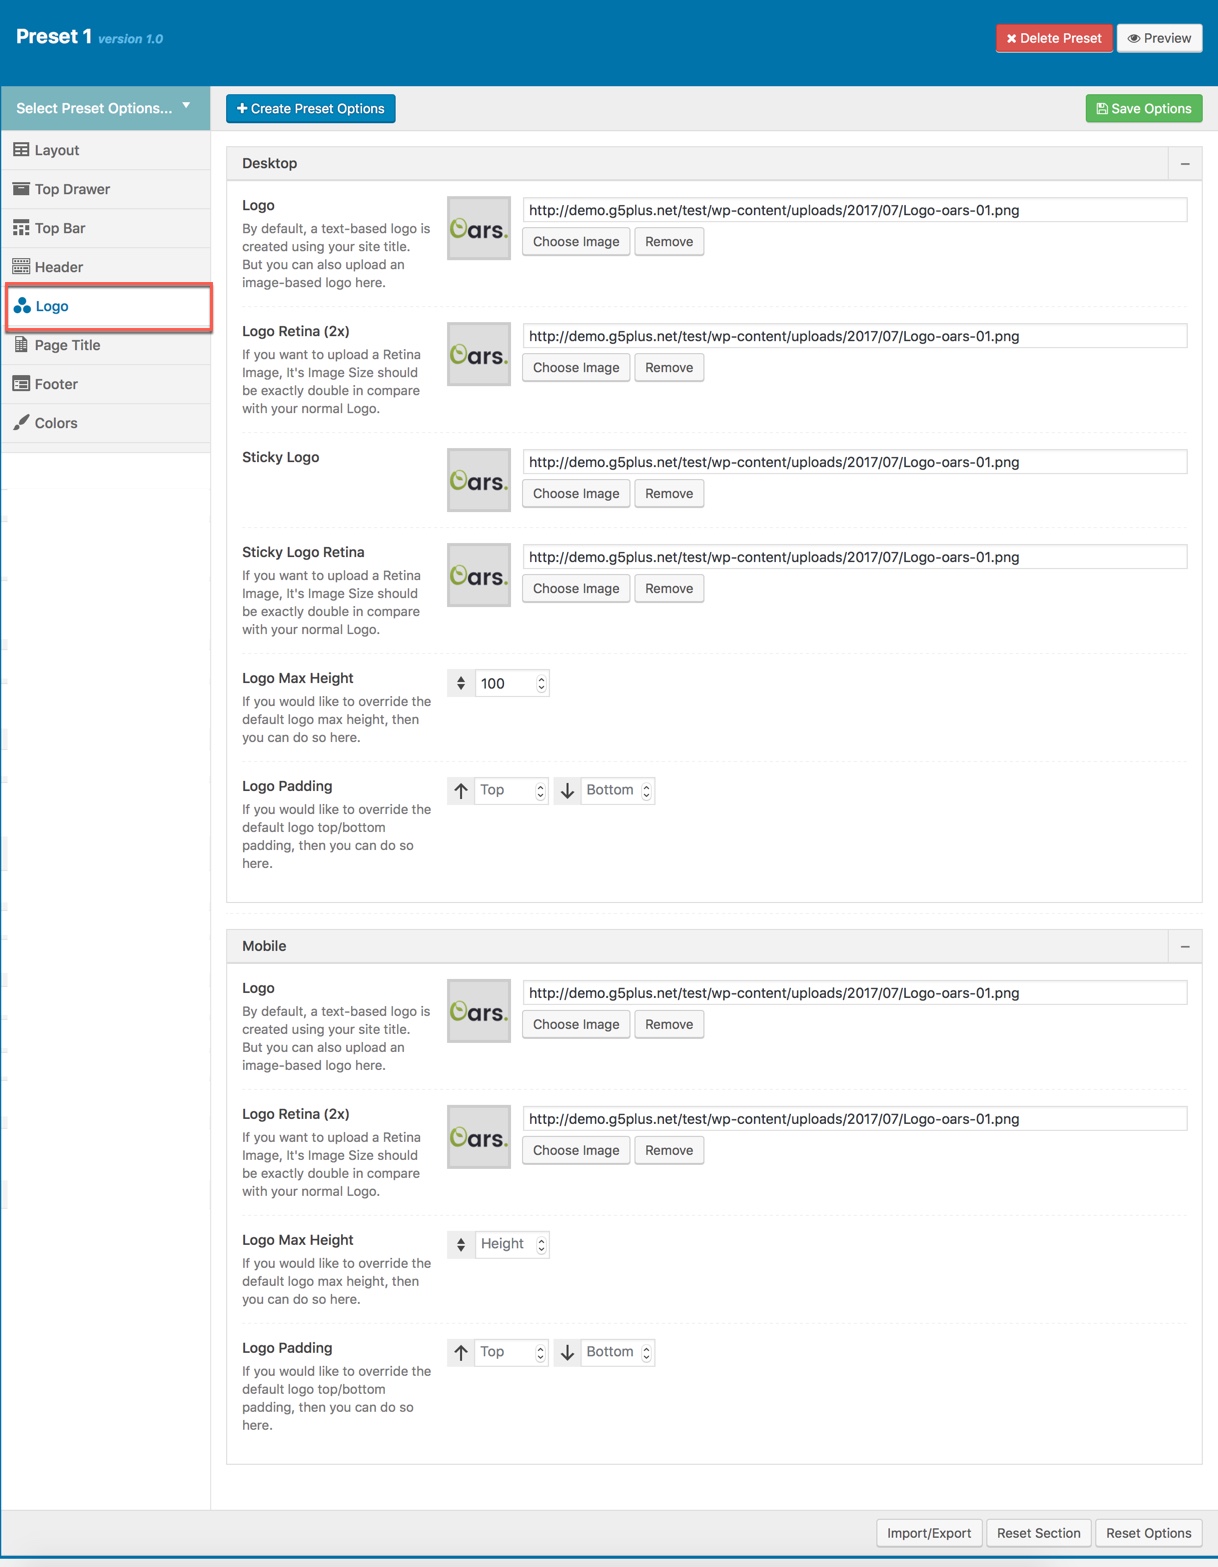
Logo Options tab in Preset
1.4 Create menu
The menu is one of the most important elements of the site. It provides your visitors with the information about site structure. If your menu has well-thought and conveniently grouped elements, you visitors will be able to find the needed section easily. You can also consult Mega Menu section to build an attractive menu by your own.
Navigate to Appearance → Menus section to manage all menus on your site and do follow as below screenshot:
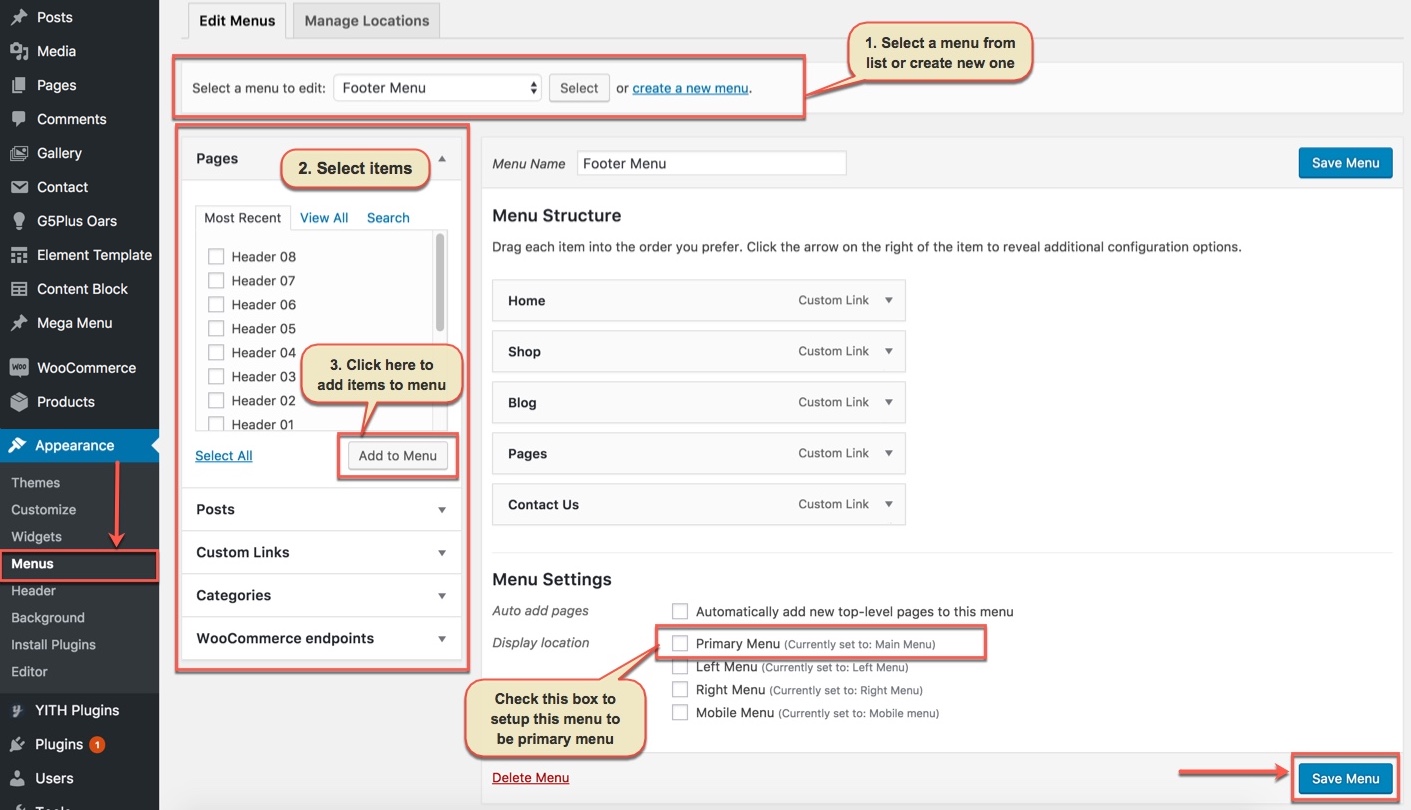
Appearance → Menus
In the Menu Settings section, click to Primary Menu to setup this menu to be the main site menu and is used almost in all header styles and menu locations.
If you want to extra more fields to add to your menu, you can click on Screen Options and select:
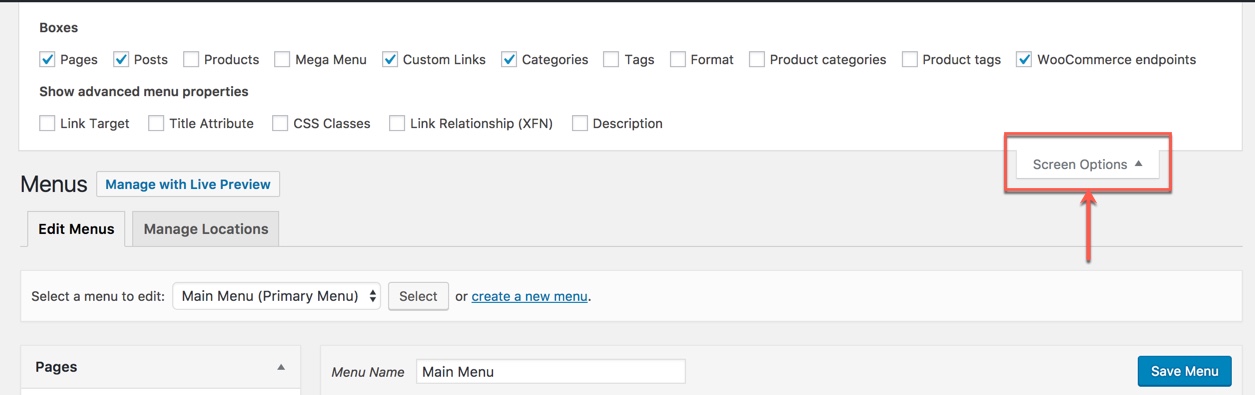
Extra fields to add to menu
Finally, don't forget to Save Menu after everything is set properly and check it on the site.
II. BUILD FOOTER AREA
The screenshot below is demo Footer Area on the frontend
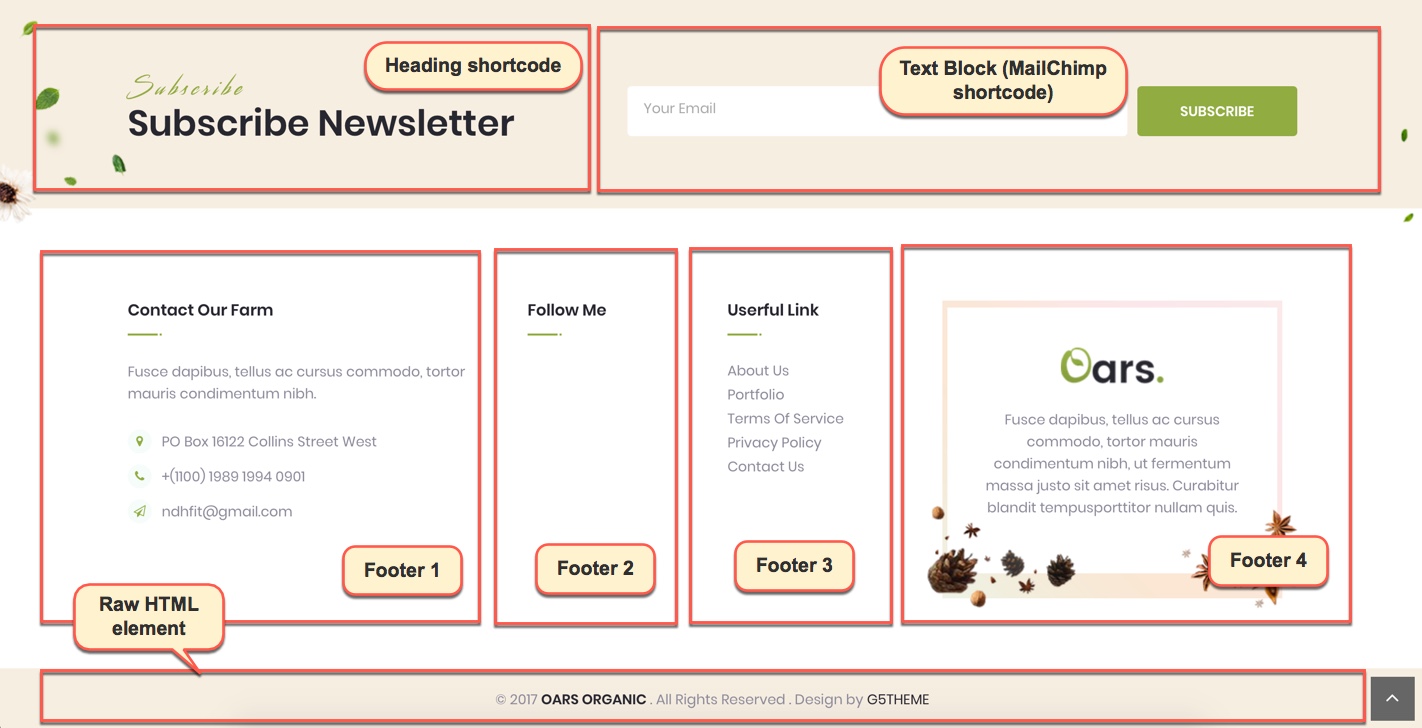
Extra fields to add to menu
2.1 Add widgets to FOOTER 1 area
Go to Widget Manager
Add Text widget and G5Plus: Infor Box widget to Footer 1 area
1. Add Text widget to Footer 1 area and setup as below:
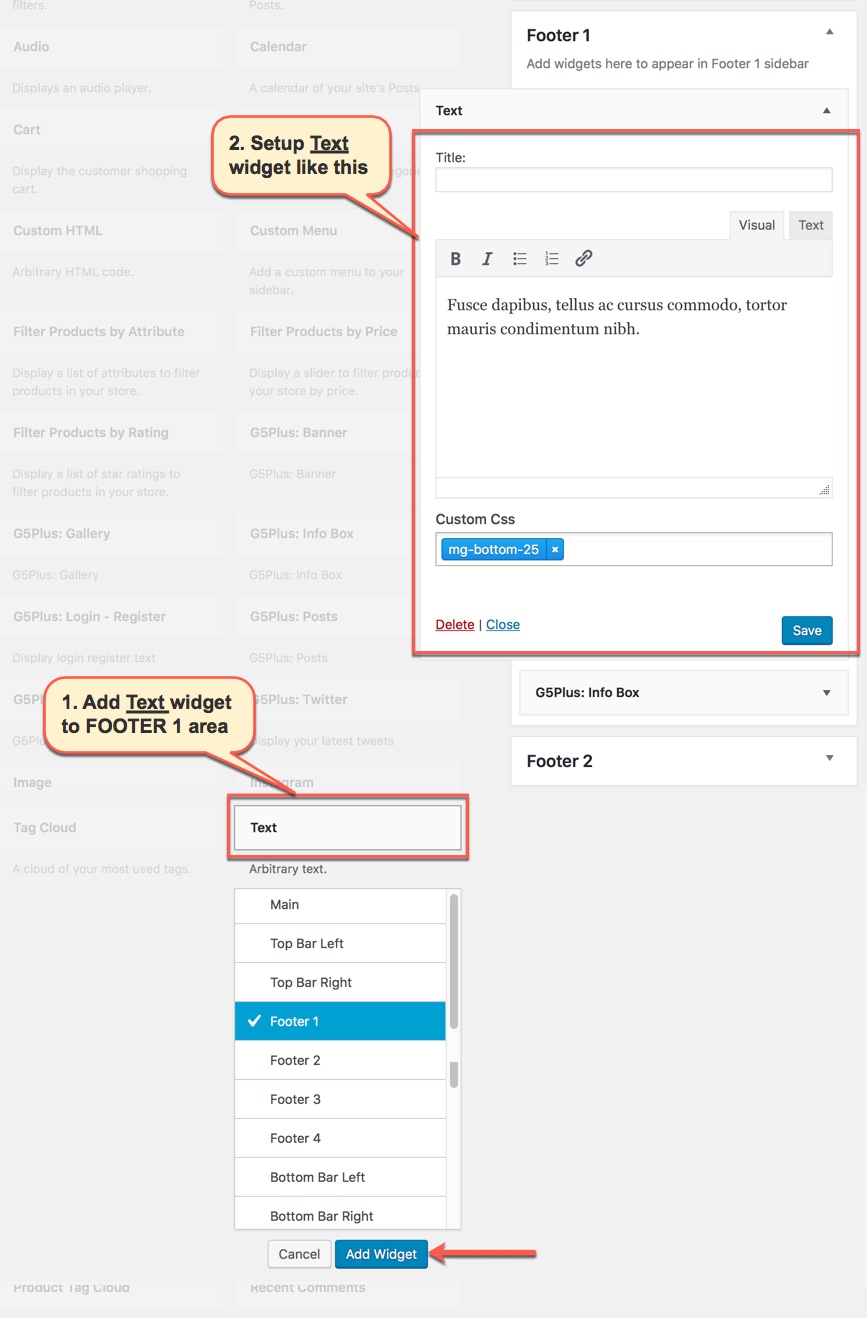
2. Add G5Plus: Info Box widget to Footer 1 area and setup as below:
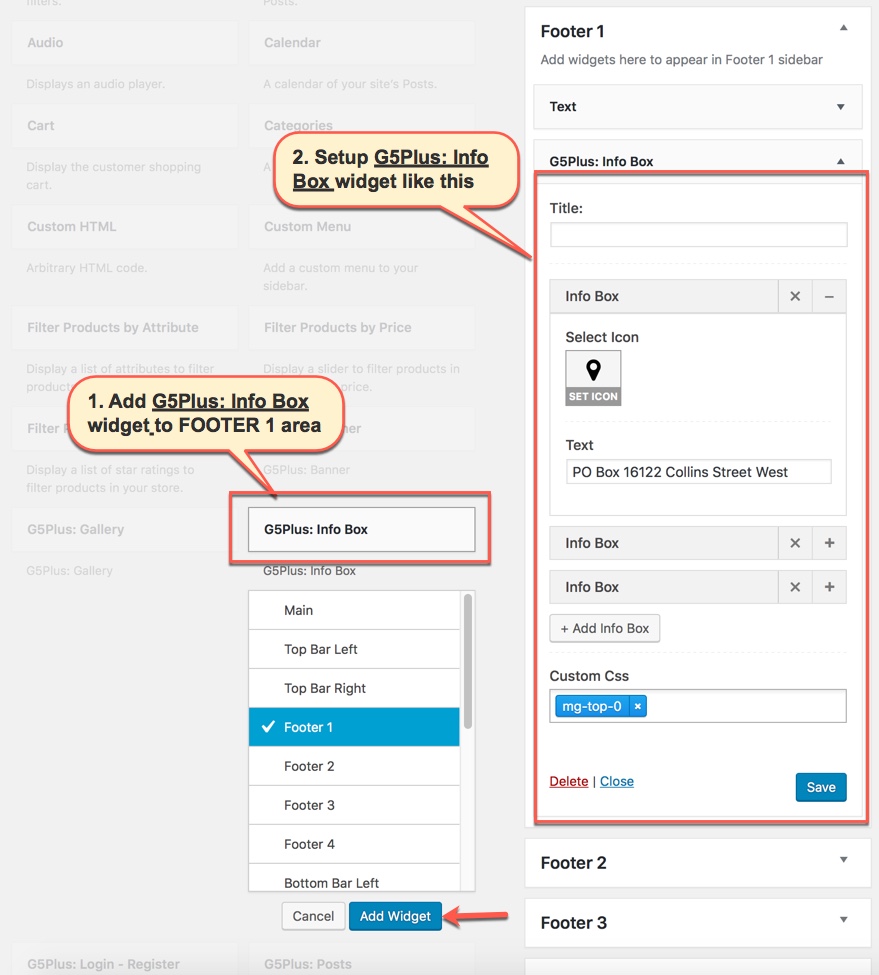
2.2 Add widgets to FOOTER 2 area
Add G5Plus: Social Profile widget to FOOTER 2 widget area
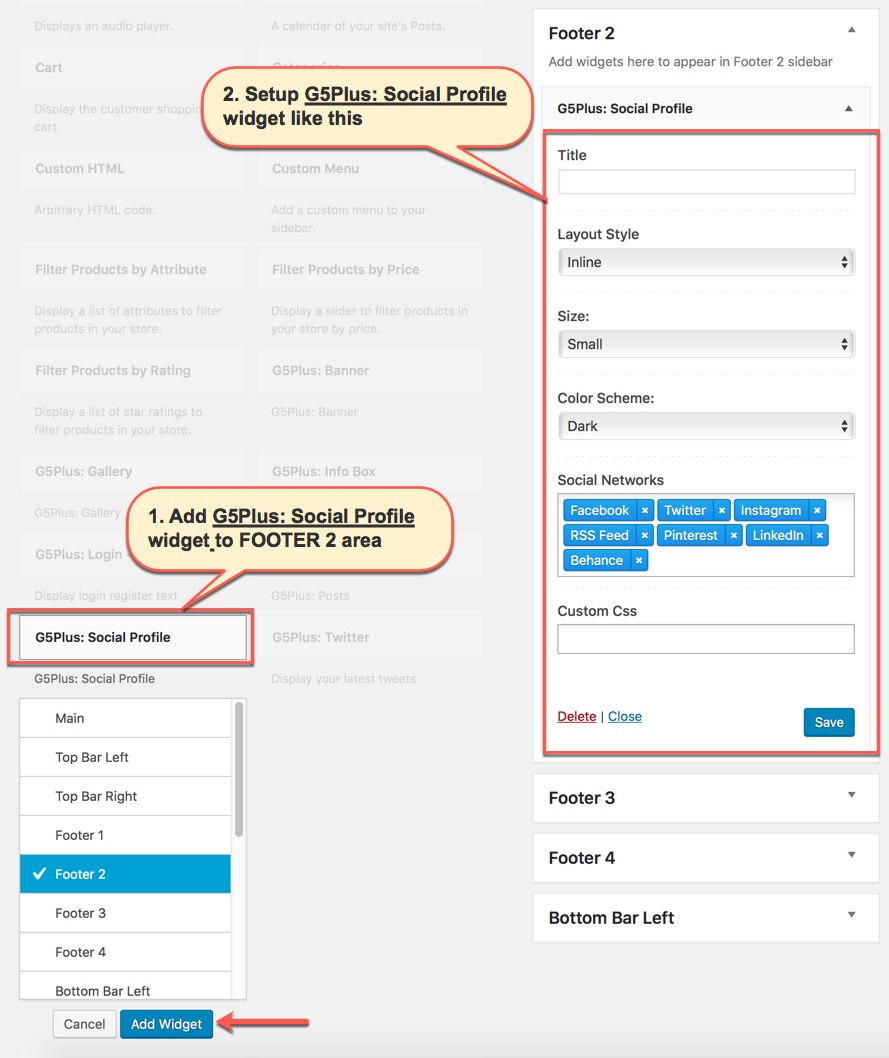
2.3 Add Widgets to FOOTER 3 area
Similar to FOOTER 2 widget area, we add Custom Menu widget to FOOTER 3 widget area:
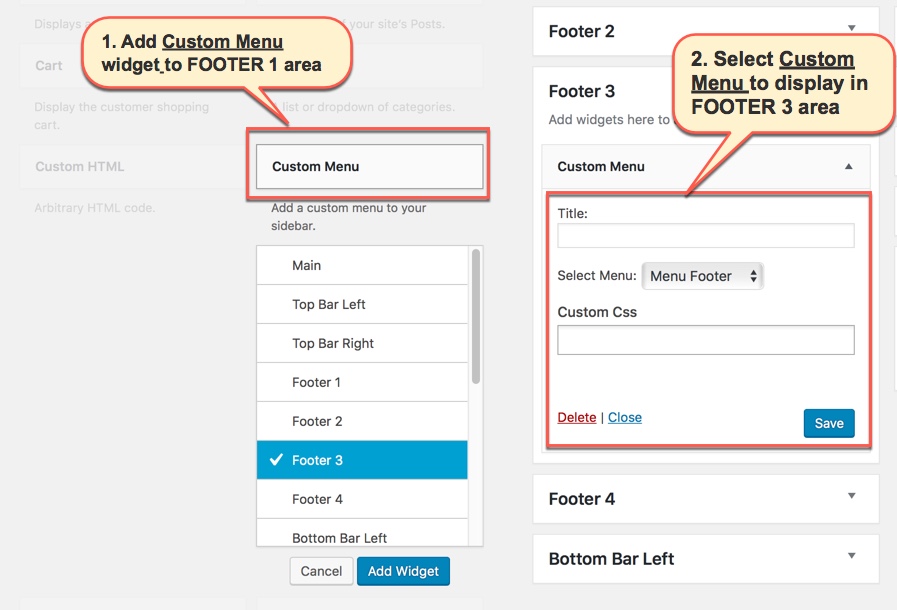
2.4 Add Widgets to FOOTER 4 area
Add G5Plus: Banner widget and Text widget and G5Plus: Social Profile to Footer 4 area
1. Add G5Plus: Banner widget:
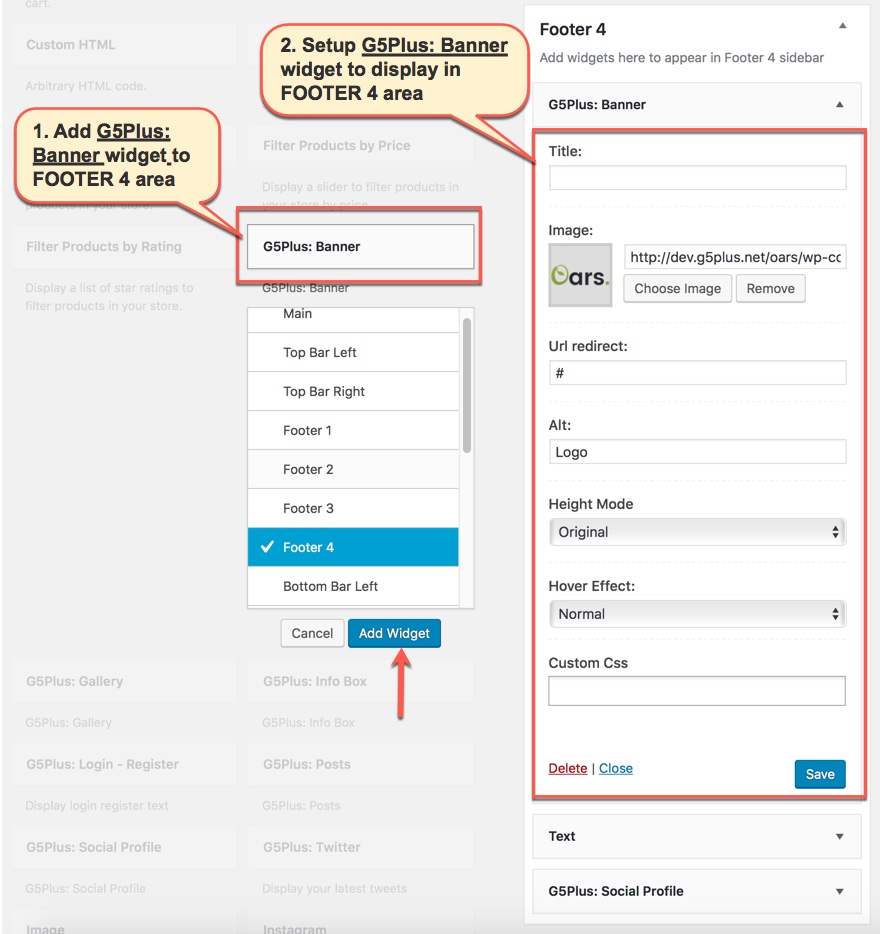
2. Add Text widget:

3. Add G5Plus: Social Profile widget:
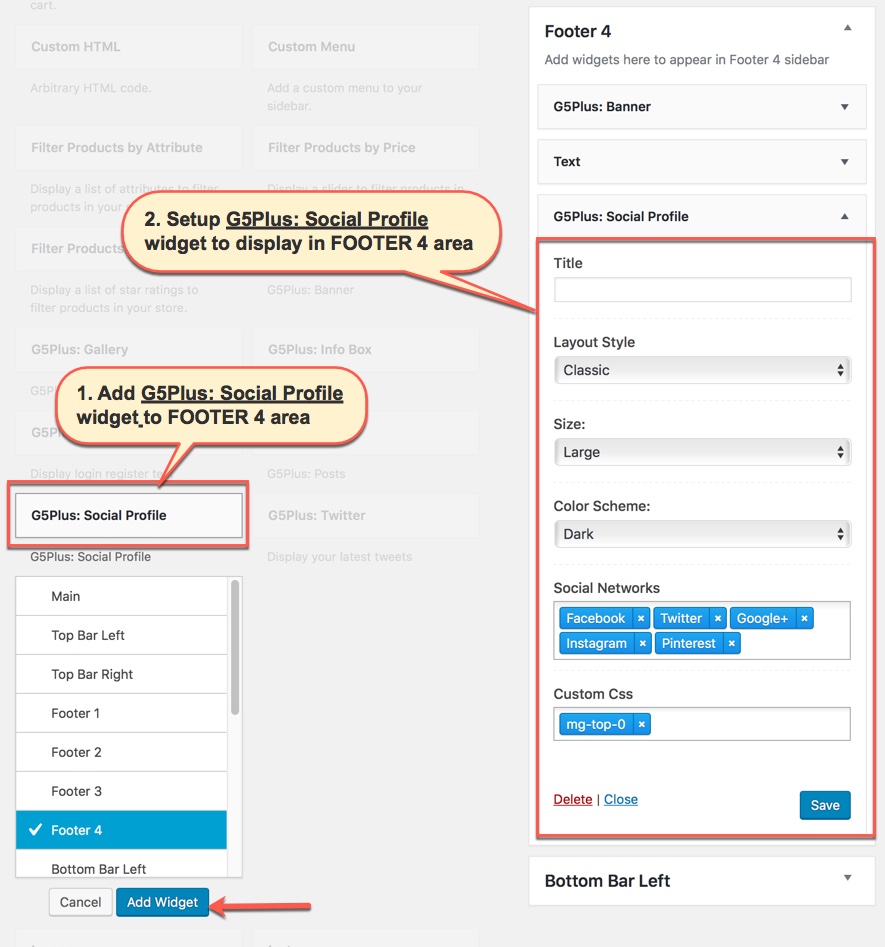
Notice: You can create a new widget simply like this:
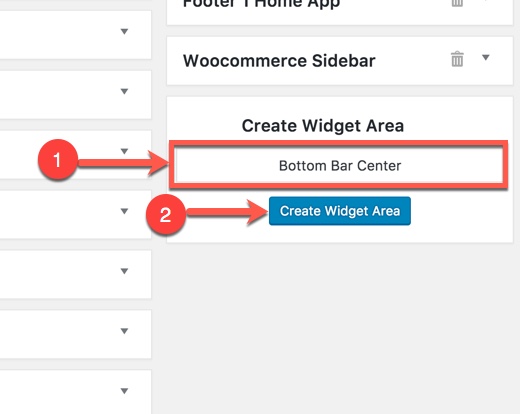
2.5 Settings Footer
Add New Content Block for Footer area
You can use Visual Composer elements/shortcodes/templates to build your Footer Area as your liking
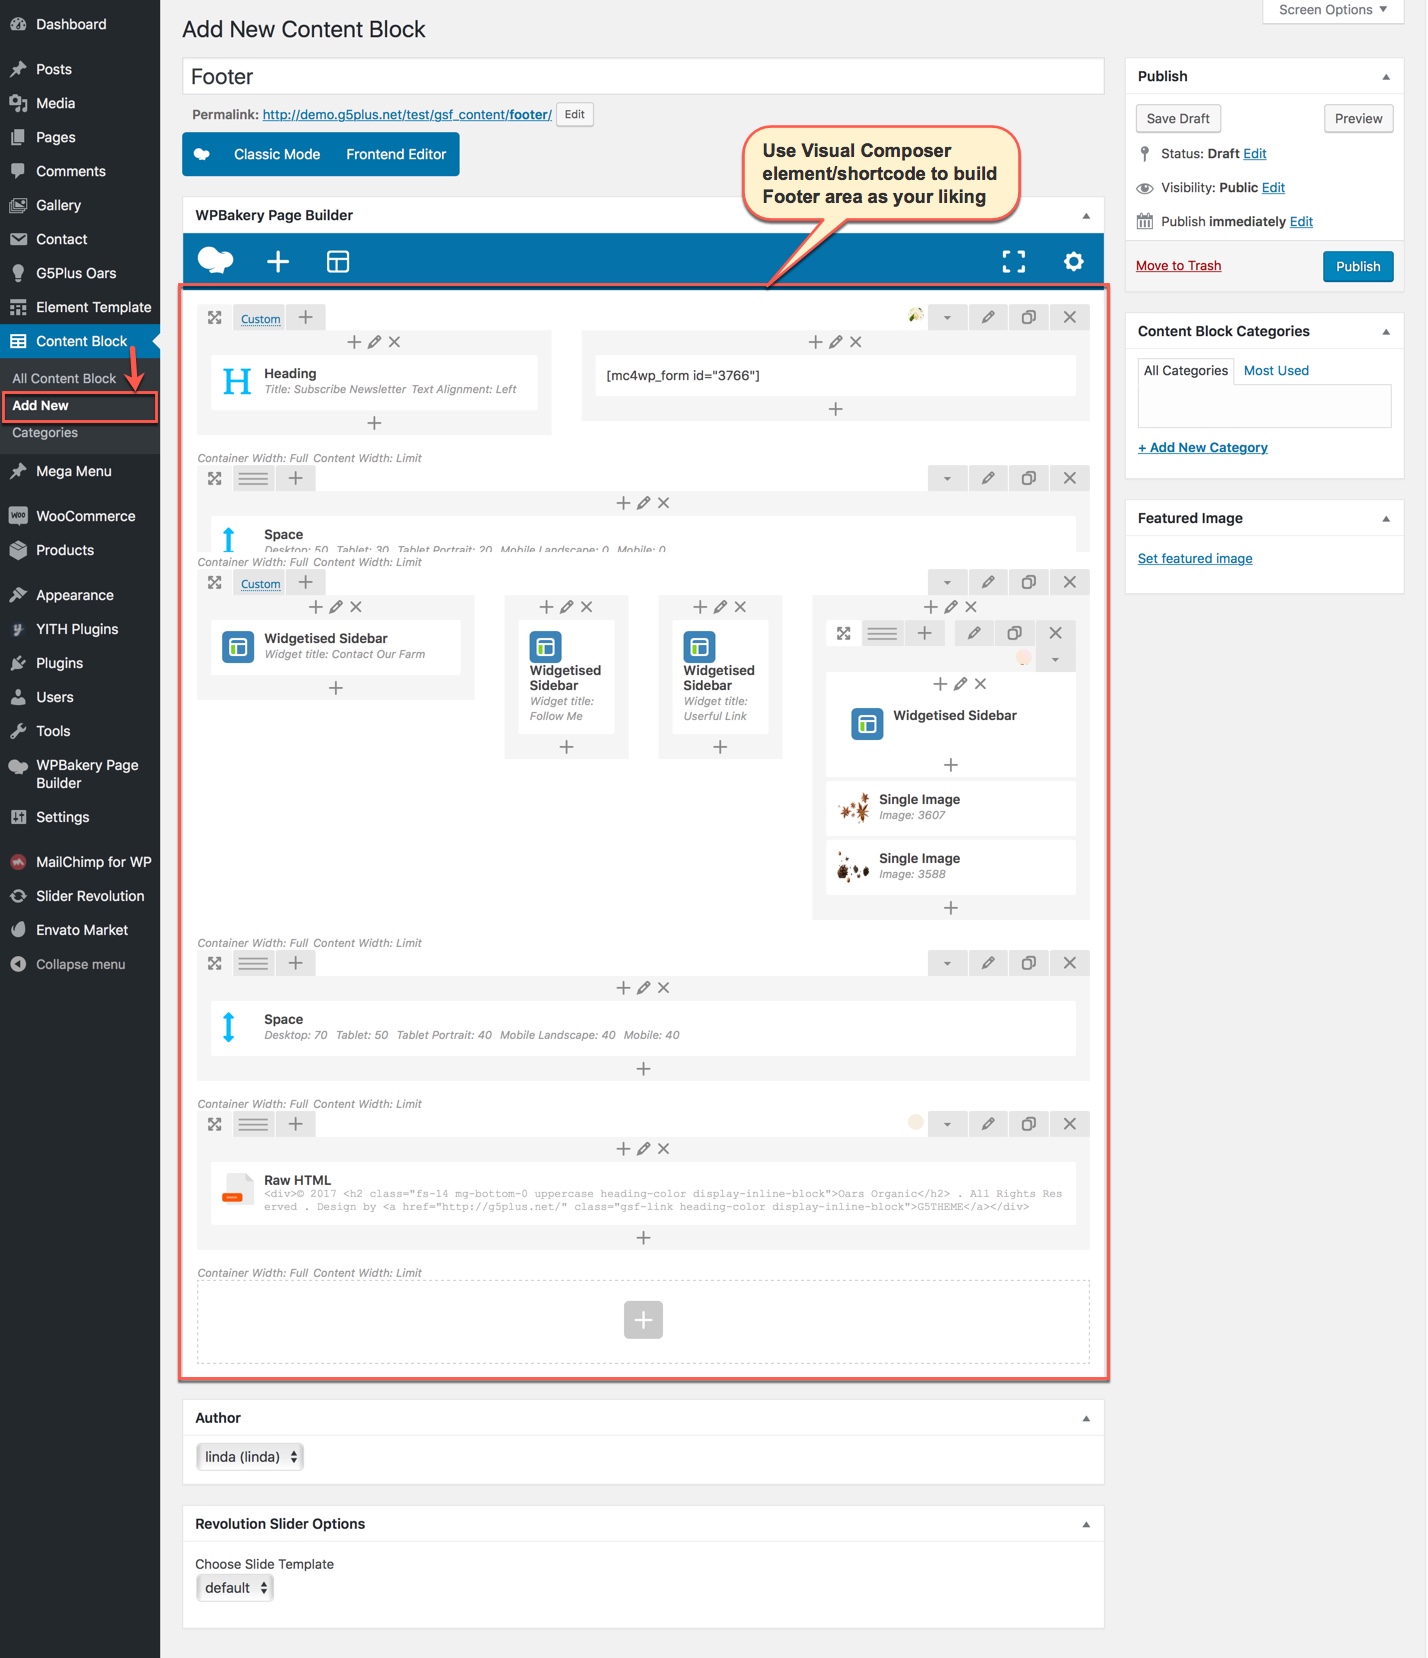
Add New Content Block for Footer area
In this Content Block, We use shortcode of Mailchimp form to add to Text Block shortcode (Please consult Mailchimp Settings section for more details about this shortcode) and Widgetised Sidebar in Visual Composer to build Content Block and apply to Footer area.
Specify the Content Block to use as a footer content in Theme Options
Go to Theme Options → Footer tab, then setup general options for Footer area and specify the Content Block to use as a footer content. In case you only want to apply this Footer for some pages/posts such as homepage, you need to create a new Preset then setup options for Footer Area as your liking as below. (You can consult Preset Options section for more details in use Preset)
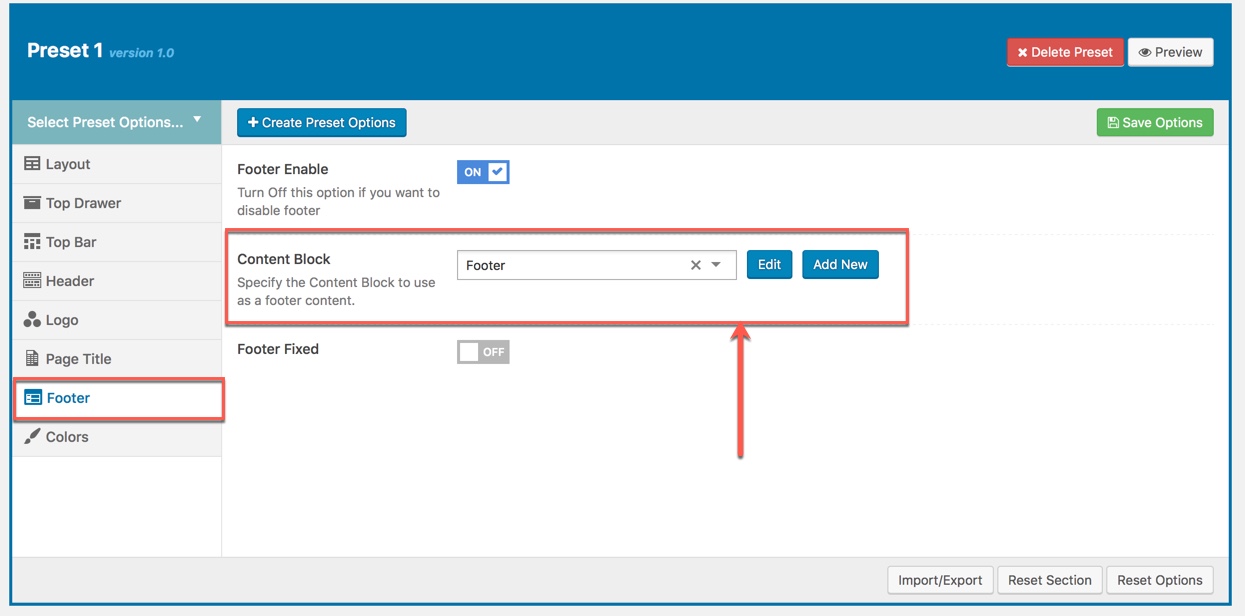
Footer Settings in Preset
CONTACT FORM
You can do step by step as image below to build contact form
Add New Contact Form
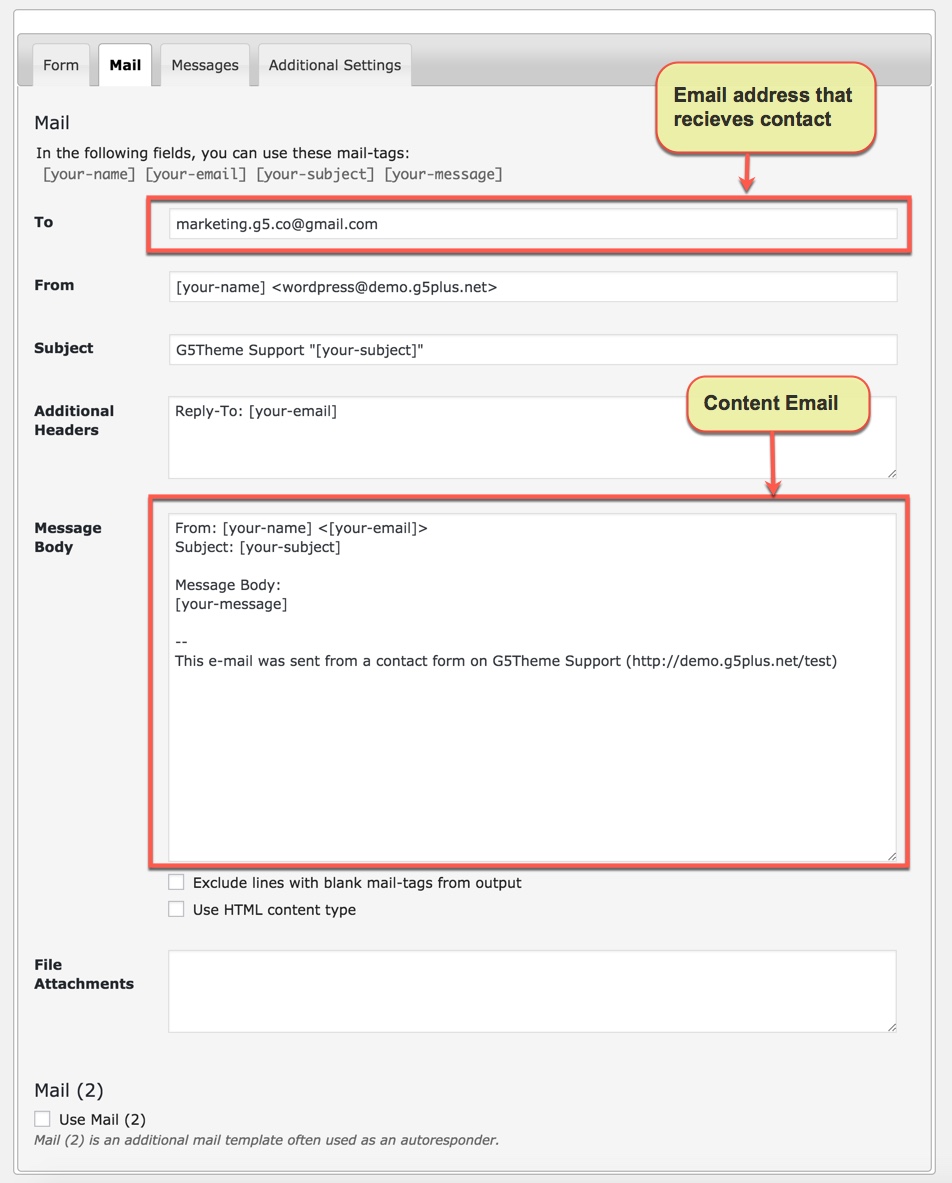
You can visit Contact Form 7 Plugin to further details. Or copy and paste content to Form field like this:
Example Value Content for Contact Form
<div class="g5plus-contact-form contact text-center">
	<label> Your Name (required)
		[text* your-name] </label>
	<label> Your Email (required)
		[email* your-email] </label>
	<label> Subject
		[text your-subject] </label>
	<label> Your Message
		[textarea your-message] </label>
	[submit "Send"]
</div>
You can also consult a lot of our contact forms have been created here:

IMPORT SLIDER HOME PAGE
After setting up the homepage, you need to setup the slider for homepage to make it display the same as in live preview. The download package contains the exported slider (Revolution Slider) that can be used as your slider template. Please follow the steps below to import it to your shop:
- Go to "Revolution Slider"
- Click "Import Slider" button
- When a popup appear, click "Browse" and select one of zip sliders(these files include in main file downloaded) file.
- Click "Import Slider" button to start import the selected slider
- Repeat the steps to import all
You could consult our video guide on How to Import Slider using Revolution Slider
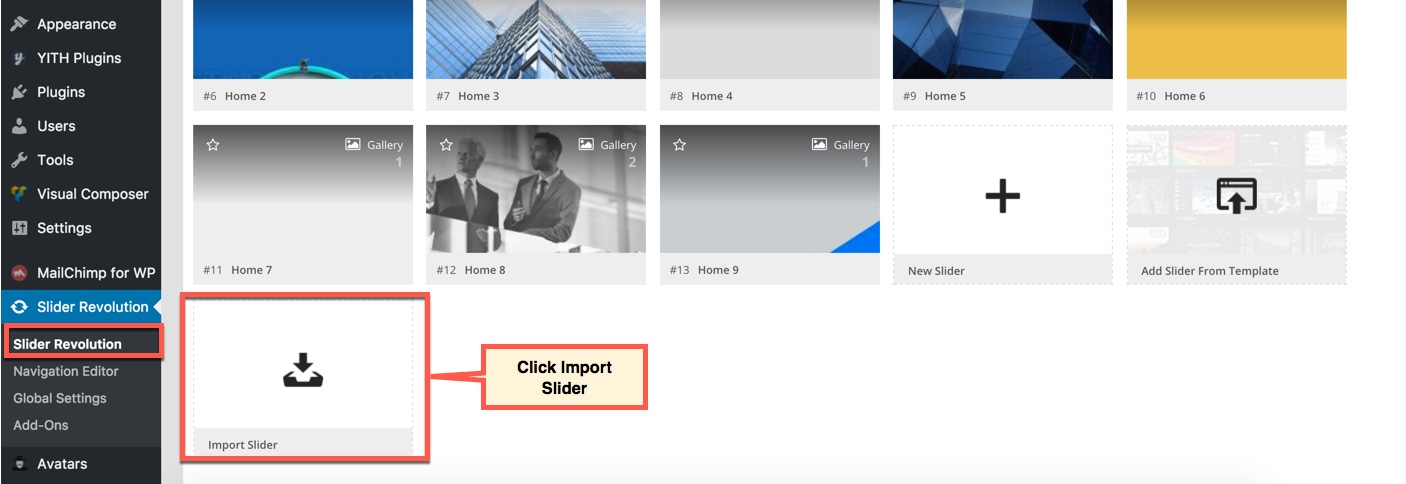
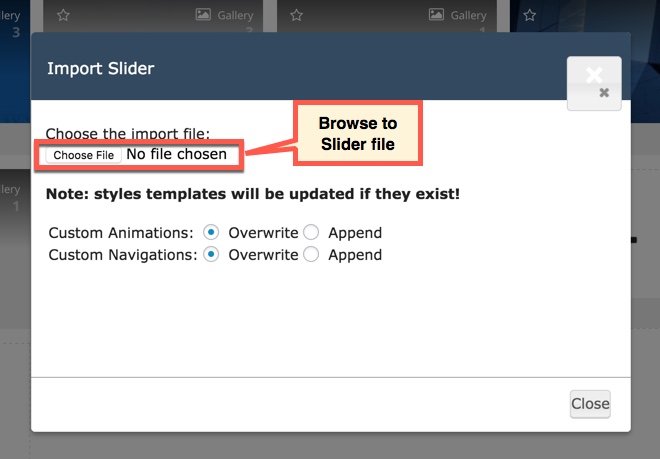
Please note that these steps are to set up slider for homepage the same as in live demo. If you want to make your own slider, please follow the official Slider Revolution document.
SETTING A STATIC PAGE AS HOME
If you installed OARS demo Data, you don’t need to create a new Home Page, you just need to choose from the list Home Pages that were automatically created from the demo content, following these steps:
- Go to Settings → Reading.
- For Front page displays, select A static page (select below)
- Choose any homepage as you want... from the dropdown for Front page
- Click Save Changes

Save all your changes!
TRANSLATE THEME
People all around the world use WordPress, around 44% of WordPress websites are written in a language other than English. We’re about to show you how to translate our themes. Using Make as an example, we’ll show you how to translate Pepper theme to Vietnamese, to be precise!
We will using Loco Translate plugin that provides in-browser editing of WordPress translation files.
- 1. Install and activate LOCO Translate plugin.
- 2. Create and update language files directly in your theme or plugin.
- 3. Saving custom translations.
Please confsult our video guide on How to translate G5THEME Theme using LOCO Translate plugin, We have been use Mowasalat theme for example and the process of Pepper theme translation is similar to this.
Video guide on How to translate theme using LOCO plugin