Preset are Options that were set beforehand to facilitate use, it will override settings in Theme Options on all pages/posts applyed it. auteur Demo Data also has many demo presets which lets you create WordPress pages very easily.
Video guide on How to use Preset
Preset Options
From WP-dashboard, navigate to A → Theme Options .
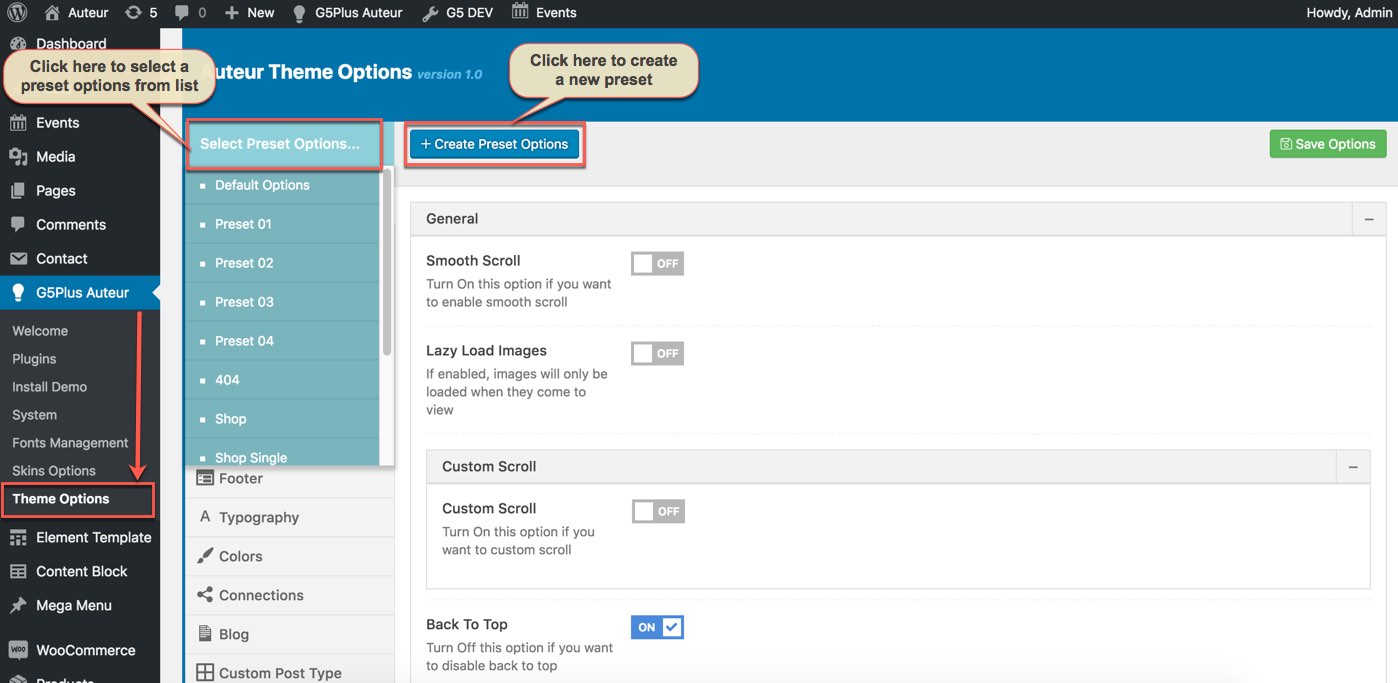
Goto Preset from dashboard
1. Manage all presets: From the interface of Theme Options, you can manage all presets list, choose a preset to edit/delete or preview it on the frontend
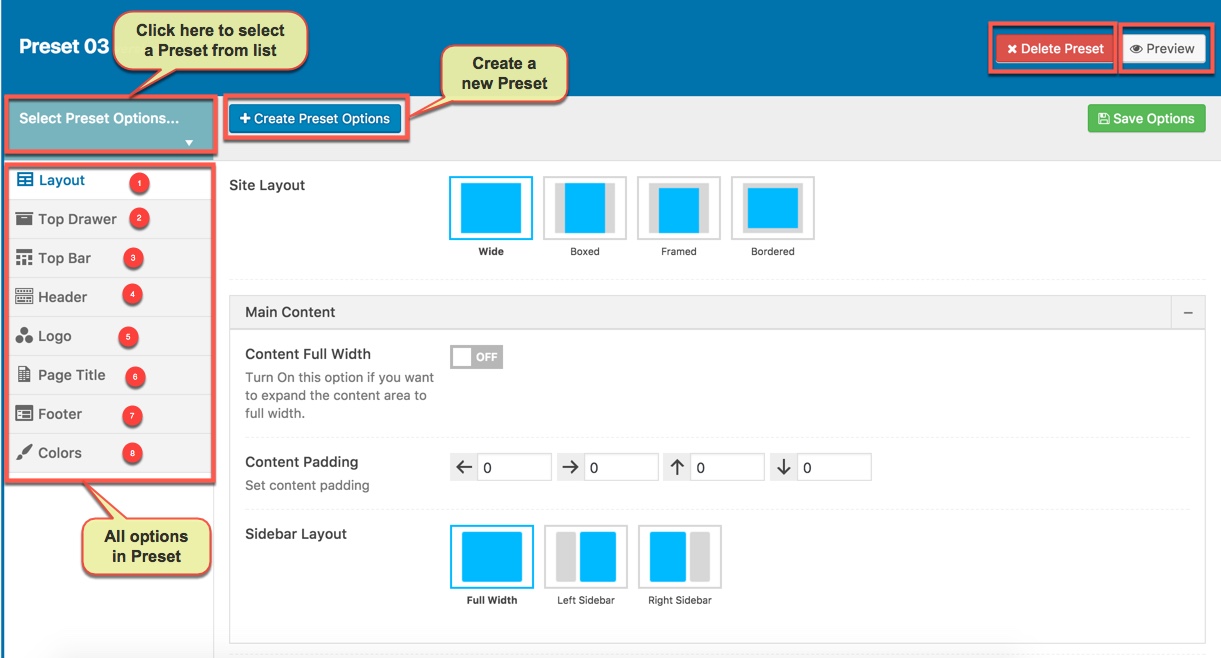
Manage all presets
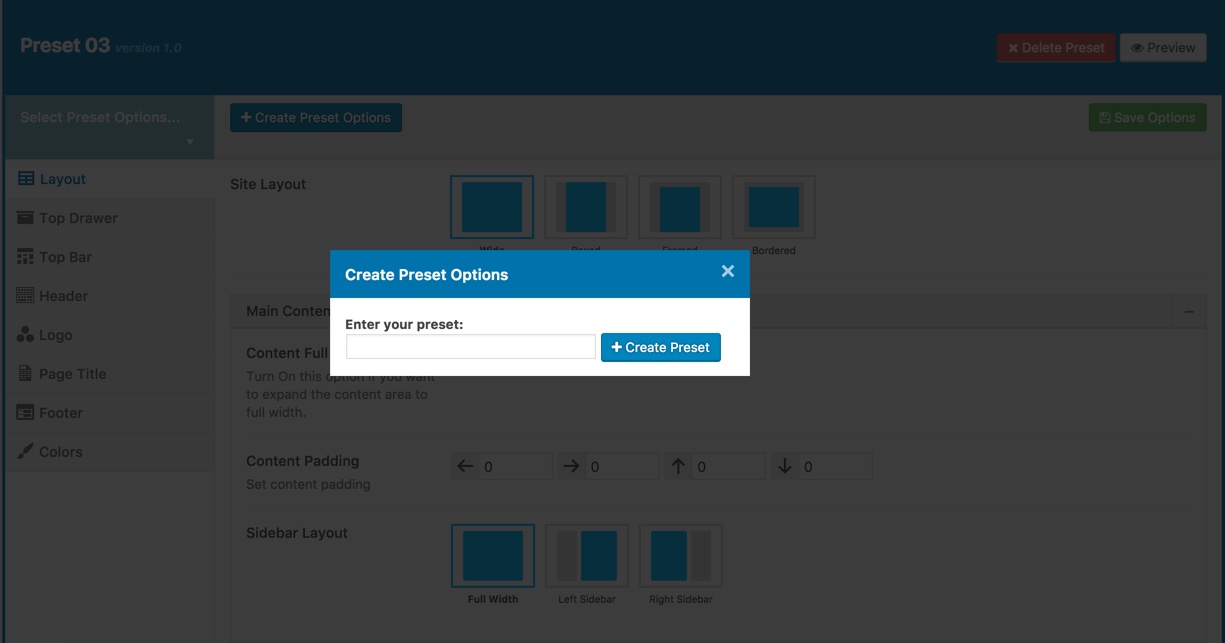
Create a new Preset
2. Preset Setting: Preset Setting in Theme Options is a option that you can choose a Preset to apply for each page type (404 page/blog/woocommerce)
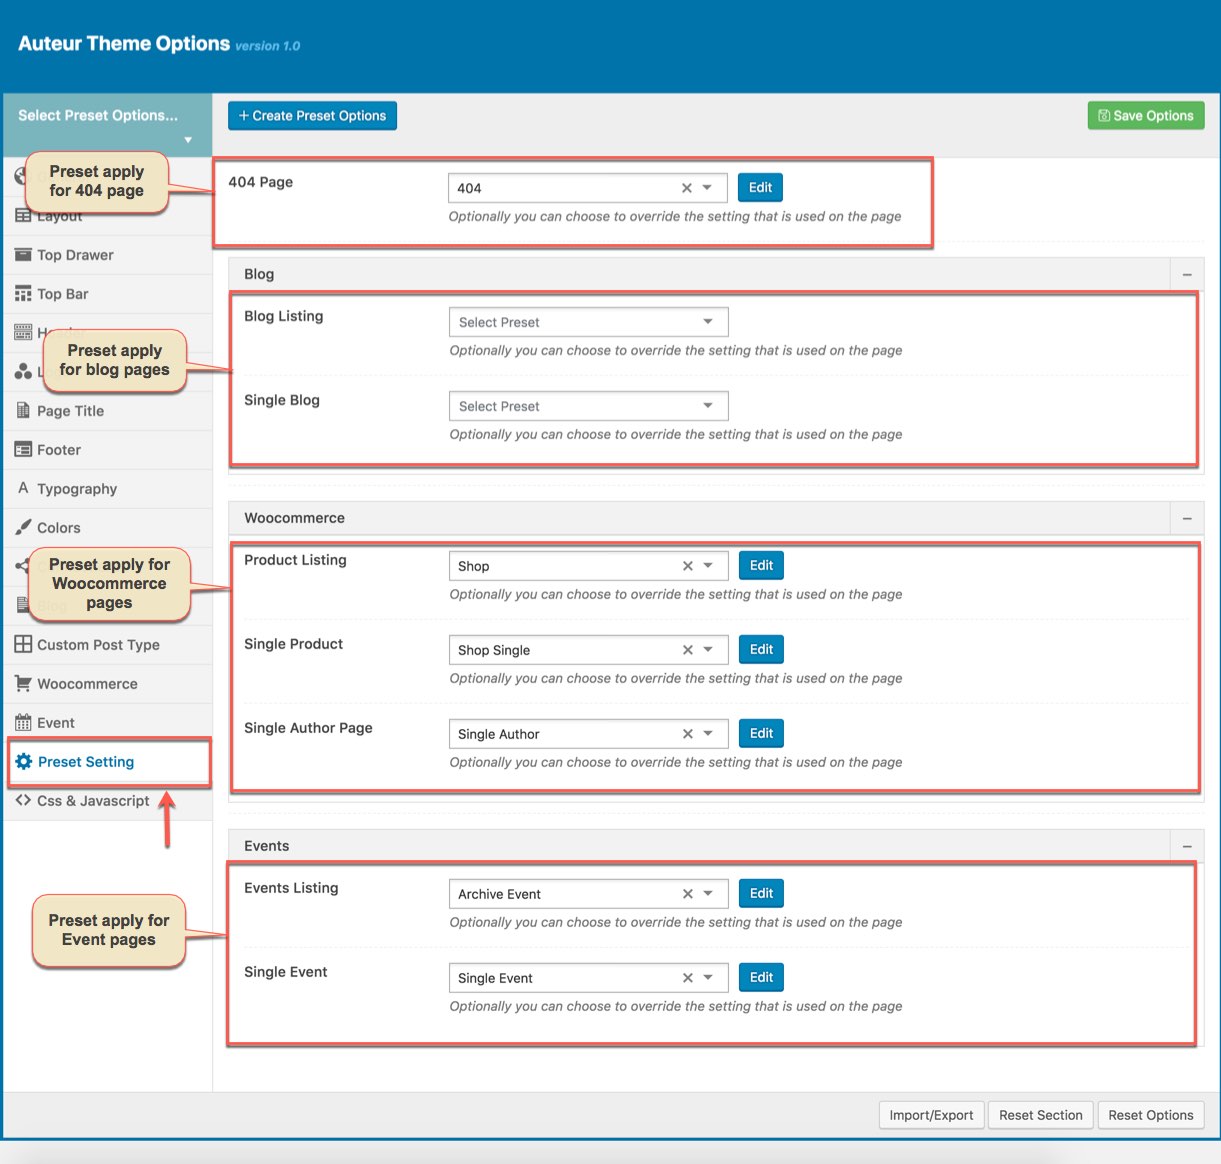
Preset Setting in Theme Options
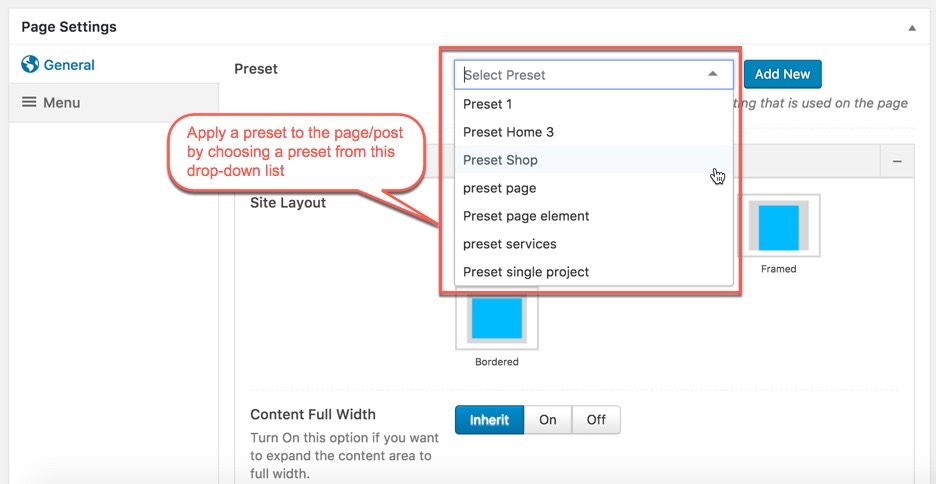
Apply Preset to Page/Post
When you create a new page/post or edit a page/post, you can choose a preset from drop-down list then apply the preset to the page/post. All settings in the preset will be applied for this page/post and override settings in Theme Options. You can also Edit or Add New Preset by click on buttons next to drop-down list.
From a page that has been applied a Preset on the frontend, you can edit the Preset by clicking to Edit Preset button
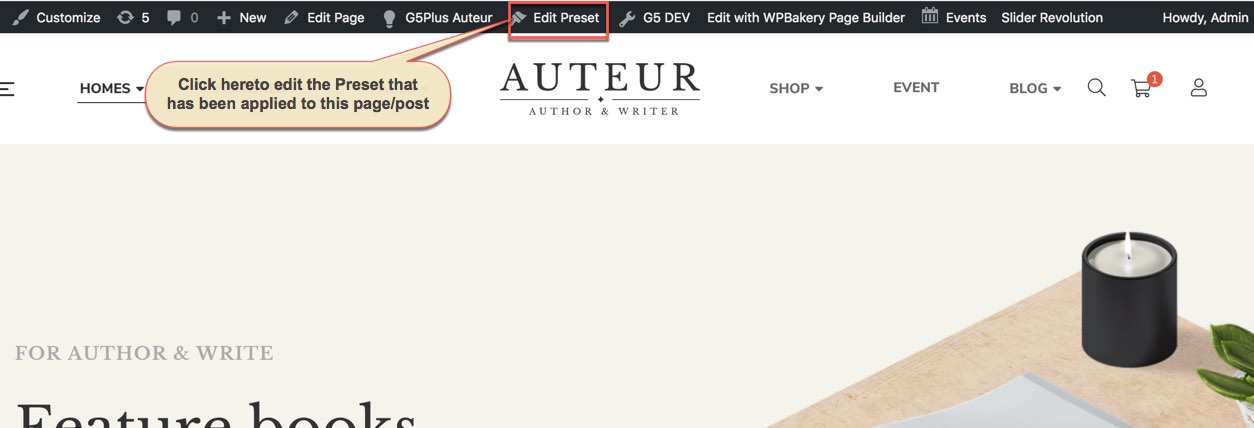
NOTE: Preset and Page Settings will use the Theme Options value if left empty or if the value is default. They will override Theme Options if any other value is entered. This setup gives users maximum flexibility for setting a global theme option, then being able to override it on a page/post/shortcode basis. You can consult our guide on How to use Preset for more informations.
You can set the following Options for the Preset you are currently editing:
Page Layout
This option is used for setting Page Layout in a Preset. It will overwrite Page Layout settings in Theme Options . Any option is set to "Default" which means they will take on the global options set in Auteur theme Options
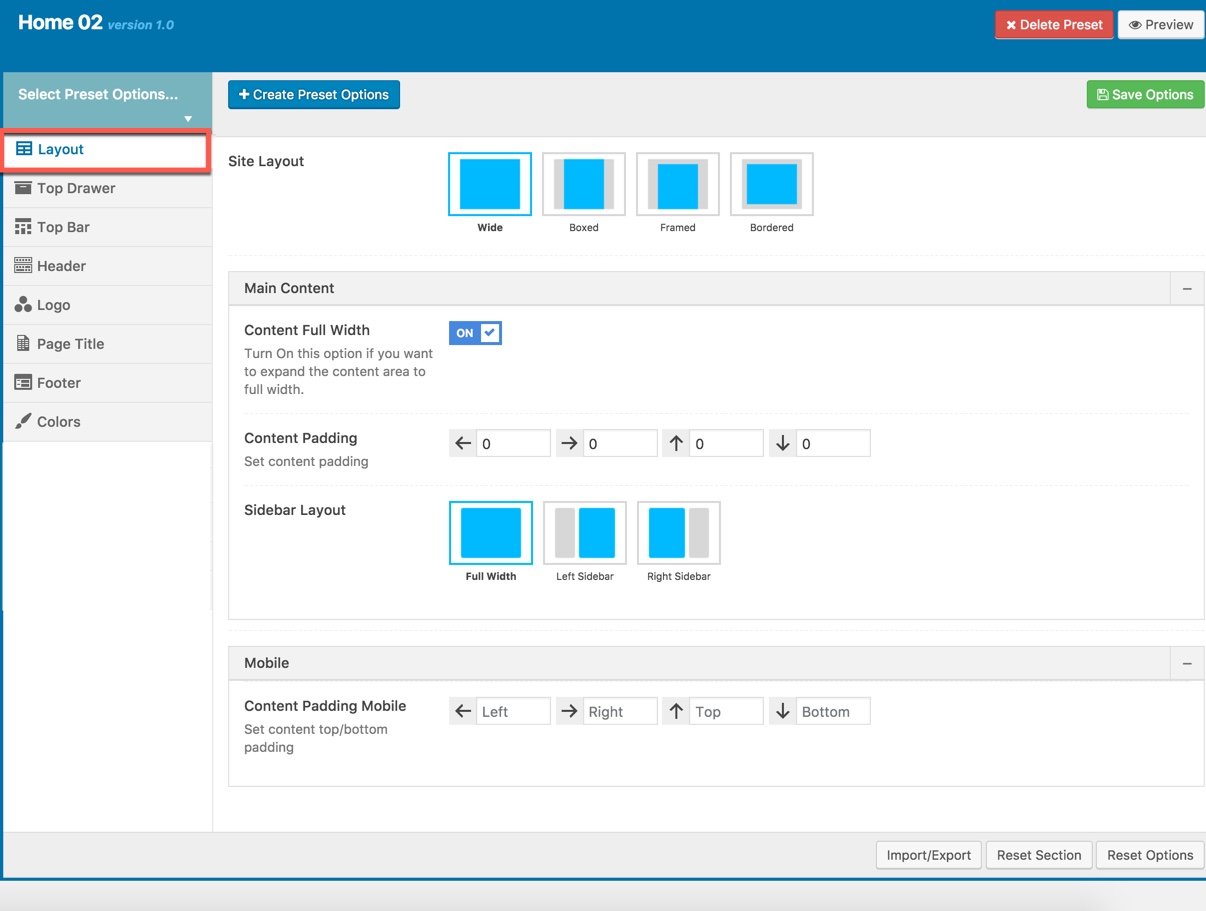
Page Layout Options for the Preset:
| Attribute | Description |
|---|---|
| Size Layout | You can set layout: WWide, boxed, framed, bordered |
| Main Content | |
| Content Full width | Enable/Disable option that expand the content area to full width |
| Content Padding | Set content padding |
| Sidebar layout | Select widget area to display as sidebar |
| Mobile | |
| Content Padding Mobile | Set content top/bottom padding mobile. Do not include units (empty to set default) |
Top Drawer
This option is used for setting in a Preset. It will overwrite Top Drawer settings in Theme Options . Any option is set to "Default" which means they will take on the global options set in Auteur theme Options
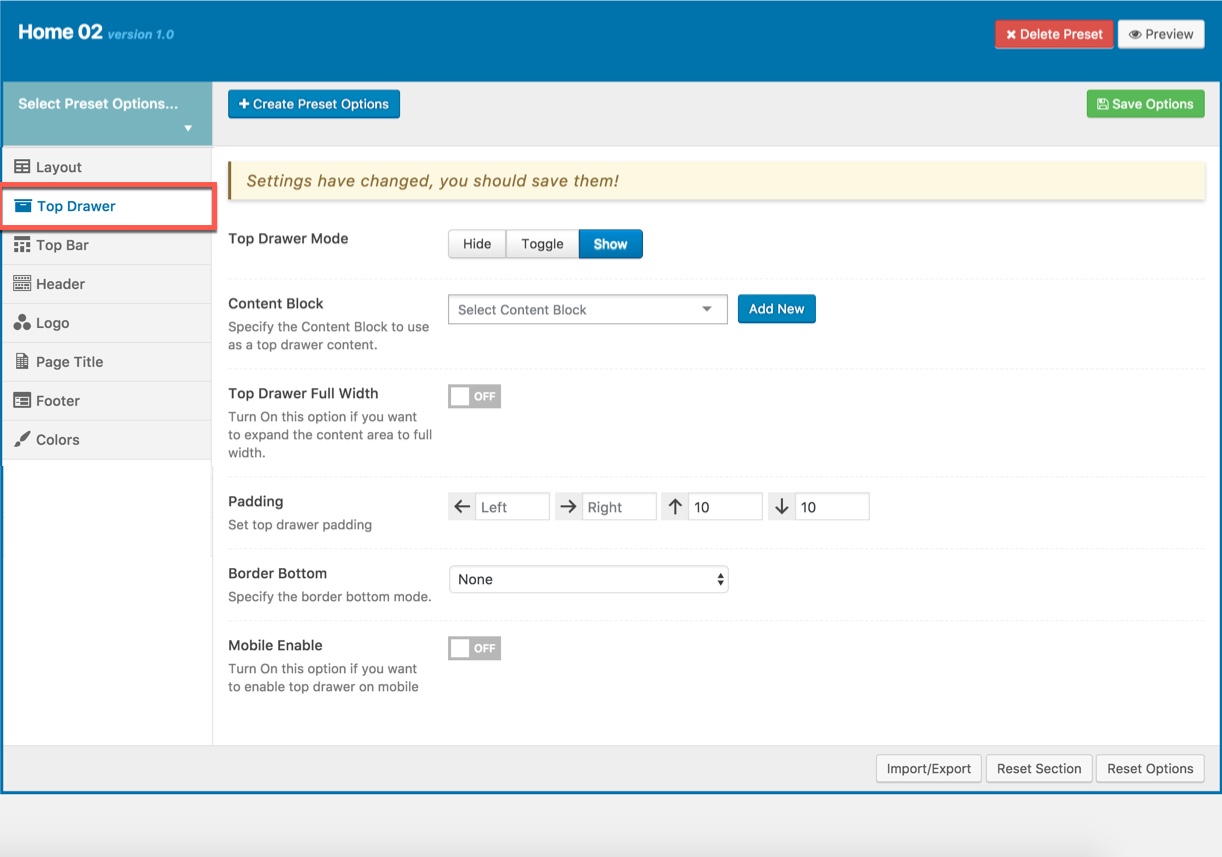
Top Drawer Options for the Preset:
| Attribute | Description |
|---|---|
| Top Drawer Mode | Set type of top drawer: 'Hide', 'Show', 'Toggle'. |
| Content Block | Select Content Block from list to use as a top drawer content. |
| Top Drawer Full width | Set status: On if you want to expand the content area to full width. |
| Padding | Set Padding space for top drawer included: padding-left, paaging-right, padding-top, padding-bottom. |
| Border bottom | Set the border bottom mode: none, full, container |
| Mobile enable | Set mobile enable:on, off |
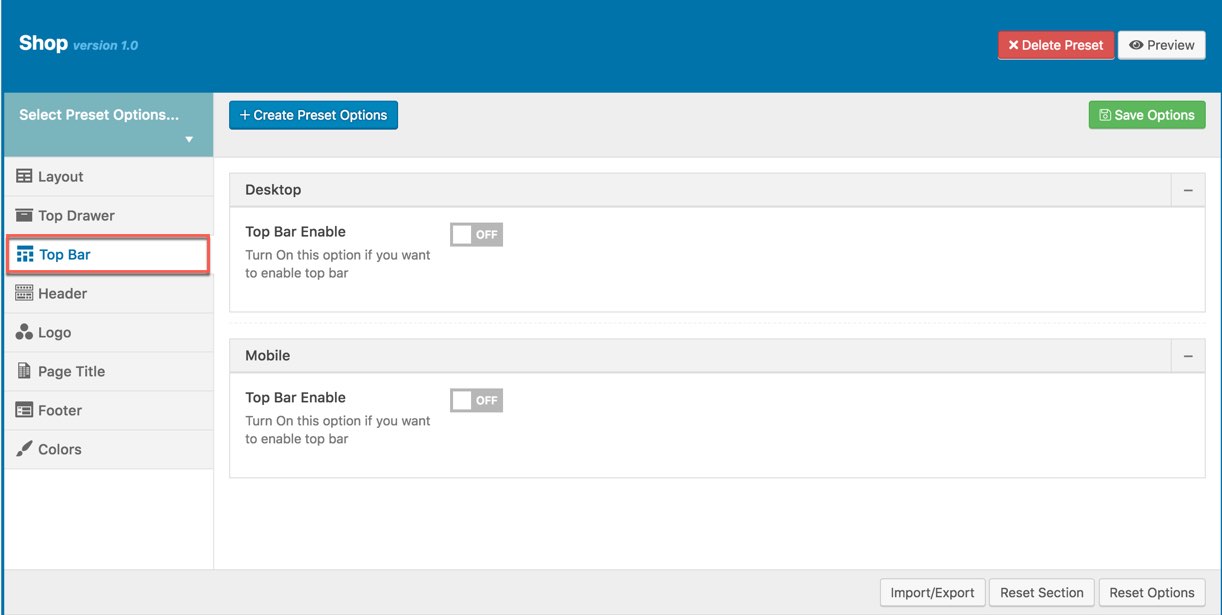
Top Bar
This option is used for setting Top Bar in a Preset. It will overwrite Top Bar settings in Theme Options . Any option is set to "Default" which means they will take on the global options set in Auteur theme Options
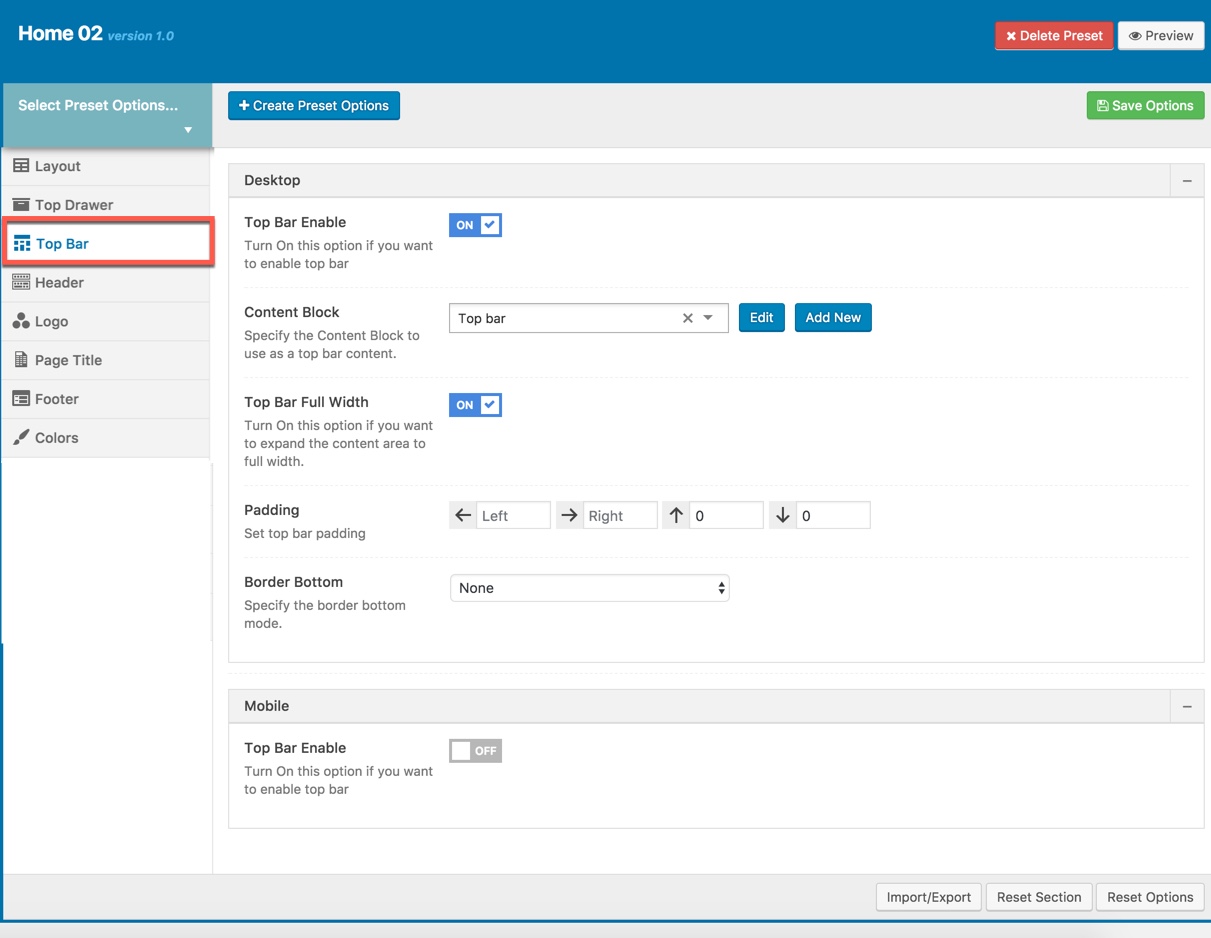
Top Bar Options for the Preset:
| Desktop | |
|---|---|
| Top Bar Enable Enable/Disable Top Bar | Enable/Disable Top Bar |
| Content Block | Select Content Block from list to use as a top drawer content. |
| Content Block | Set type to use as a top bar content. |
| Top Bar Full Width | Enable/Disable option that expand the content area to full width |
| Padding | Set Padding space for website include: padding-left, paaging-right... |
| Border bottom | Set the border bottom mode: none, full, container |
| Mobile | |
| Mobile enable | Set mobile enable:on, off |
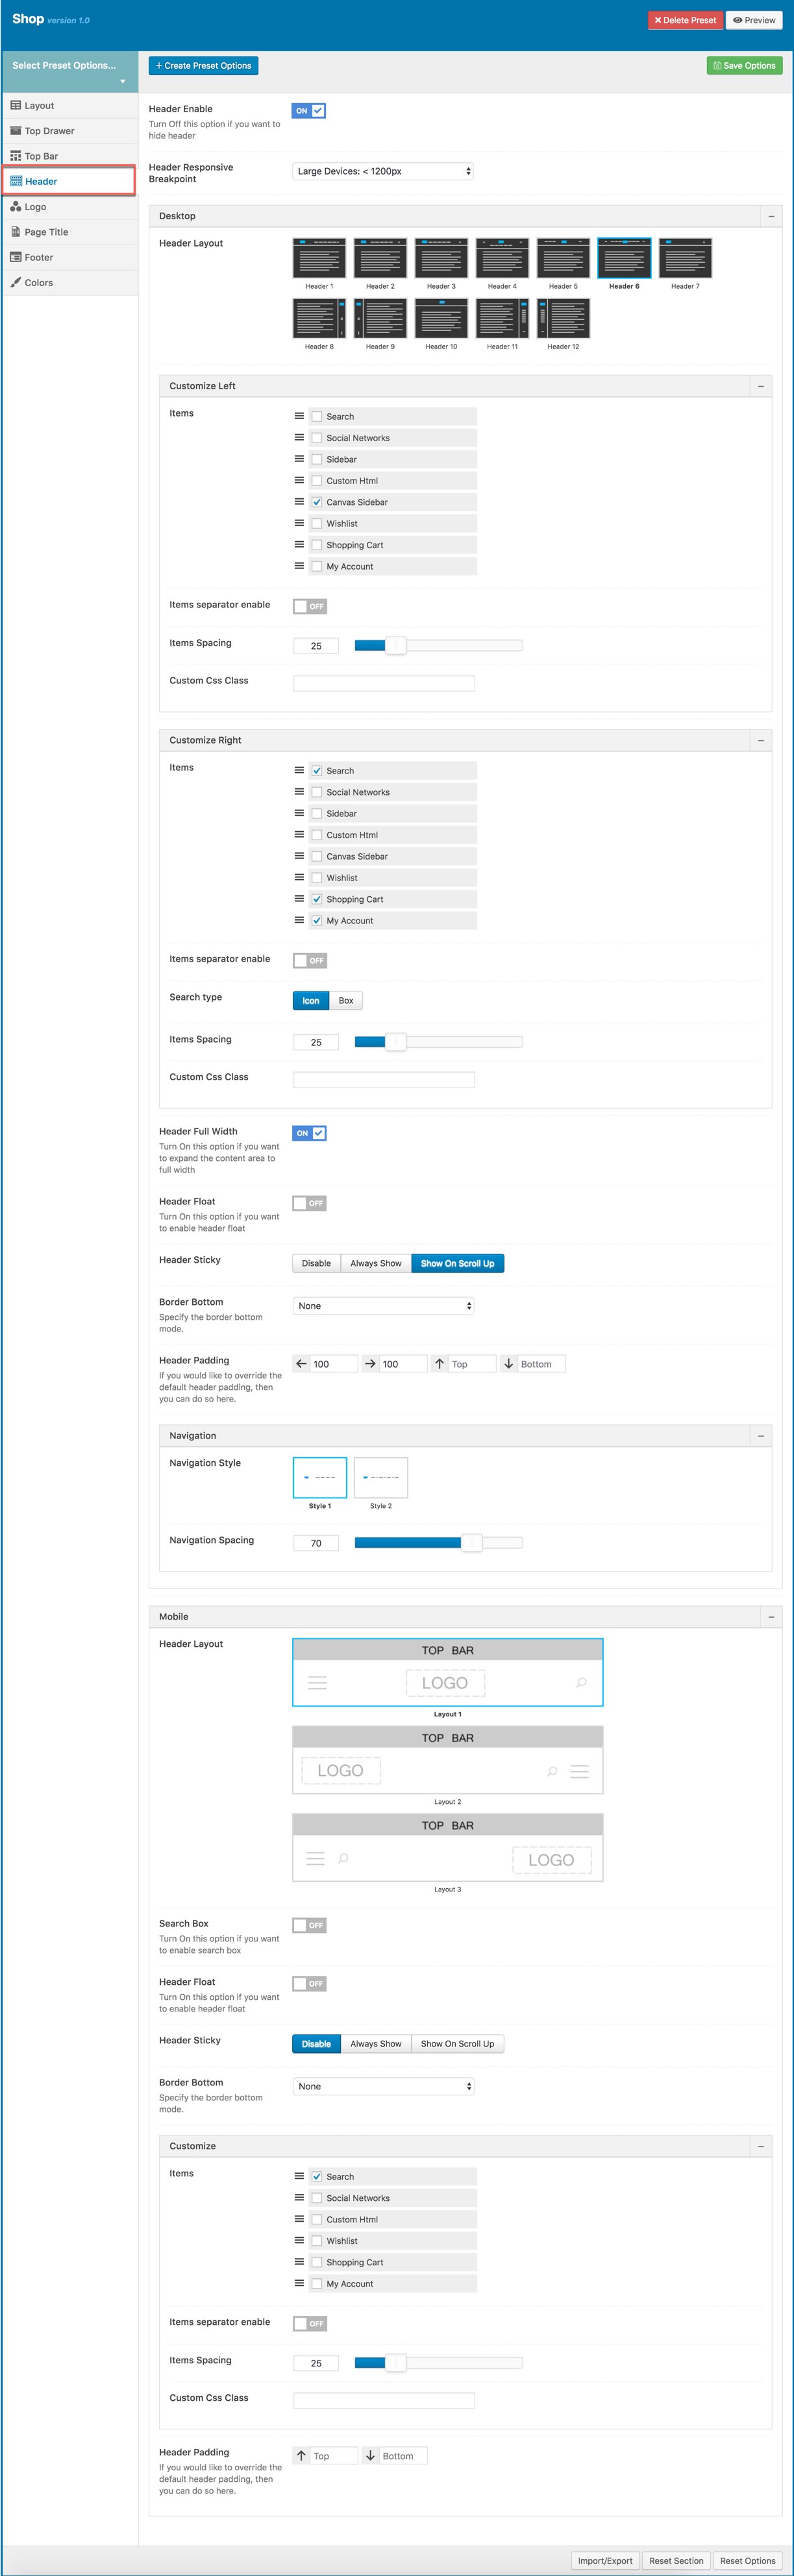
Header
By-default,Header is functioning from Theme Options for all pages. If you want a different header for a page, then you can setup "Header" in this preset and apply it to that specific page.
Header option is used for setting Header in a Preset. It will overwrite Header settings in Theme Options . Any option is set to Default which is the current header style of your Theme Option. So, if you want same header on all pages, then you don't need to select anything. If you want a different header for a specific page, then you can choose any other option as your wish.
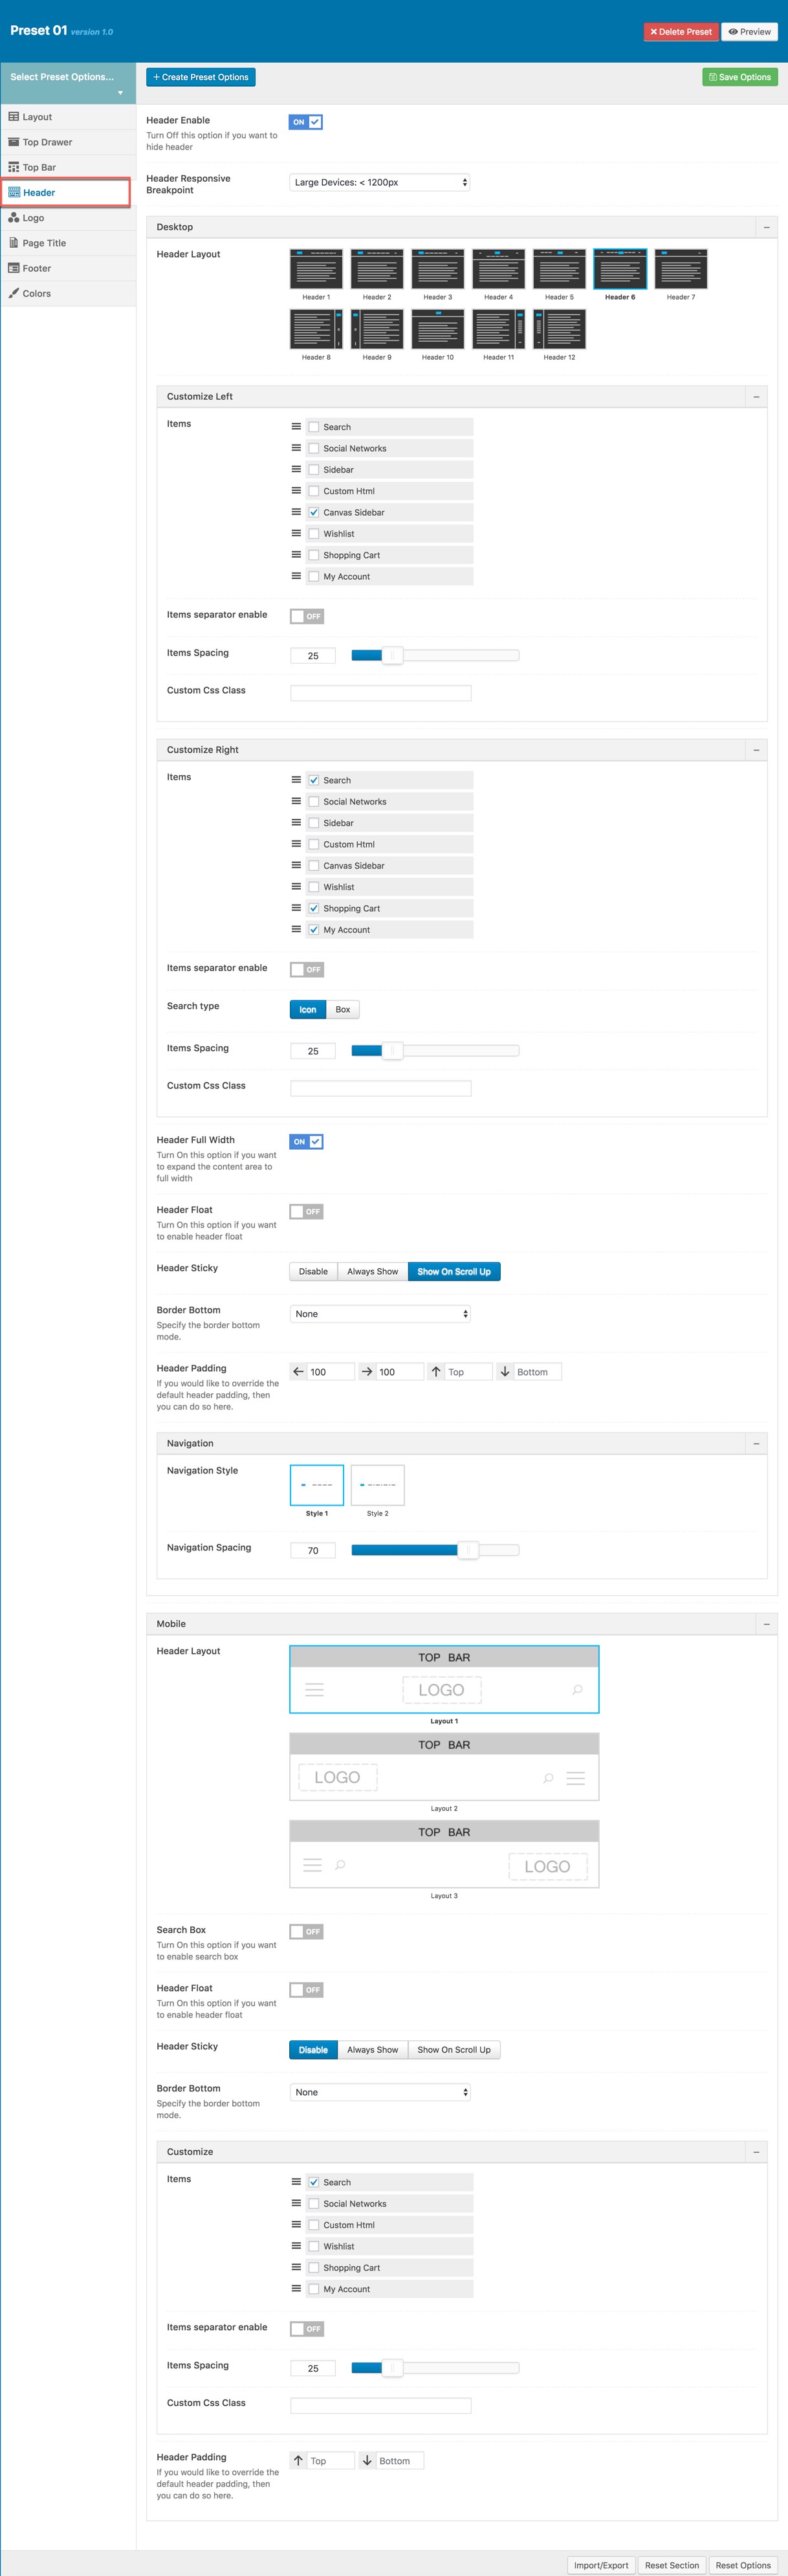
Description of Header Options for this Preset
| Attribute | Description |
|---|---|
| Header Enable | Set enable/disable of header |
| Header Responsive Breakpoint | You can response with 3 screens of devide |
| Header Layout | Set layout of header in Desktop |
| Customize | Left/Right Select the items to be display on the Header Navigation Left/Right, items separator, space between them and you can add CSS if you want. |
| Header Full Width | Set enable of full width header |
| Header Float | Set enable float for header |
| Header Sticky | Set sticky mode for header:on, off |
| Border bottom | Select Header border bottom, include: None, Full Border, Container Border |
| Header padding | Set Padding top/bottom for Header area. If selected default will take value in Theme Options |
| Navigation Style | Select Navigation Style between 2 styles. |
| Navigation Spacing | Set Navigation Spacing(px) by draging scroll bar . |
| Page Header Mobile | |
| Header Mobile Layout | Set layout fot header mobile. |
| Search Box | Enable/Disable the search box in the mobile header |
| Header Float | Turn On/Off this option if you want to enable/disable header float |
| Mobile Header Search Box | Set visible for search box by turning on/off option. |
| Header mobile sticky | Set sticky mode for mobile header. |
| Customize | Add items, space between them and custom CSS (if you want) |
| Border bottom | Set border bottom: Full, container, none. |
| Header padding | Set header padding space |
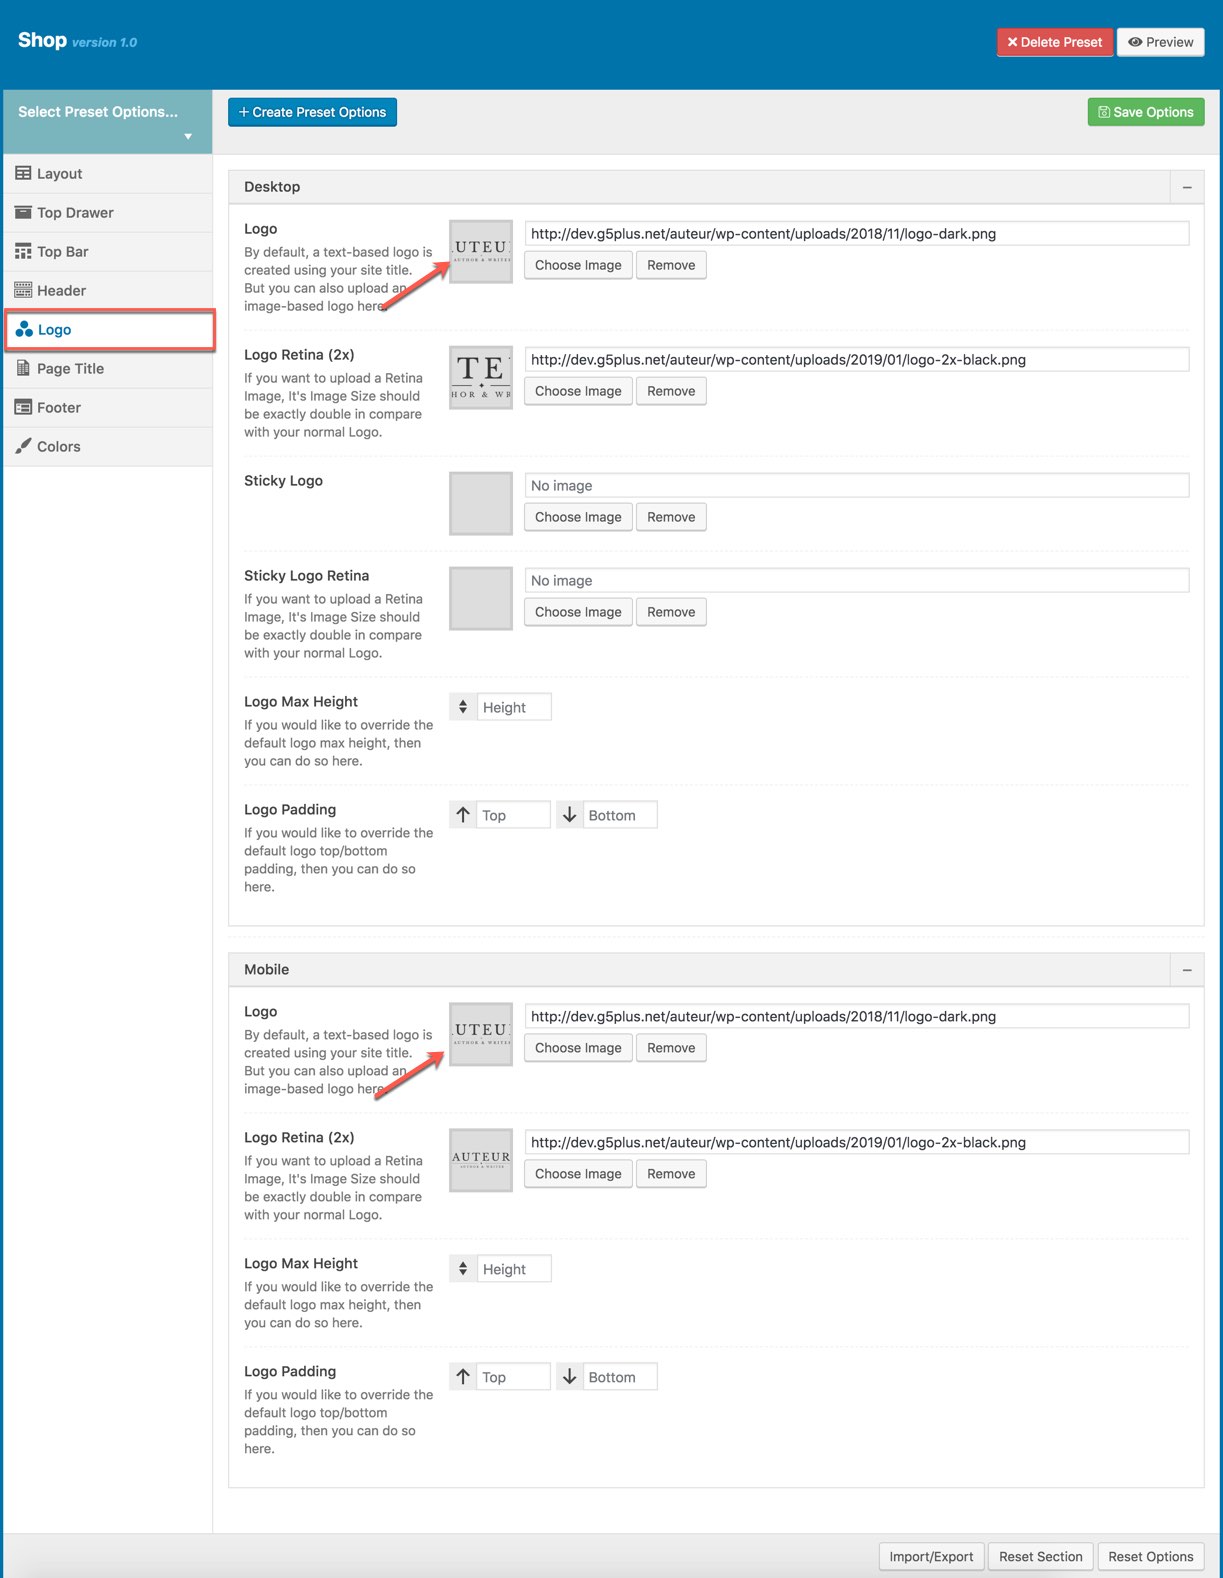
Logo
Logo panel has all options for you to setting how logo display on pages that are applied this preset. It will overwrite Logo settings in Theme Options . Any option is set to "Default" which means they will take on the global options set in Auteur theme Options
![]()
You can set the following Logo Options for the Page you are currently editing:
| Attribute | Description |
|---|---|
| Logo Desktop | |
| Logo | Upload header logo if you want custom header logo for page used this preset. |
| Logo Retina | Upload Header Logo Retina for retina if you want custom Header Logo Retina for page used this preset |
| Sticky Logo | Upload logo sticky if you want custom logo for page used preset. |
| Sticky Logo Retina | Upload logo sticky for retina if you want custom logo retina for page used this preset |
| Logo max height | Set max height for logo, if leave empty will take value in Theme Options |
| Logo padding | Set padding for logo, if leave empty will take value in Theme Options |
| Logo Mobile | |
| Logo | Upload logo if you want custom logo mobile for page used this preset. |
| Logo Retina | Upload logo mobile for retina if you want custom logo retina for page used this preset |
| Mobile Logo Max Height | Set max height for logo mobile, if leave empty will take value in Theme Options |
| Mobile Logo Padding | Set padding top/bottom for logo, if leave empty will take value in Theme Options |
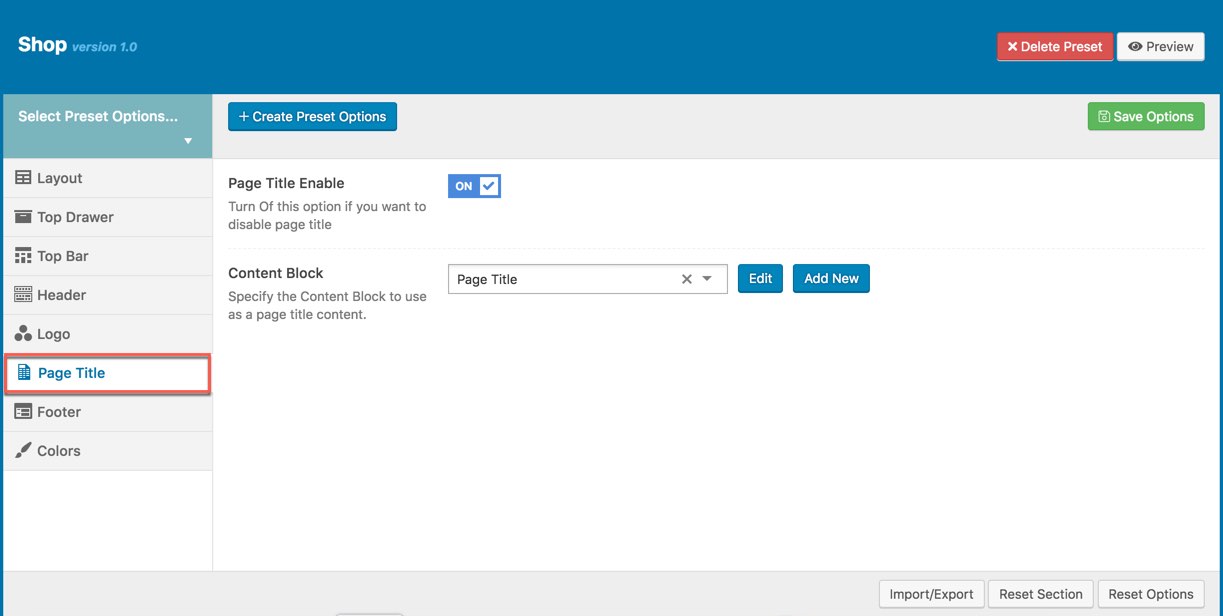
Page Title
This option is used for setting Page Title in a Preset. It will overwrite Page Title settings in Theme Options . Any option is set to "Default" which means they will take on the global options set in Auteur theme Options

You can set the following Page Title Options for the Preset you are currently editing:
| Attribute | Description |
|---|---|
| Page Title Enable | Set visible for Page Title, turn Off this option if you want to disable page title preset. |
| Content Block | Set Content Block have been built for Page Title from list preset. |
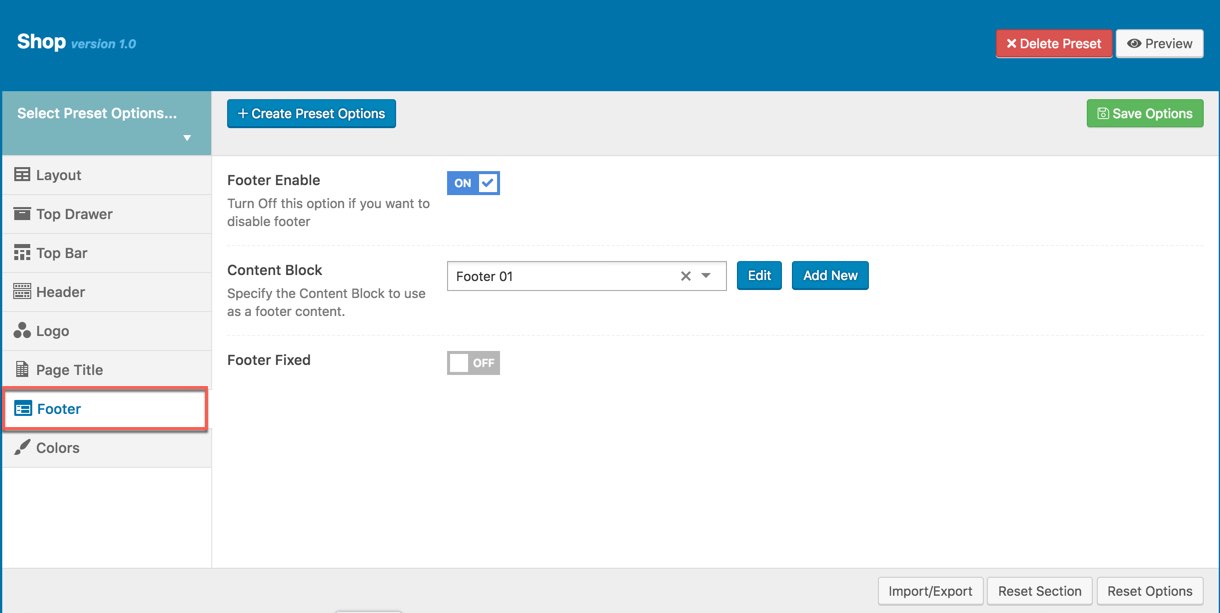
Footer
This option is used for setting Footer in a Preset. It will overwrite Footer settings in Theme Options .
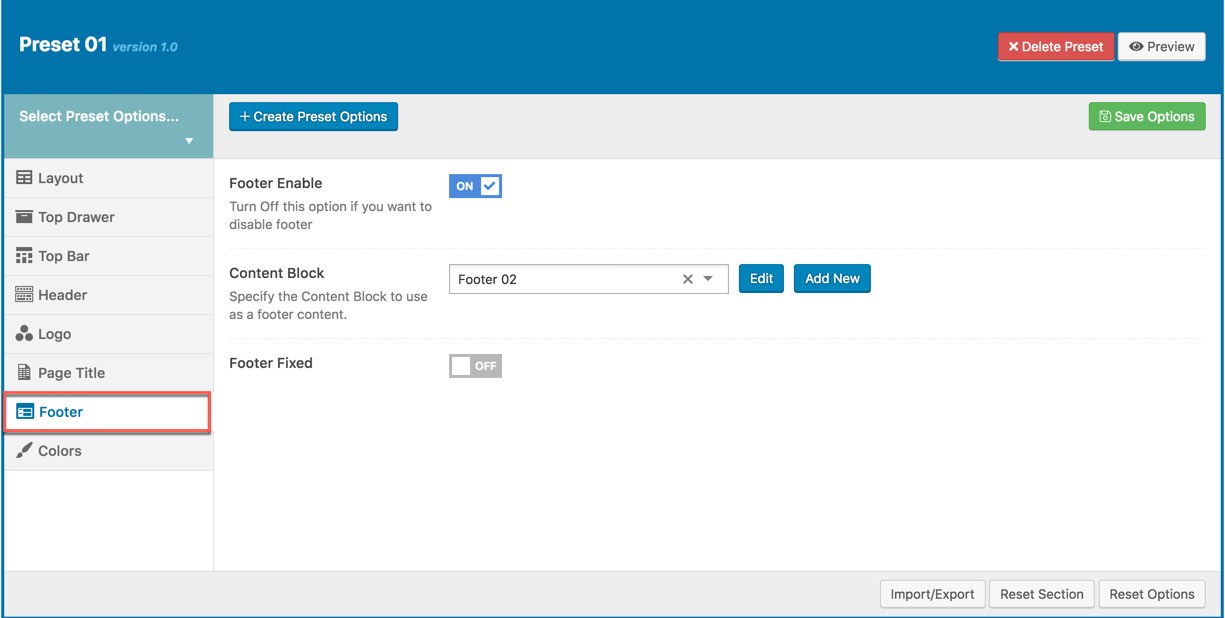
You can set the following Footer Options for the Page you are currently editing:
| Attribute | Description |
|---|---|
| Footer Enable | Set visible of footer, if selected default will take value in Theme Options |
| Content Block | Select content block for footer |
| Footer Fixed Set Footer Fixed: on or off | Set Footer Fixed: on or off |
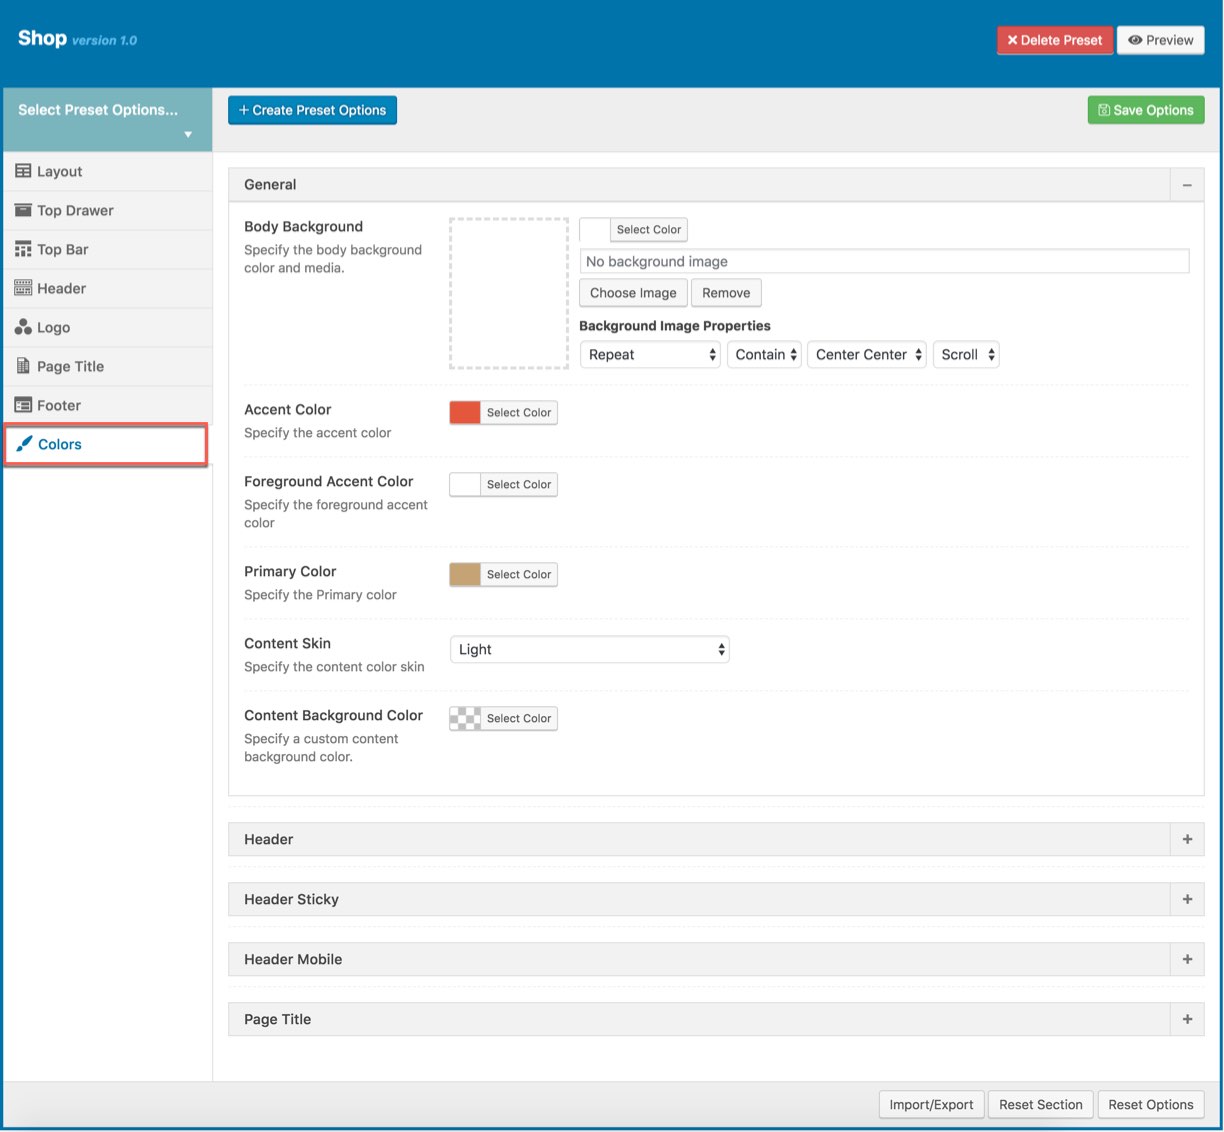
Colors
This panel is used for setting Colors in a Preset. From here you can custom and change color options for each area on page (pages are applied this preset). You can custom and choose custom color skin to display here. Please consult Skin section for more details.
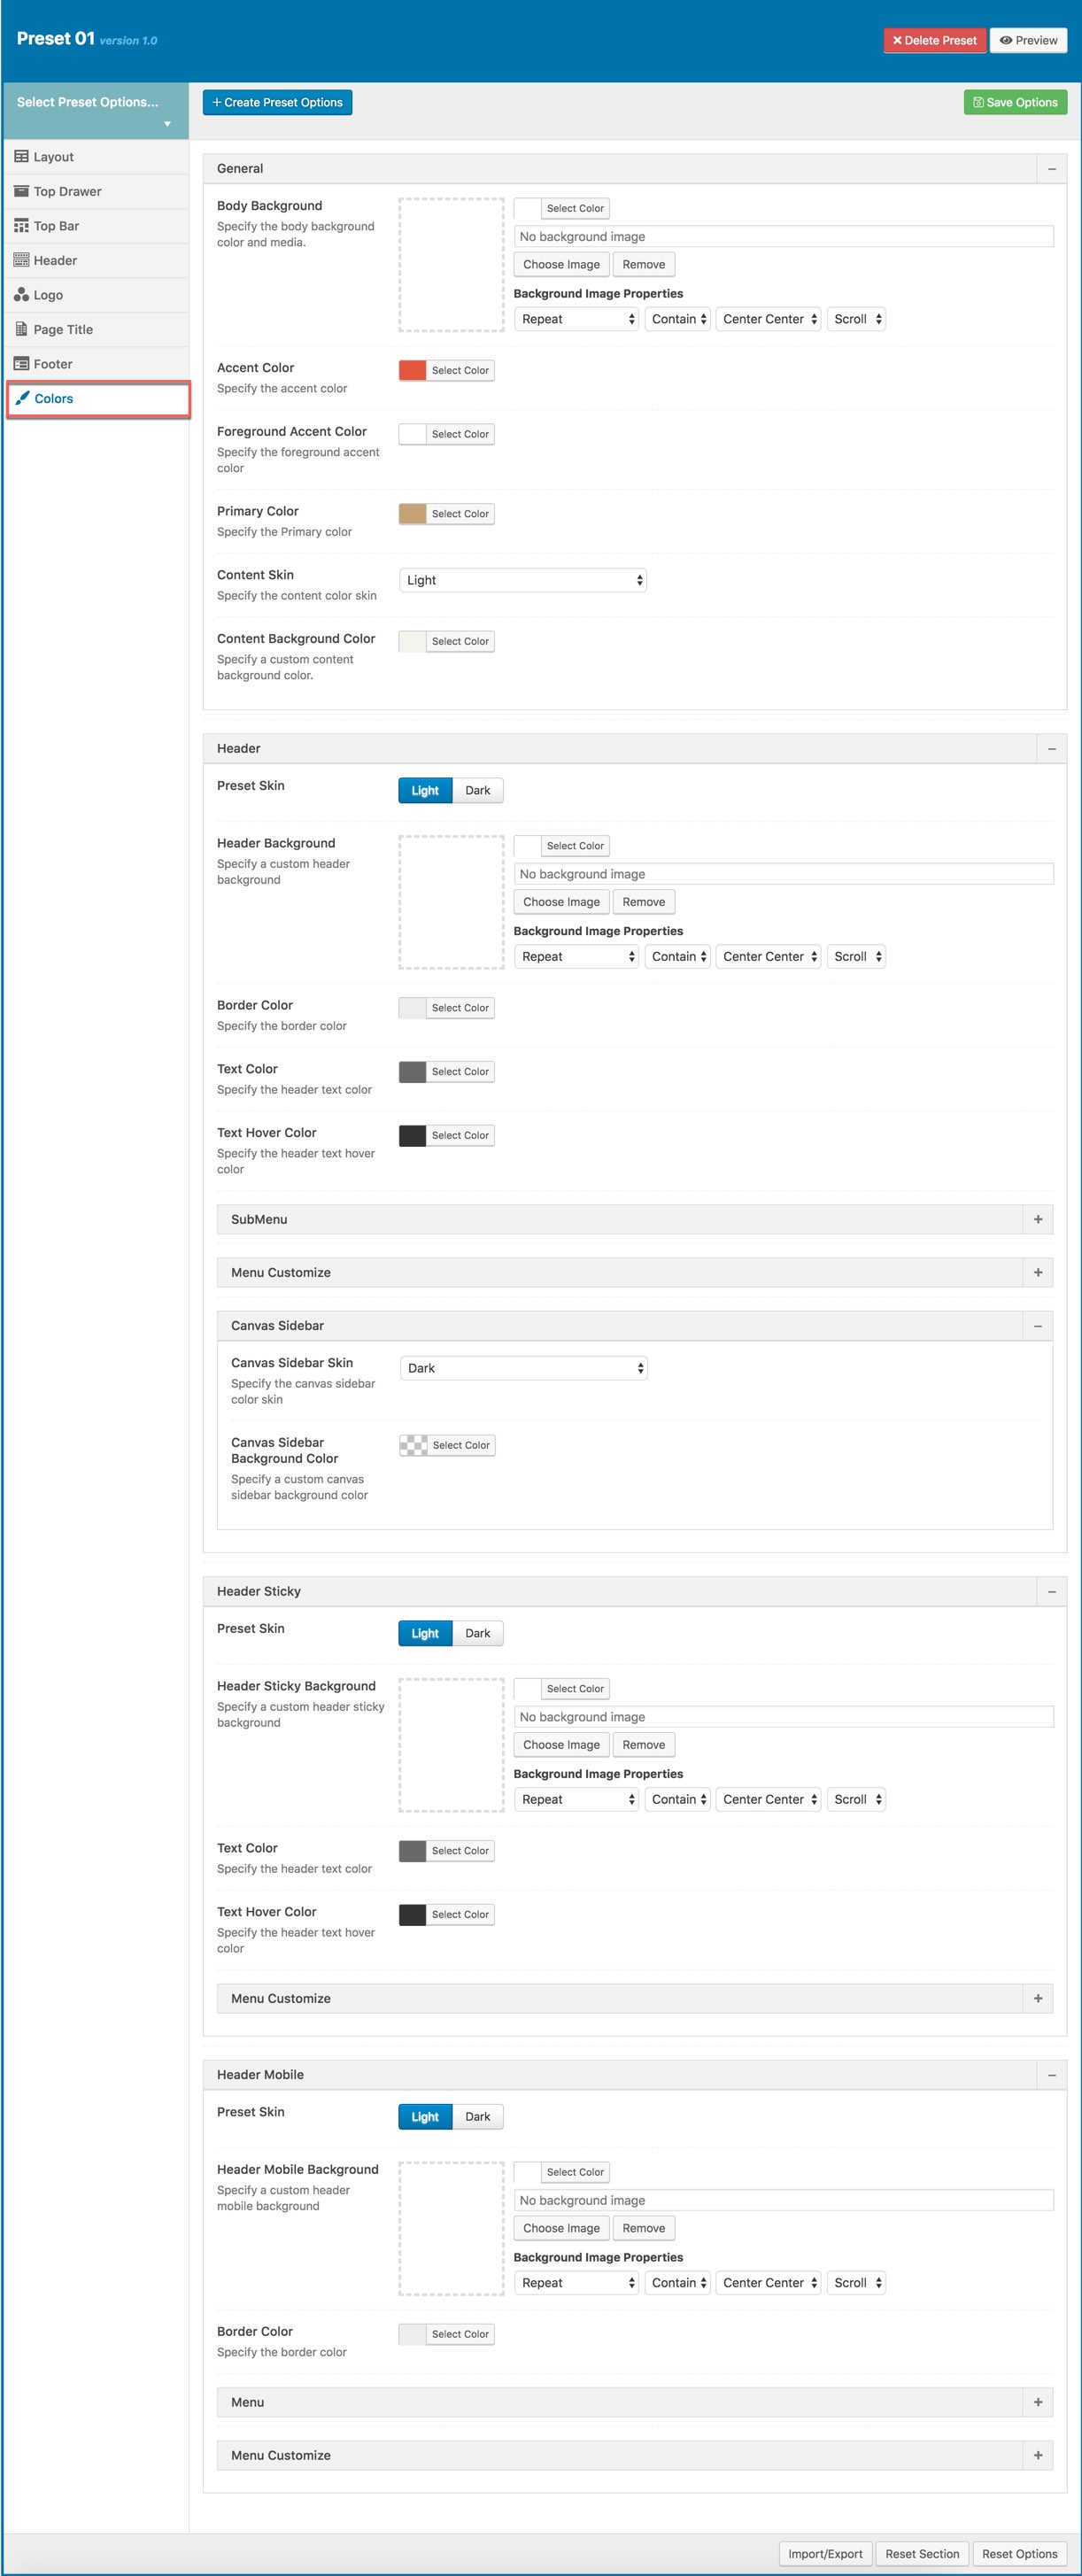
Color Options :
| Attribute | Description |
|---|---|
| General Mobile | |
| Body Background | Customize the body background color and media |
| Accent Color | Customize color for Accent Area |
| Foreground Accent color | Customize Foreground Accent color |
| Primary Color | Specify the Primary Color |
| Content Skin | Select the content color skinv |
| Content Background color | Select Background color |
| Header | |
| Preset Skin | Specify the header color between Light or Dark |
| Header Background Color | Specify a custom header background color |
| Border Color | Select the border color |
| Text Color | Select the color for text in the header |
| Text Hover Color | Specify the header text hover color |
| Content Background color | Select Background color |
| Sub Menu | |
| Preset Skin | Specify the header color between Light or Dark |
| Background Color | Specify a custom background color for submenu |
| Text Color | Select the color for text in the submenu |
| Text Hover Color | Specify the header text hover color for submenu |
| Heading Color | Specify the color for submenu heading color |
| Border Color | Select the border color |
| Header Sticky | |
| Preset Skin | Specify the header color between Light or Dark |
| Header Sticky Background Color | Specify a custom background color for submenu |
| Text Color | Select the color for text in the Header Sticky |
| Text Hover Color | Specify the sticky header text hover color |
| Menu Customize | Specify the color for text in menu customize of Header mobile |
| Border Color | Select the border color |
| Header Mobile | |
| Preset Skin | Specify the mobile header color between Light or Dark |
| Header Sticky Background Color | Specify a custom background color for submenu |
| Border Color | Select the border color |
| Menu | Specify color for the menu in Header mobile |
| Menu Customize | Specify the color for text in menu customize of Header mobile |
Use preset example
Examples in this documentation just a glimpse of what you can achive by using renewal options in the
Auteur theme. Let's discover auteur by your own!
Example using Preset to setup the full width Woocommerce shop page (as this
site )
Color Options :
Step 1 : Create a new Preset named Shop then setup options for the Preset that will be applied for Woocommerce shop page.
8 separates of Preset options will be setup as below: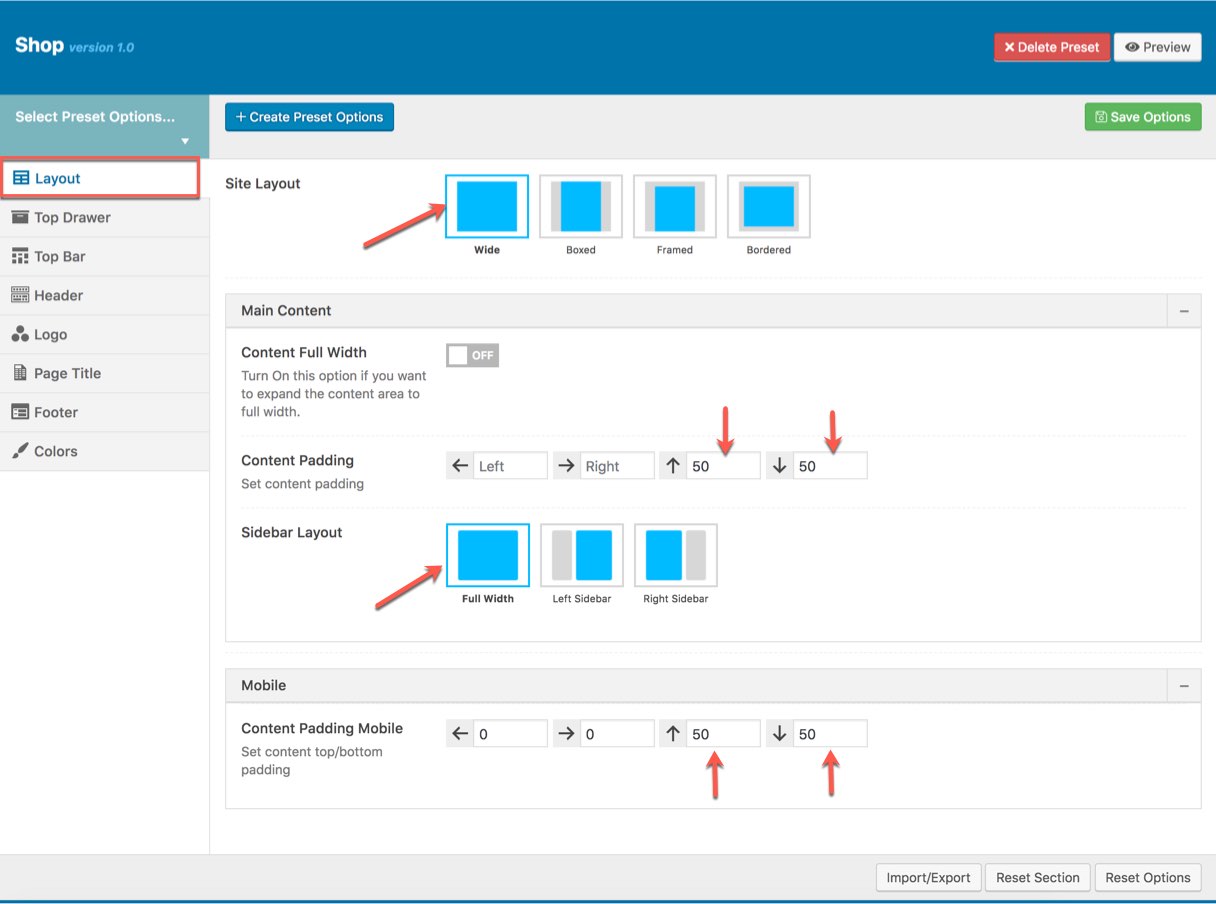

Step 2 : Apply the preset named Shop Preset for Woocommerce Product Listing in Theme Options.
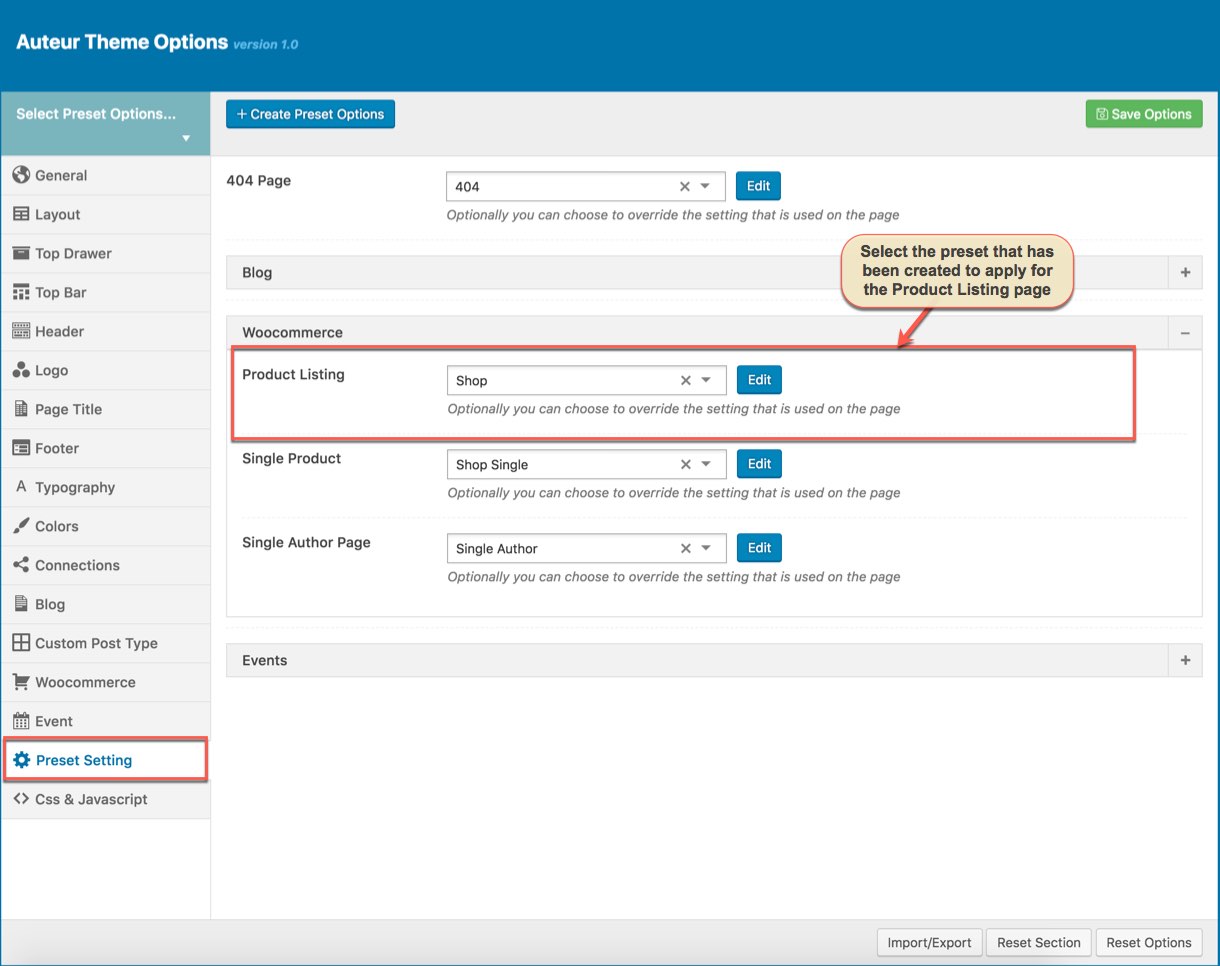
Apply Preset to each page types in Theme Options
Do not forget to setup for Woocommerce elements in Theme Options (Please consult Woocommerce option in Theme Options) and main Woocommerce Settings . And the screenshot below is your result:
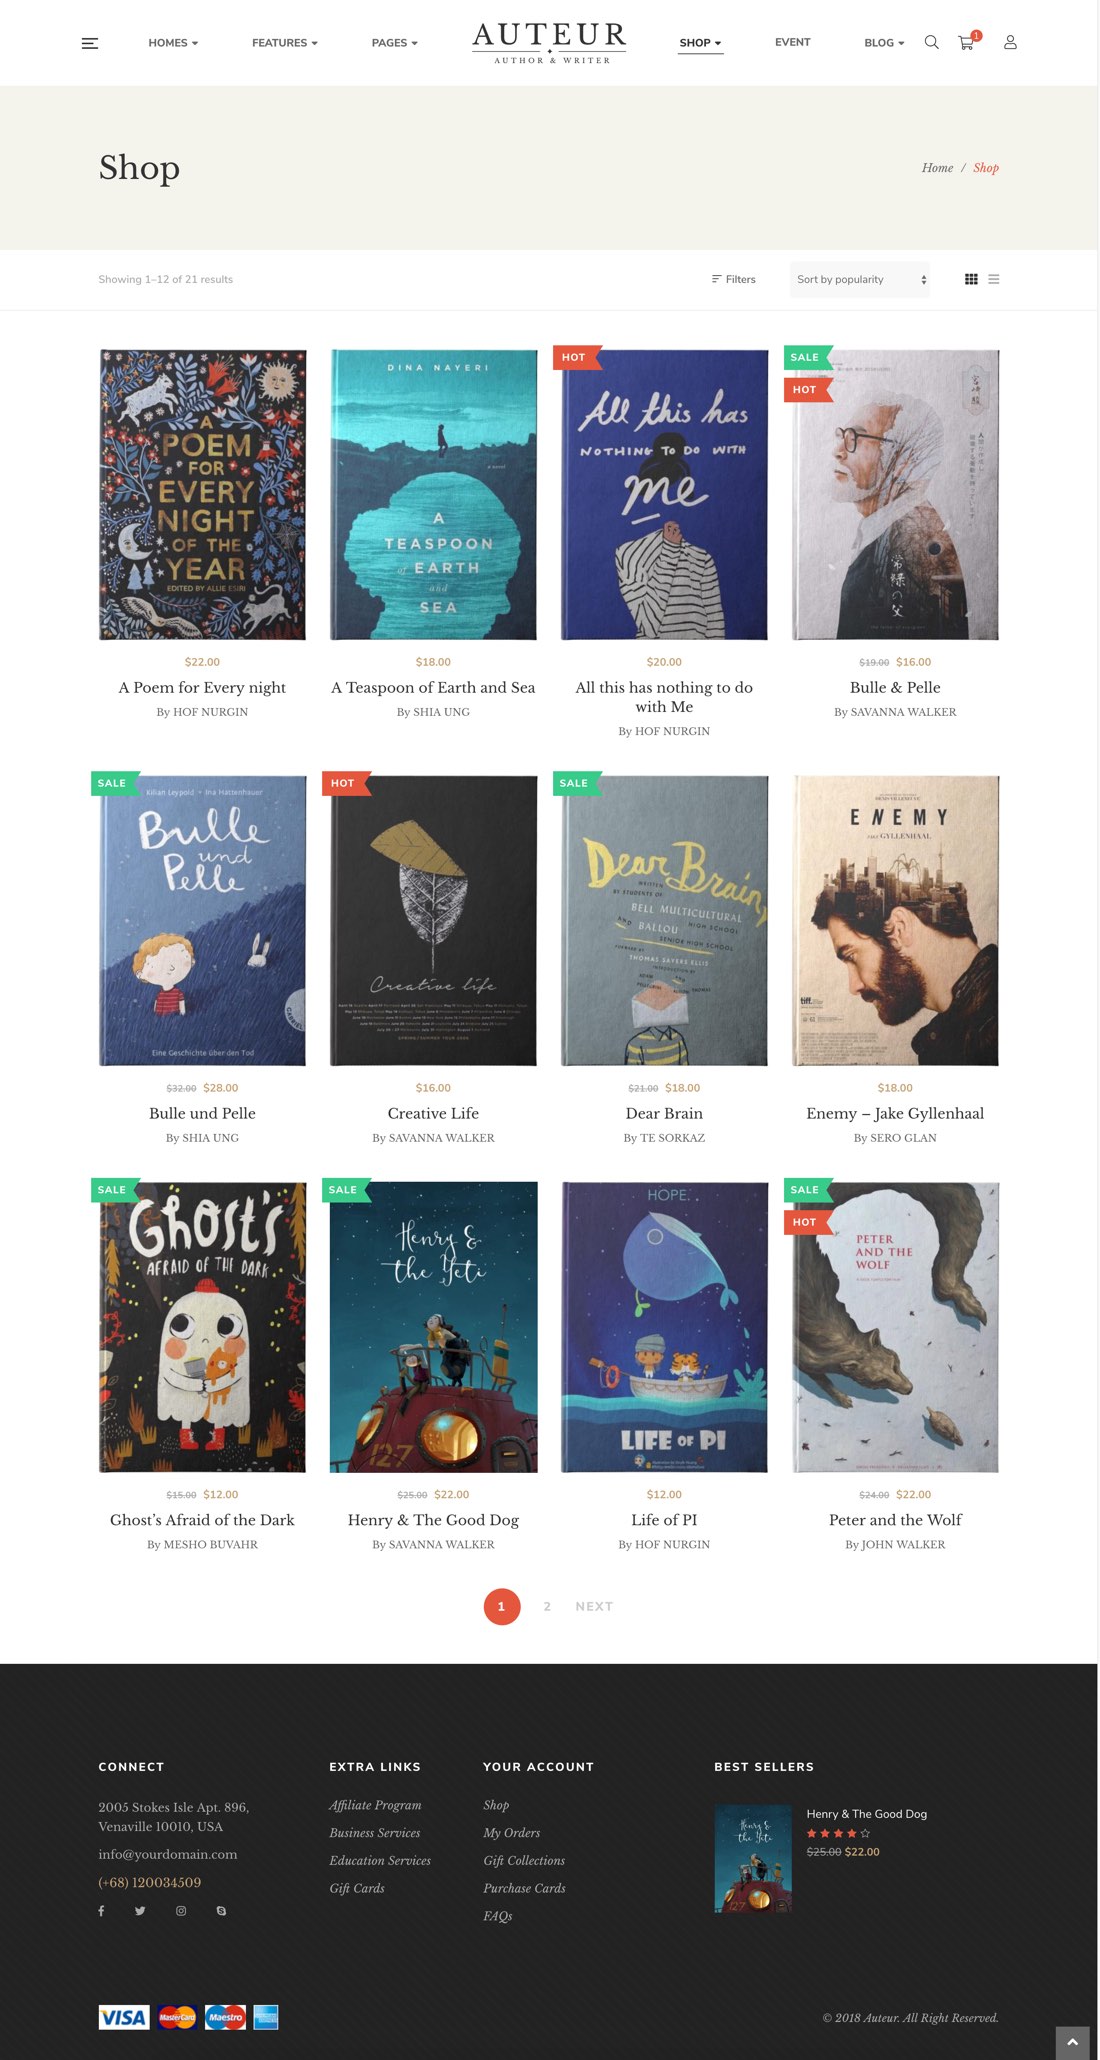
Woocommerce Shop Page fullwidth on the frontend
Note : As mentioned above, you can also apply Preset to each Page/Post if you want.
When you create a new page/post or edit a page/post, you can choose a preset from drop-down list then apply the preset to the page/post. All settings in the preset will be applied for this page/post (override settings in Theme Options).
Apply Preset to Page/Post
From a page that has been applied a Preset on the frontend, you can edit the Preset by clicking to Edit Preset button
.jpg)