Creat a new page
WPBakery Page Builder is the most powerful and used WP pagebuilder and there is more than 1 million sites that are using that to create homepage. This plugin is included in Lustria theme by free to create advanced and complex homepage in simplest way ever has seen! Now you can start fiddling with WPBakery Page Builder to build your home page with any design that you like and also you can read the WPBakery Page Builder documentation to learn how to use it HERE
You could consult our video guide on How to create page using WPBakery Page Builder
If you DID NOT One Click Install Demo, you will need to MANUALLY CREATE your Home and other pages. Here’s how to build a new page:
Creating pages is the foundation of creating your site. You can create any number of pages with content. Our theme includes several page Templates to choose from, and you will need to choose the page template that suits your needs. All of this is done in the pages section of your WordPress admin. Continue reading below to learn how to create a new page.
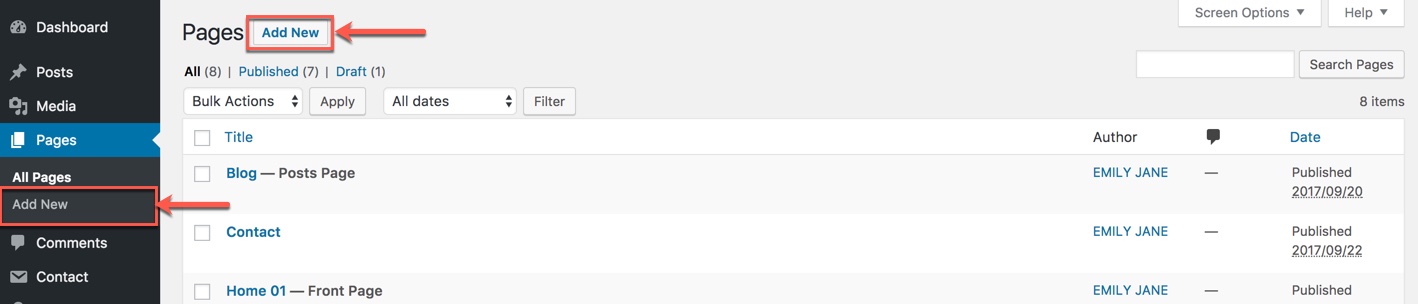
Step 2 – Navigate to Pages in your admin sidebar and click Add New option.
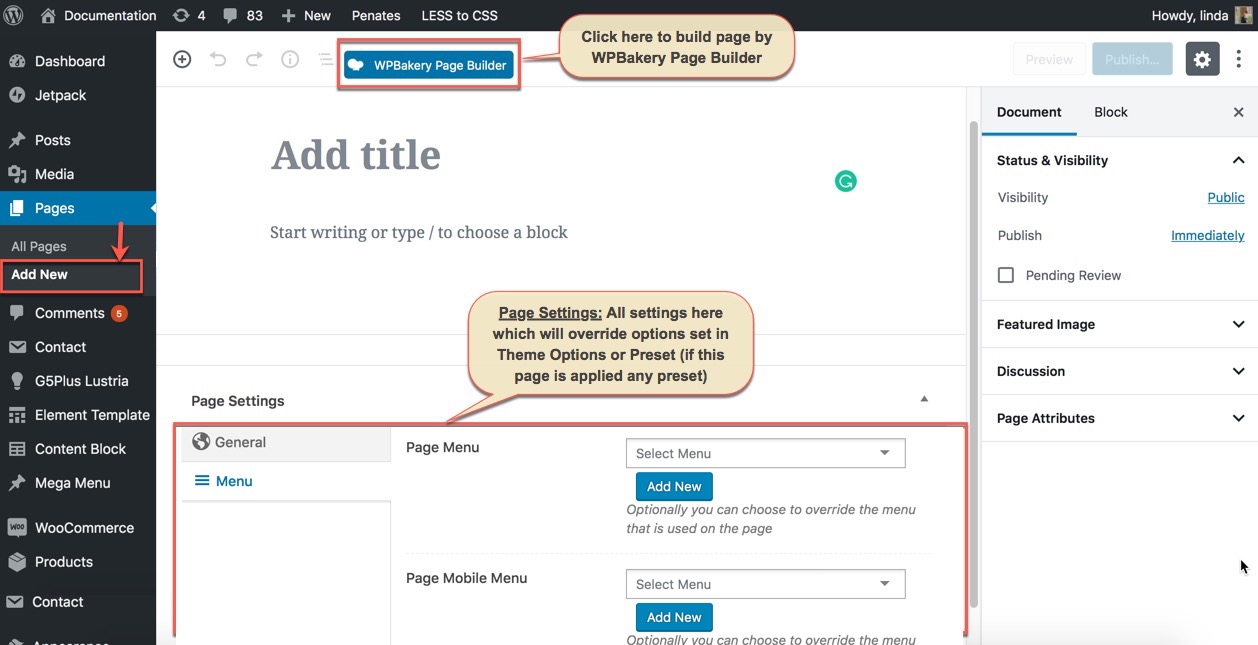
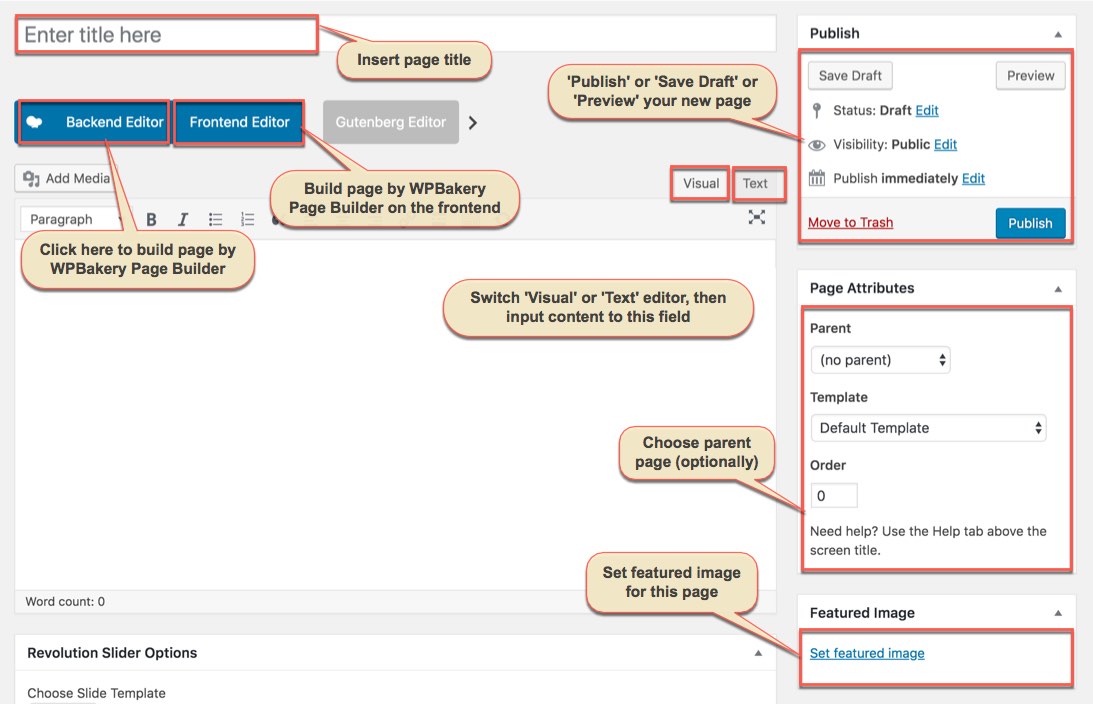
Step 2 – Input a new name for your page, and click WPBakery Page Builder to build page by WPBakery Page Builder (make sure that you have installed and activated WPBakery Page Builder plugin).
Content for your page goes in the editing field, use the Visual or Text editor.
Page content is mainly built using Elements & Shortcodes. See the Page Shortcodes/Elements section for how to use them. You can also use our demo content, see the corresponding section of this document for the demo code of each page.
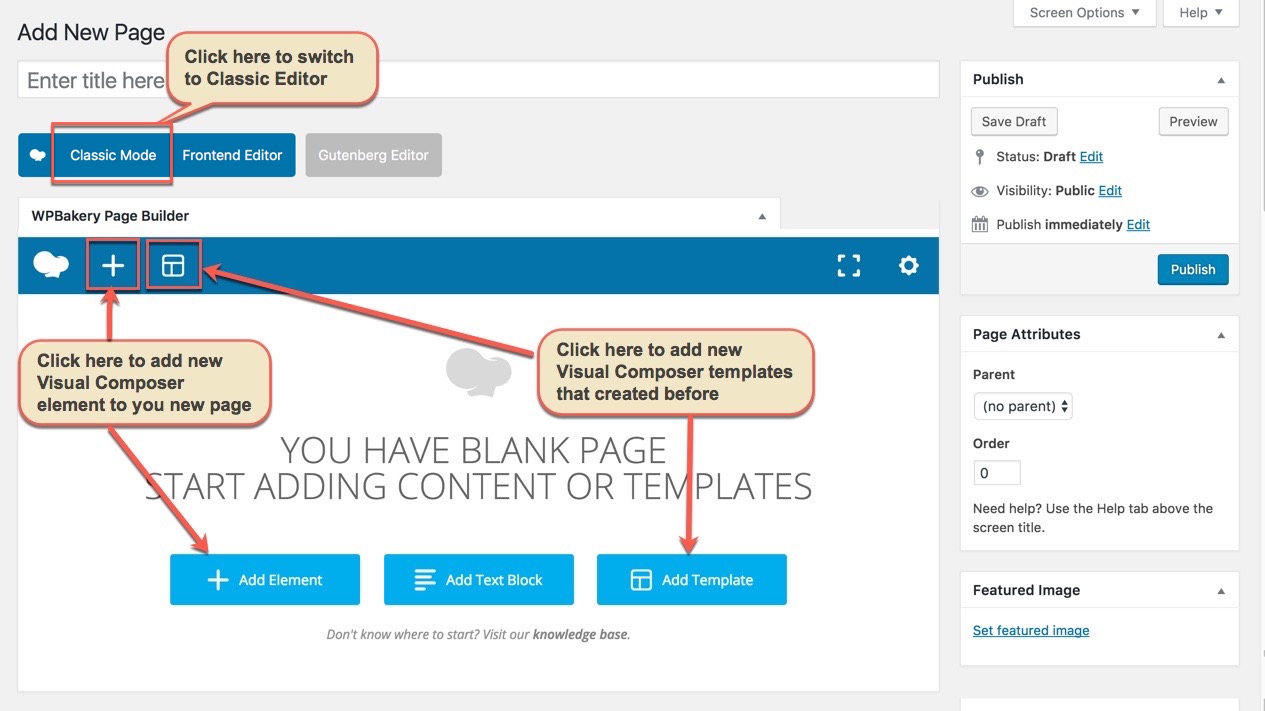
- Don't click BACKEND EDITOR: It means that you could input content to Classic Mode Area, then go to Step 3
- Click "BACKEND EDITOR": your screen could be like this
Step 4 – Setup values for Page Settings which will affect to this page only and override options set in the Preset (if this page apply any Preset) or Theme Options. With each page, Page Settings is first priority, next is Preset, then is Theme Options, any change in Page Settings just affect to this page, not entire website.
General Settings:
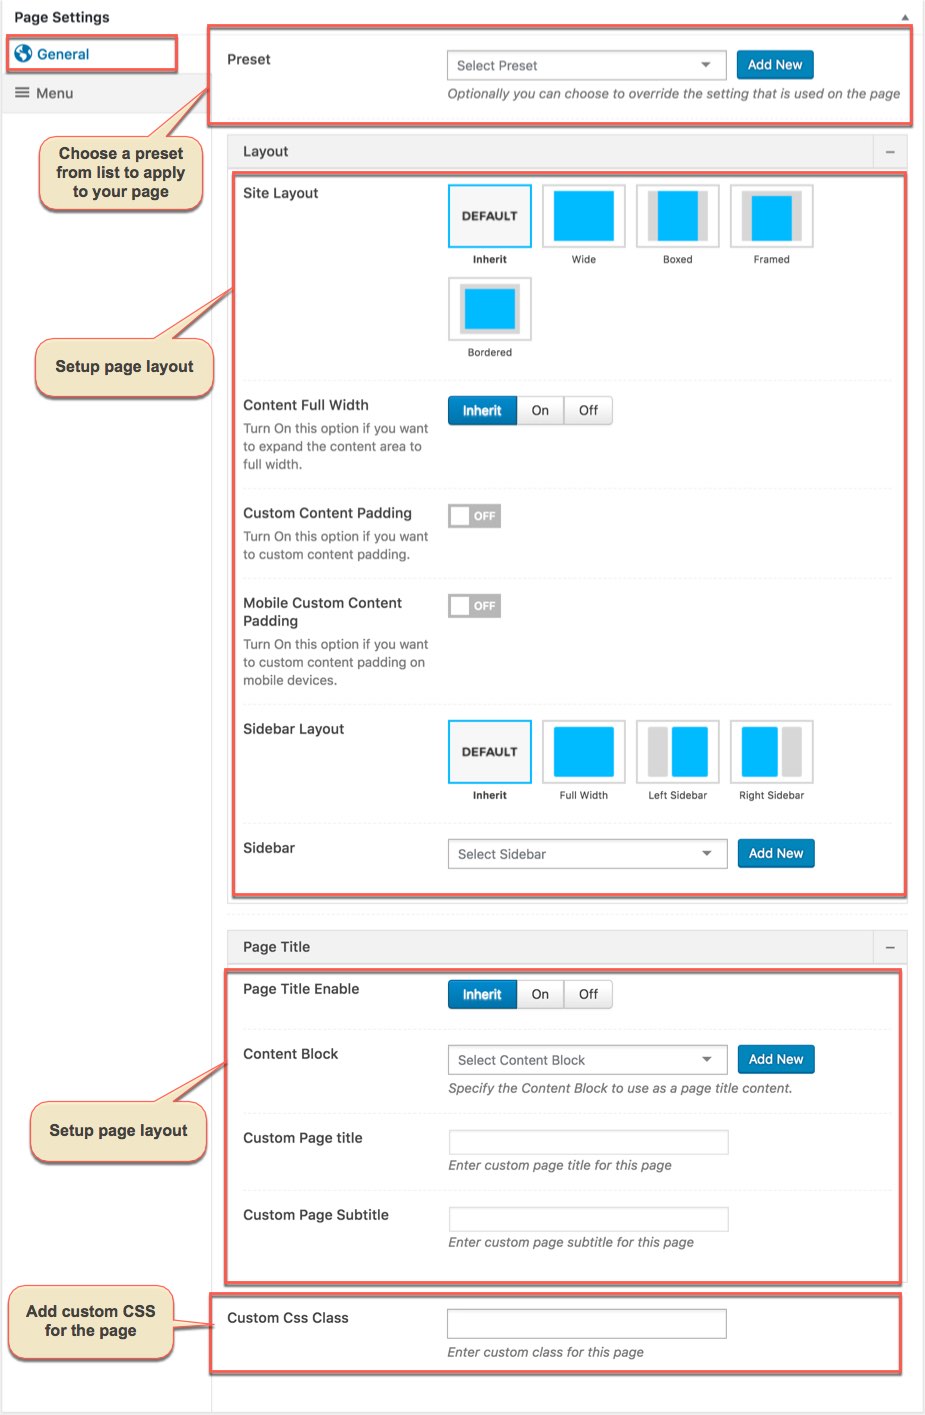
Menu Settings:

Any option that was set to be Default or was not customized means that it will use the value of equivalence option you have set in Preset (if this page apply any Preset) or Theme Options. Insert a different value to override the Preset/ Theme Option value.
You could consult our guide on How to use Preset for more details on How to apply Preset to a Page/Post
Step 5 – Set your Parent page (It’s usually set to No Parent).
Step 6 – Set featured image for your page (optional)
Step 7 - You can save draft/preview or publish this page and set it as your frontpage. You could consult Settings a static page as Home section.
Sidebar & widgets
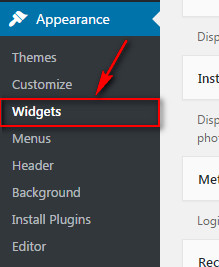
WordPress comes with built-in default widgets for your themes. Apart from these default widgets, Lustria comes with 10 custom widgets. In order to use these widgets, from WP dashboard, navigate to Appearance → Widgets.
These screenshots below are list of pre-defined sidebars as well as their locations on a page, so that you will find it easier when pulling out widgets to set up your site.

| Widget Name | Description |
|---|---|
| G5Plus Banner | A widget to display ad banners. |
| G5Plus Payment | A widget to display payment methods. |
| G5Plus: Price Filter List | A widget to display Price Filer in drop-down list style |
| G5Plus: Product Category Filter | A widget to display categories of products |
| G5Plus: Product Shorting | A widget to display a product sorting list. |
| G5Plus: Product Filter by Attribute | A widget to display a Filter of products list by attribute |
| G5Plus: Posts | A widget to display posts in 4 custom layout (carousel, mix, small image, list) and 6 post sources: popular, random, recent, oldest, trending, video post |
| G5Plus: Social Profile | A widget to display social profile. |
| G5Plus: Twitter | A widget to display recent twitter |
| G5Plus: Login - Register | A widget to display login - register form |
You can add widgets to widget areas simply by hover the widget then drag-drop to widget area as your liking
Widgetised Sidebar in WPBakery Page Builder: You can use Widgetised Sidebar element in WPBakery Page Builder to build a Content Block then use this Content Block to display as Top Bar, Top Drawer, Bottom Bar, Footer, 404 Page in Theme Options (or Preset)

And now we will show you some example of How these widgets display on the frontend (except 2-Top Bar Left, 3-Top Bar Right widget area and 10-Canvans widget area have not been available on Lustria demo Data now)
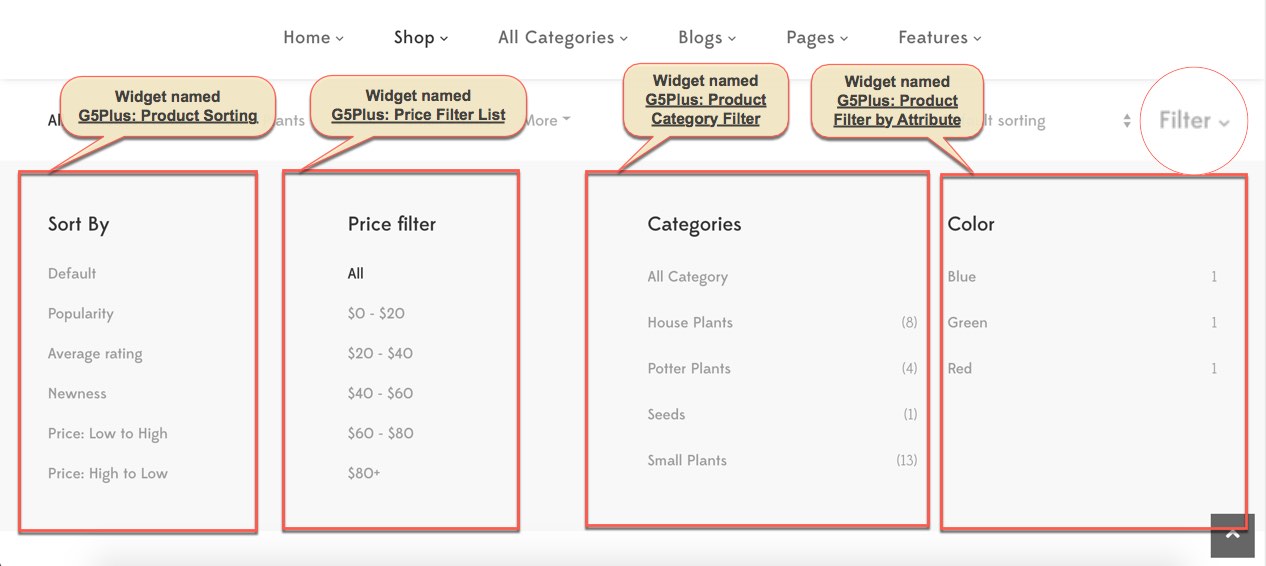
Widget area named 'G5Plus: Price Filter List', 'G5Plus: Product Shorting', 'G5Plus: Product Filter by Attribute', 'G5Plus: Product Category Filter'
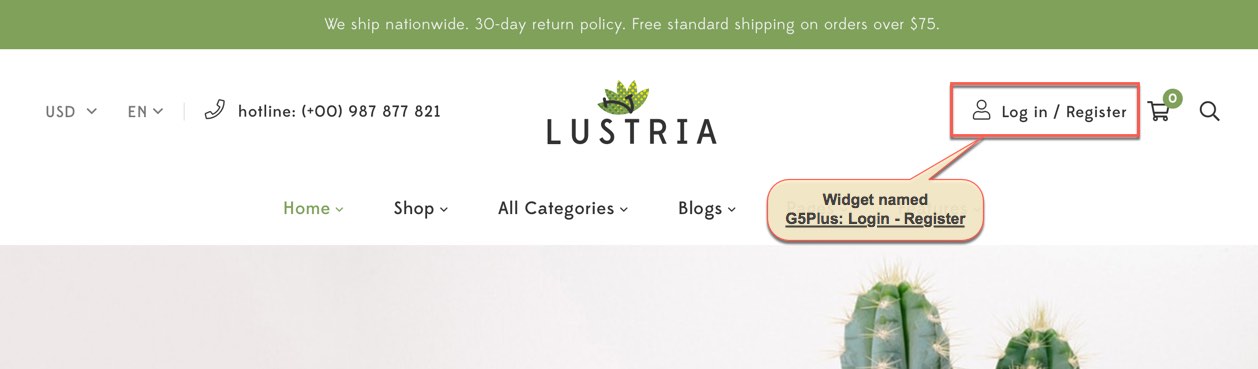
Widget named 'G5Plus: Login - Register' on frontend on frontend
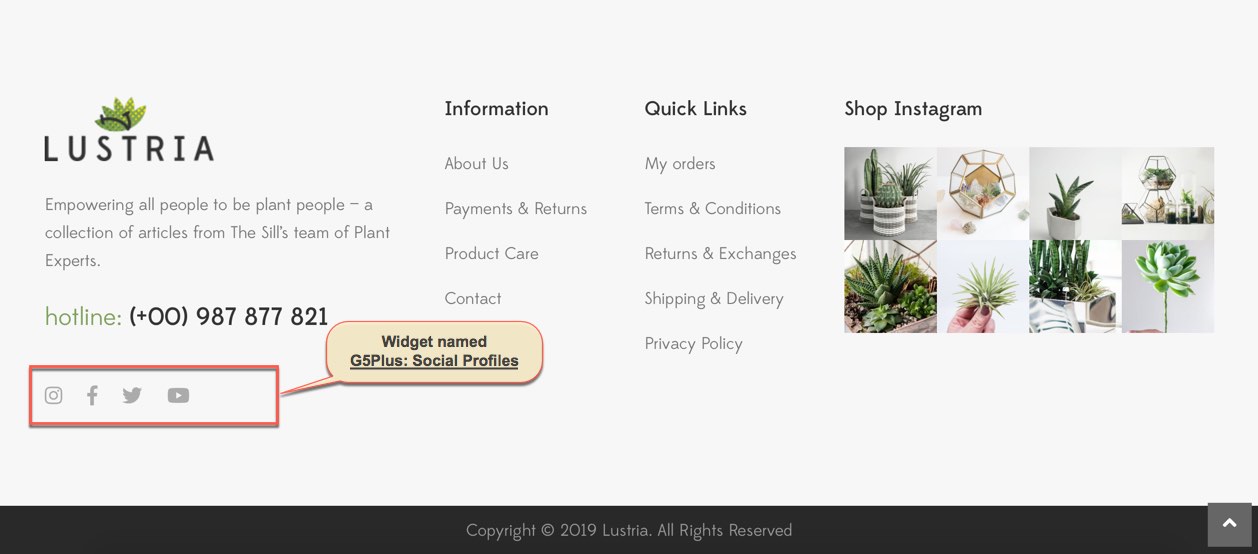
Widget named 'G5Plus: Social Profiles'
Widget named 'G5Plus: Posts'

Building OnePage
Home OnePage aims to focus the user's attention to the content that they want. When you choose an item on Main Menu of OnePage, it immediately navigates to the section that you've chosen.
If you want to build your Home OnePage please consult our guide below:
Step 1 - You just have to create a Menu with Links as items.

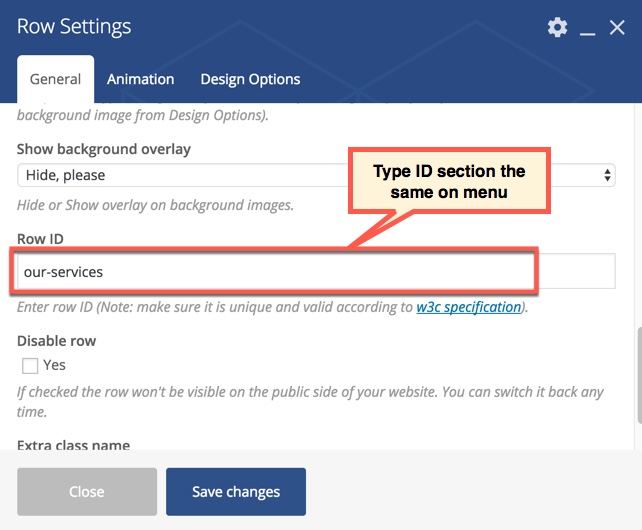
Step 2 - Go to your homepage, anywhere you want the menu item to navigate to section, please edit row by WPBakery Page Builder and type id on field: Row ID (make sure that the Row ID is the same as menu item URL)
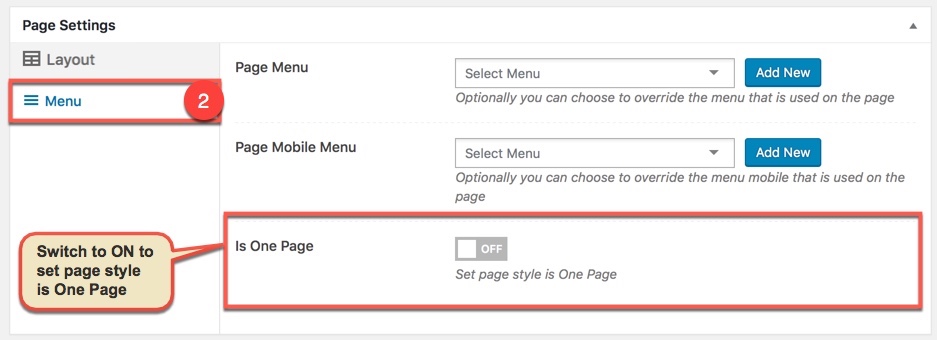
Step 3 - After building content to your Homepage, scroll down to Page Settings area to choose style of page is OnePage
You could please consult our video guide on How to build OnePage (We use ORSON theme for example but this process is similar to the process of building OnePage on Lustria theme).
Build a HomePage
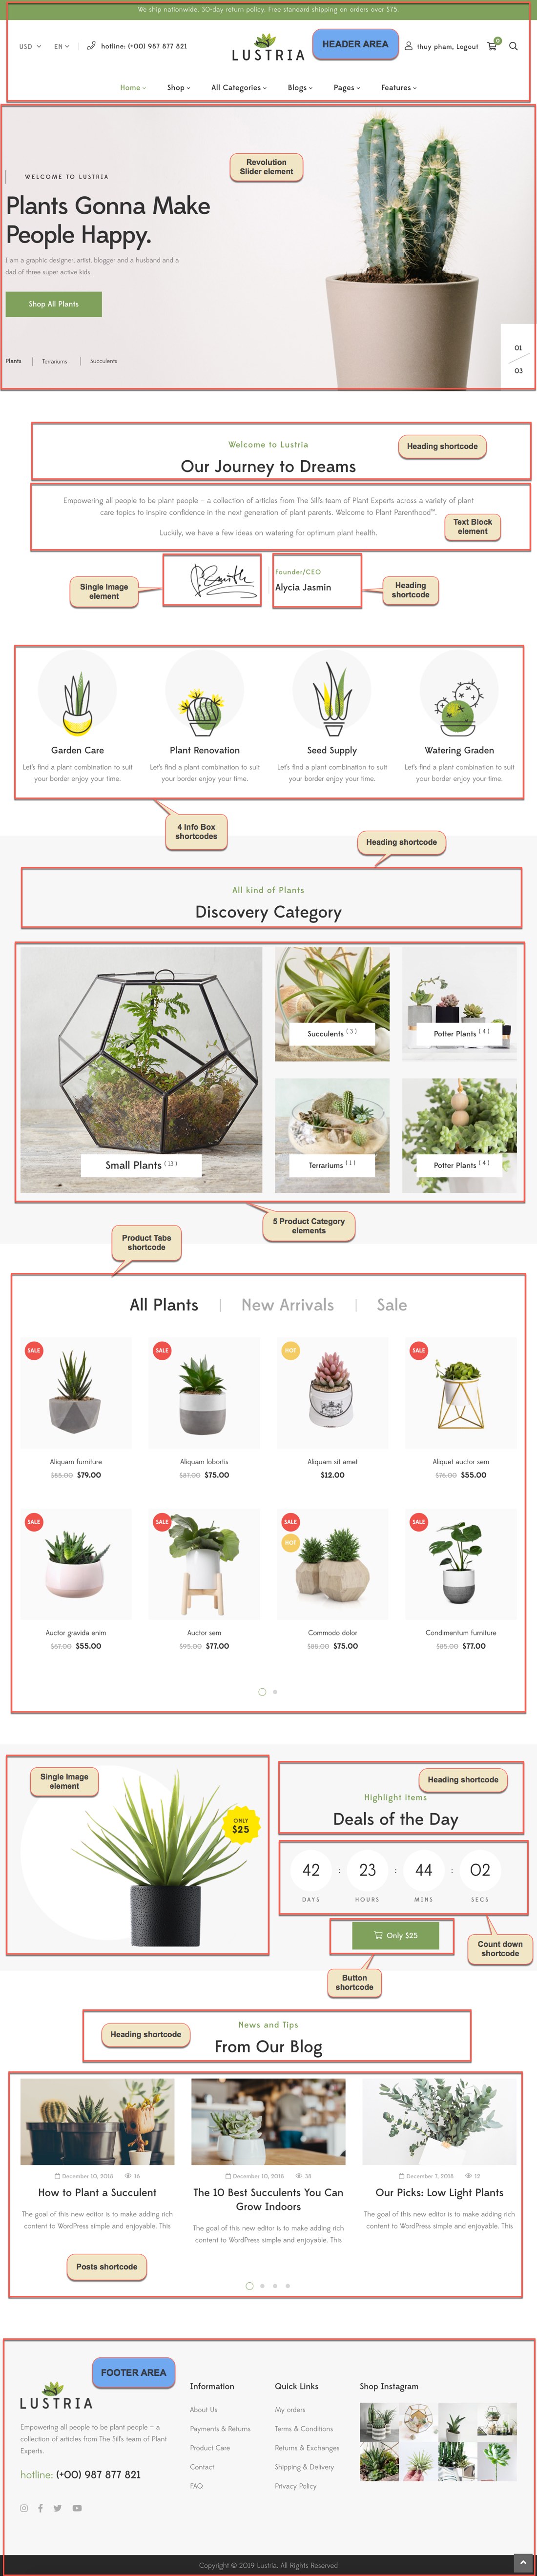
This is step by step guide on how to build homepage manually for Home 01
Note: You need Wordpress, Lustria theme & all required plugins are already. Building other homepages process are similar.
Overview elements
Build header area
You can setup options in Theme Options (which will affect to entire website) or create a new Preset and apply to any page. Please consult this video guide on How to build Header Area. This process is similar to building Header Area on Lustria theme.
The screenshot below is an header area:
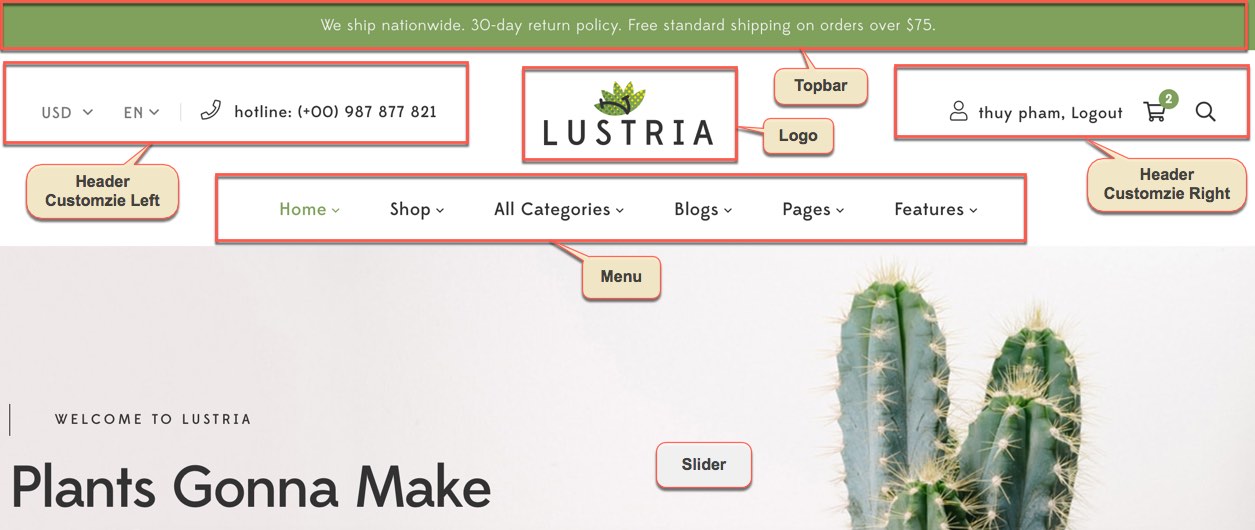
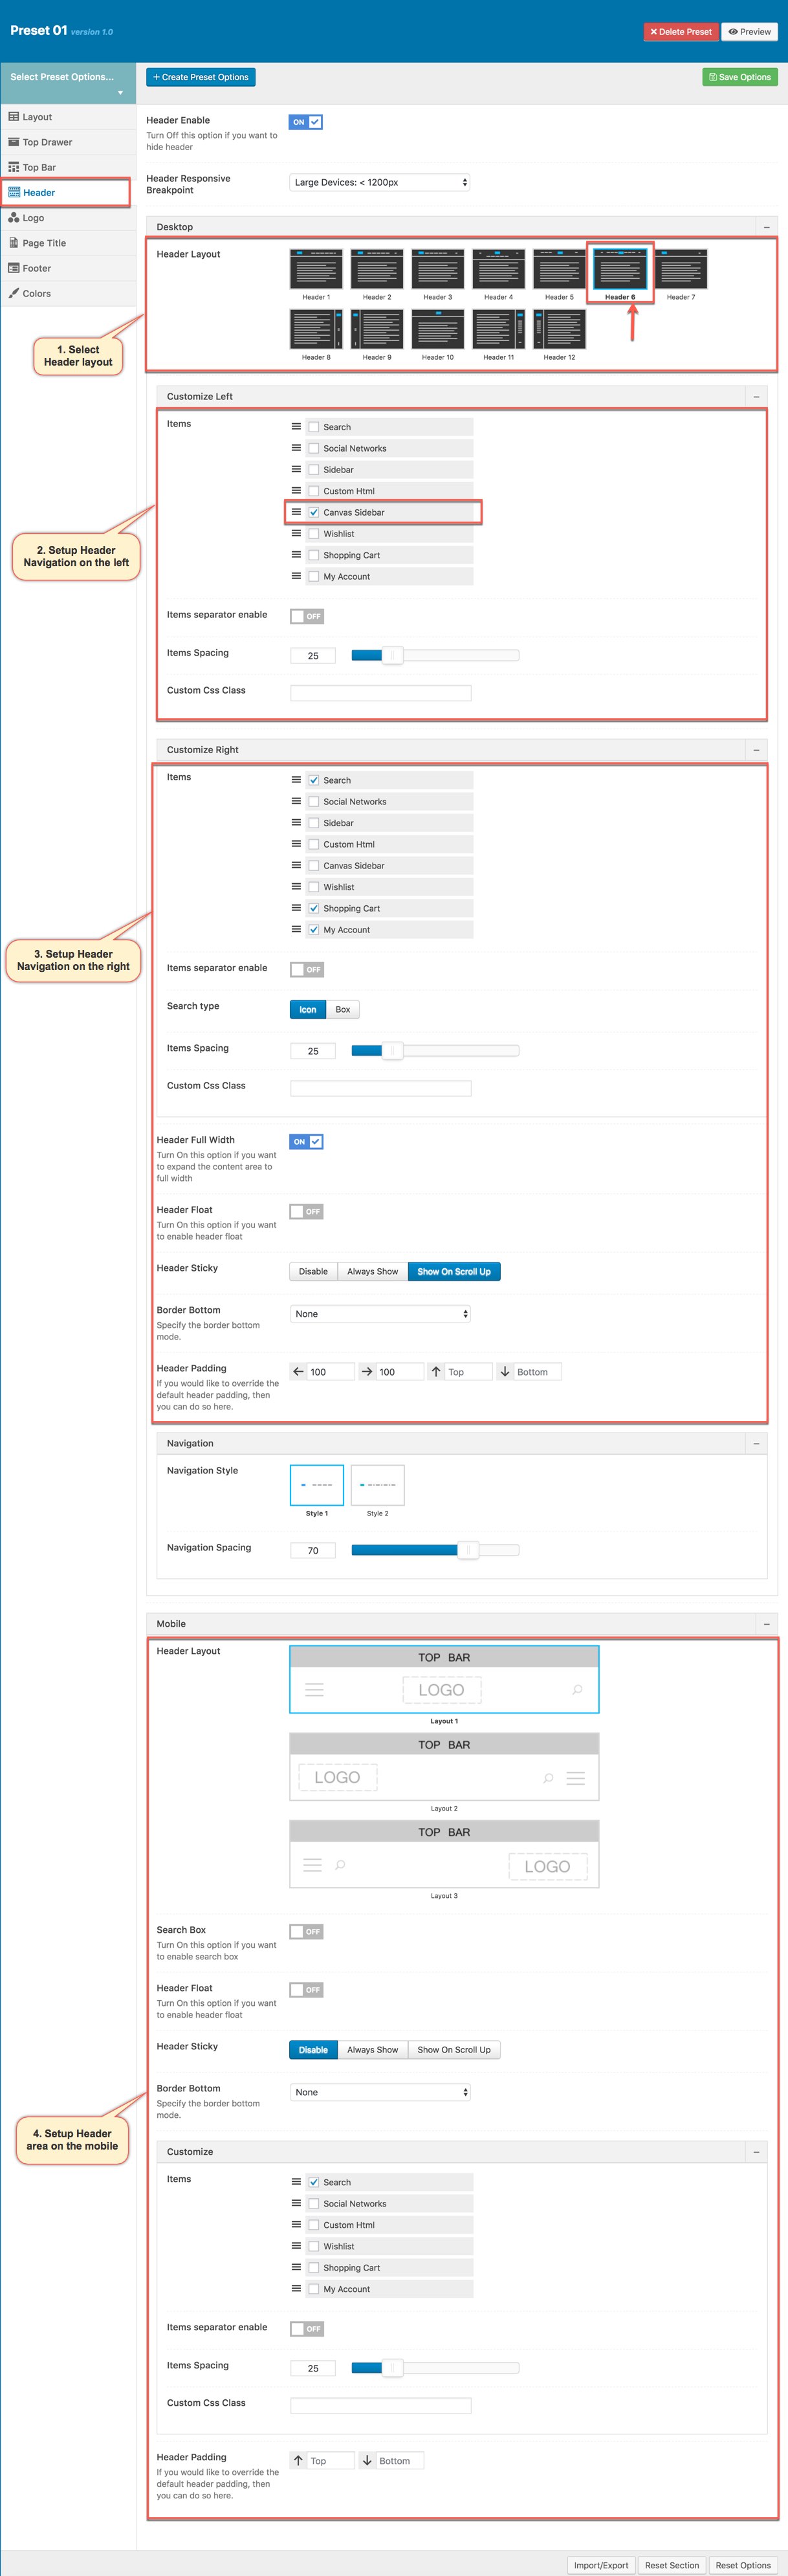
1.1 Setting header
If you want apply this header to all your pages, setup by going to Theme Options → Header tab (In case you only want to apply this header for some pages/posts such as homepage, please create a new Preset then setup options for Header Area as your liking as below. You can consult Preset Options section for more details in use Preset)
1.2 Upload logo
Go to Theme Options → Logo tab, then change logo (please read detailed description below each item before upload):
1.3 Setting for Topbar
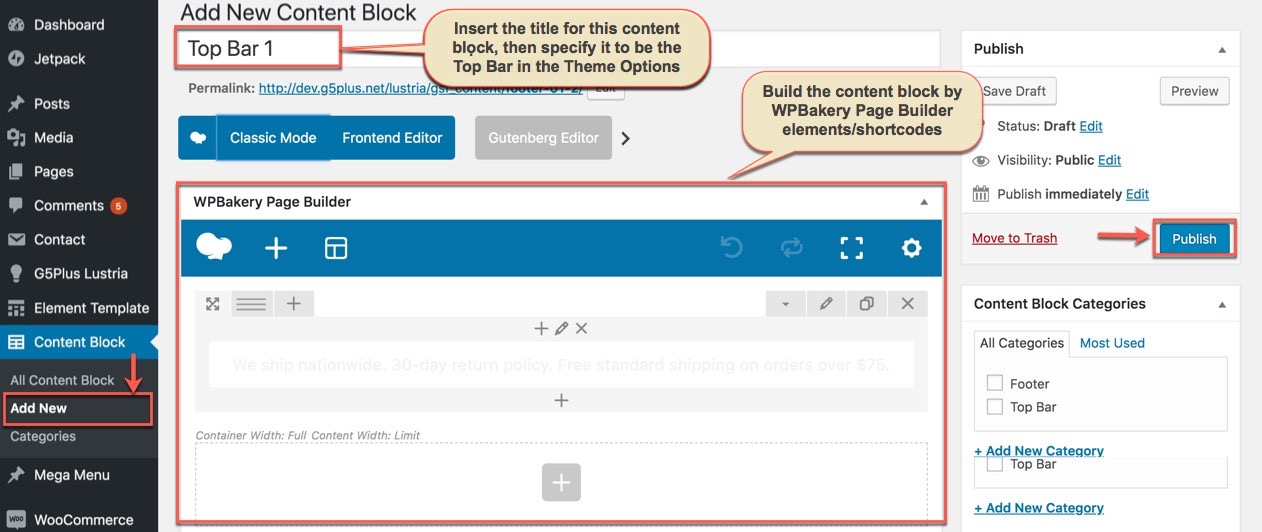
If you want to display the Top Bar in the Header area, The work-flow to build this Top Bar Area is: creating a new Content Block (that built by WPBakery Page Builder elements/shortcodes), then use this content block as Top Bar content. Please consult Content Block section to build an attractive content block by your own.
Create a new content block by WPBakery Page BUilder elements/shortcodes
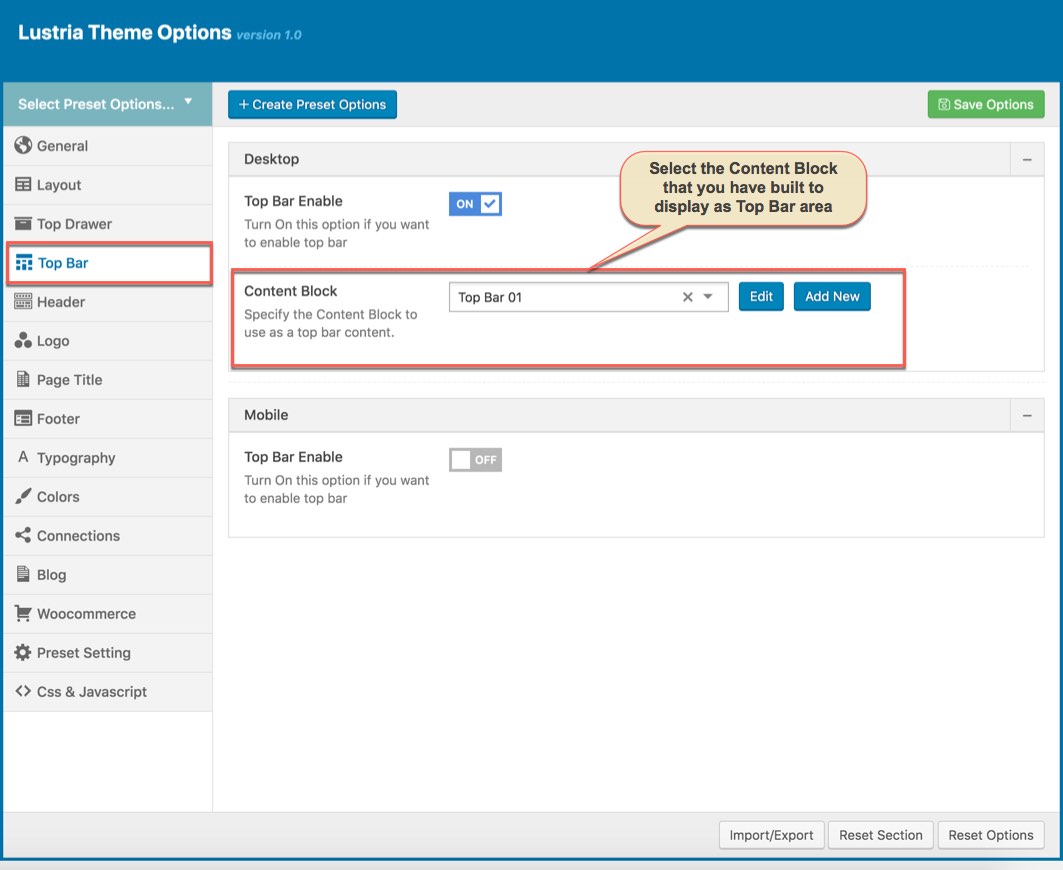
Set the content block to display as Top Bar
1.4 Create menu
The menu is one of the most important elements of the site. It provides your visitors with the information about site structure. If your menu has well-thought and conveniently grouped elements, you visitors will be able to find the needed section easily. You can also consult Mega Menu section to build an attractive menu by your own.
Navigate to Appearance → Menus section to manage all menus on your site and do follow as below screenshot:
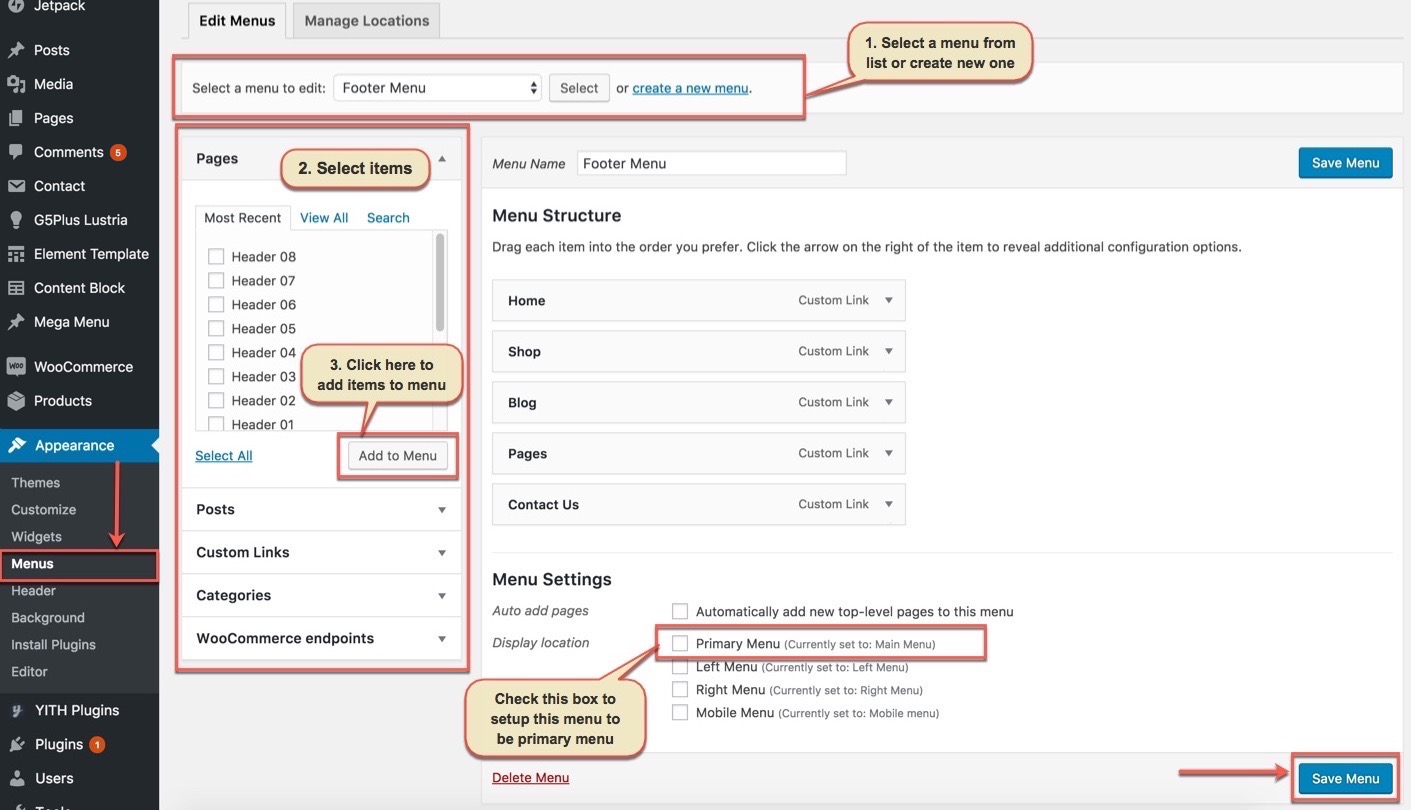
In the Menu Settings section, click to Primary Menu to setup this menu to be the main site menu and is used almost in all header styles and menu locations.
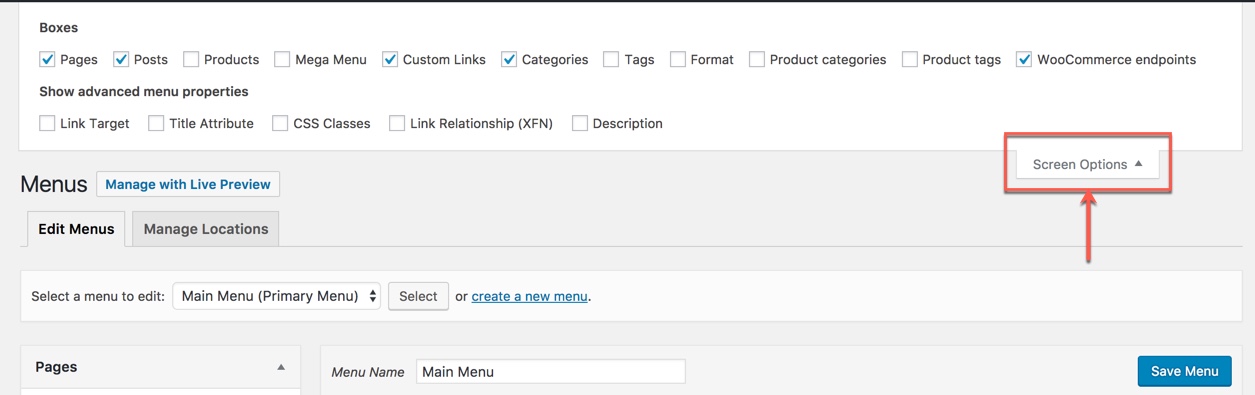
If you want to extra more fields to add to your menu, you can click on Screen Options and select:
Finally, don't forget to Save Menu after everything is set properly and check it on the site.
Build footer area
The screenshot below is demo Footer Area on the frontend
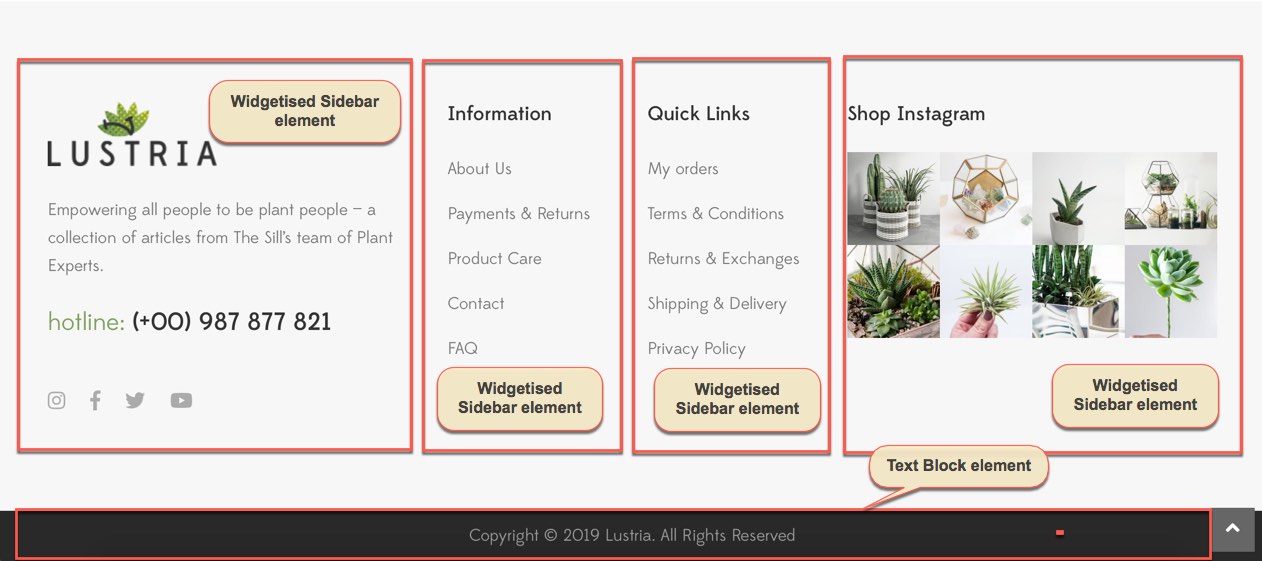
The work-flow to build this Footer Area is: Adding widgets to the Widget Areas (sidebar), then create a new Content Block that included 'Widgetised Sidebar' elements and setup this Content Block to be display as Footer.
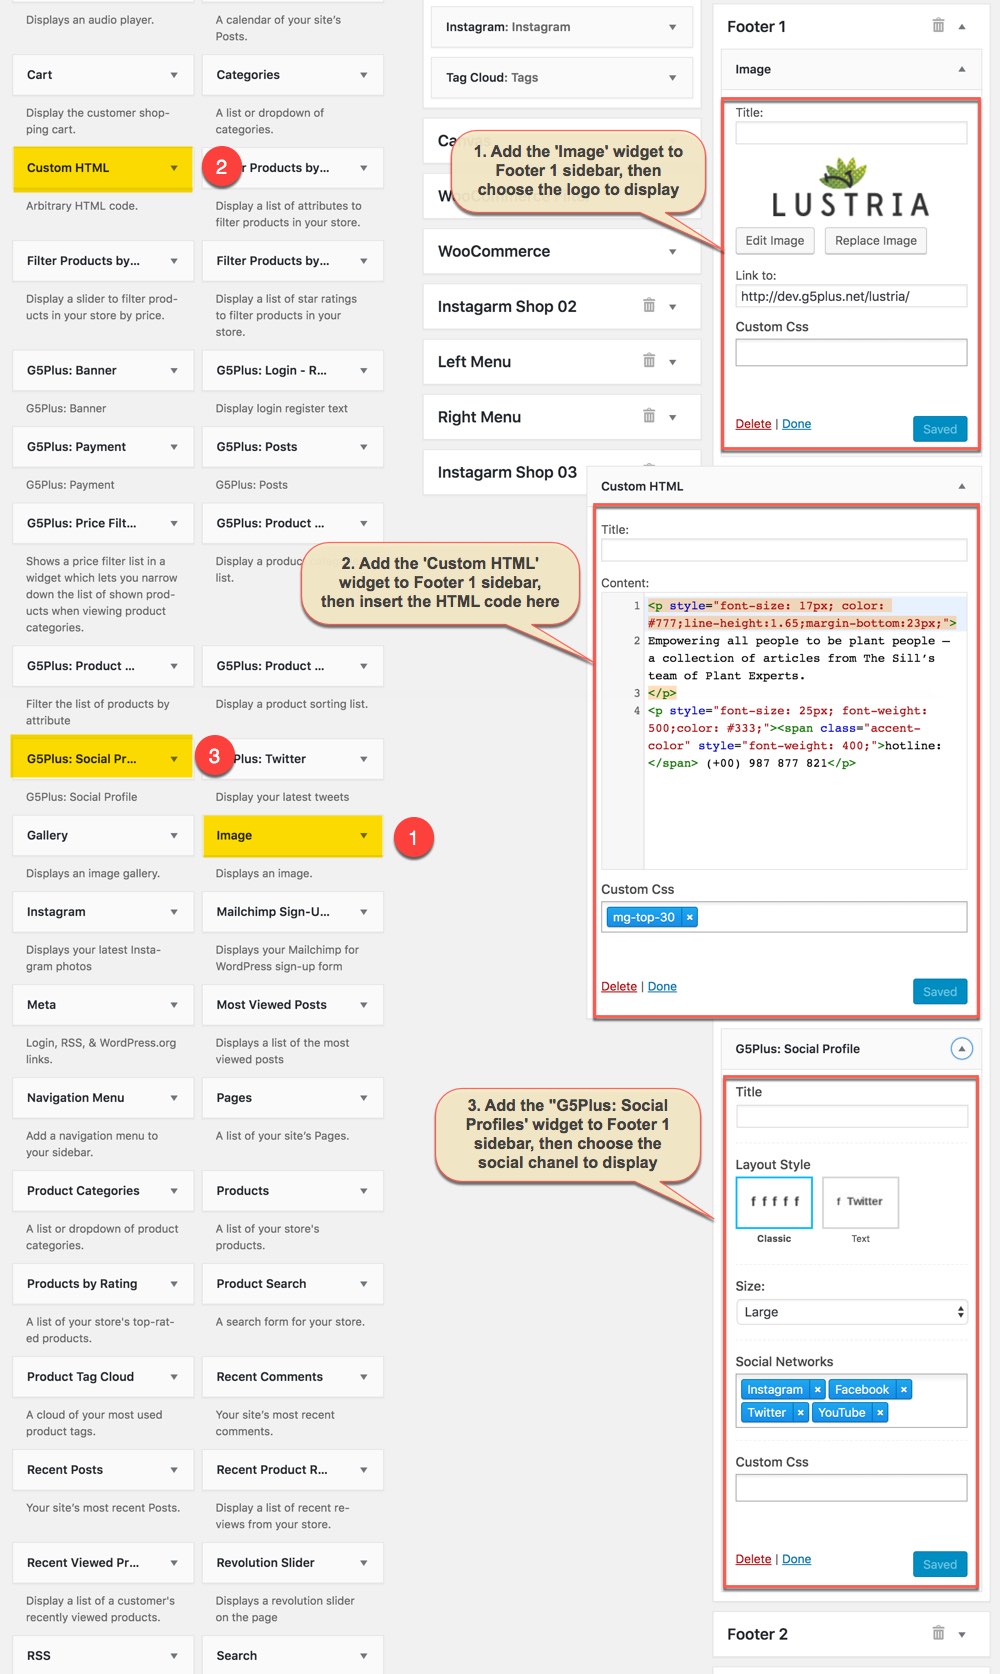
1. Add widgets to a widget area
Go to Widget Manager
Add Image widget, Custom HTML widget and G5Plus: Social Profile widget to FOOTER 1 sidebar
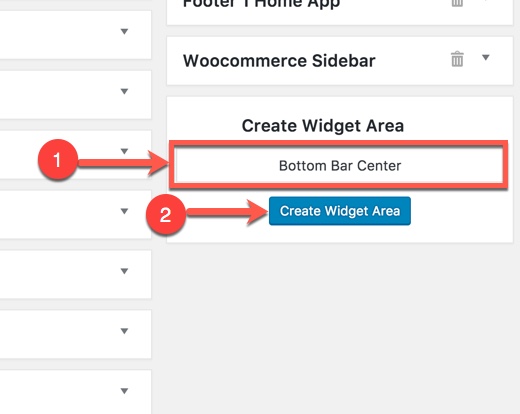
Notice: You can create a new widget simply like this:
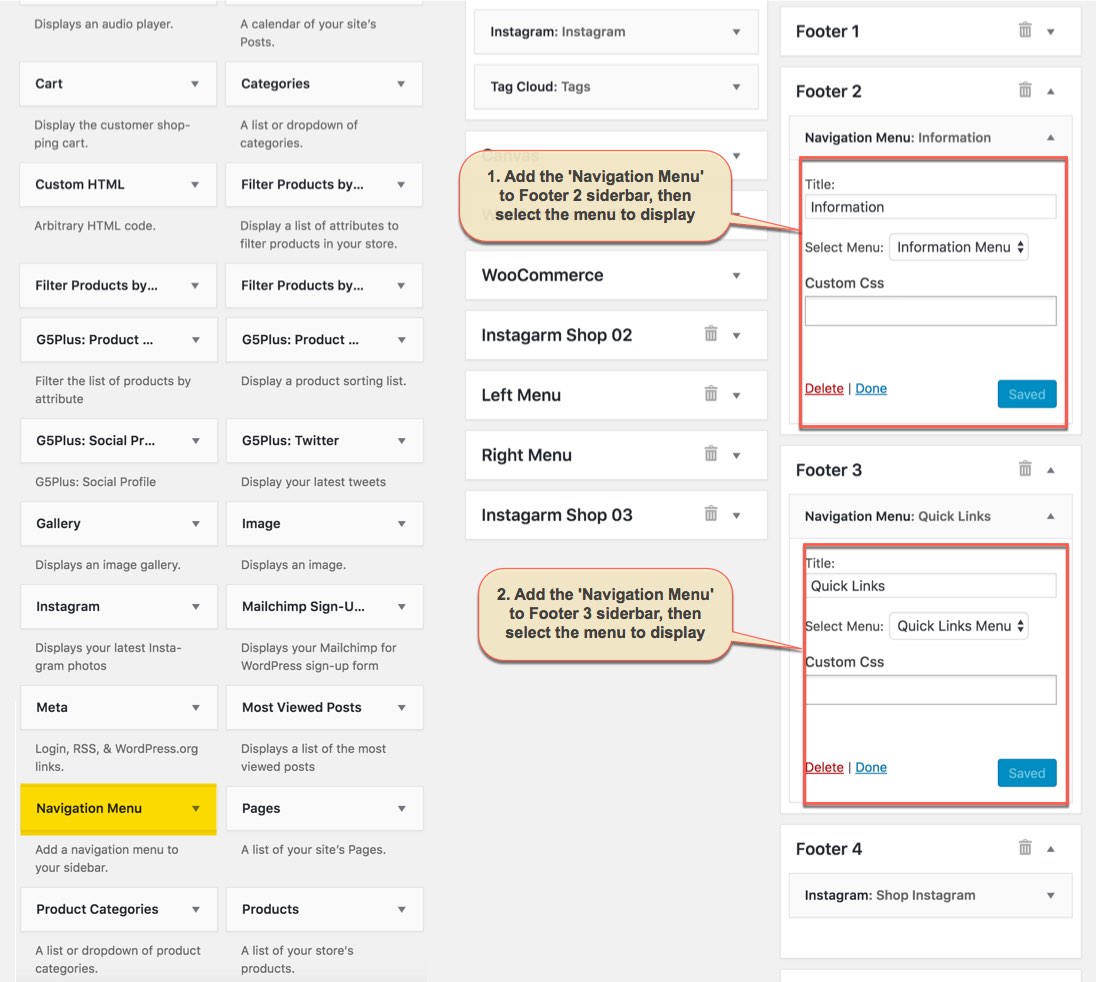
Add Navigation Menu widget to FOOTER 2 sidebar and FOOTER 3 sidebar
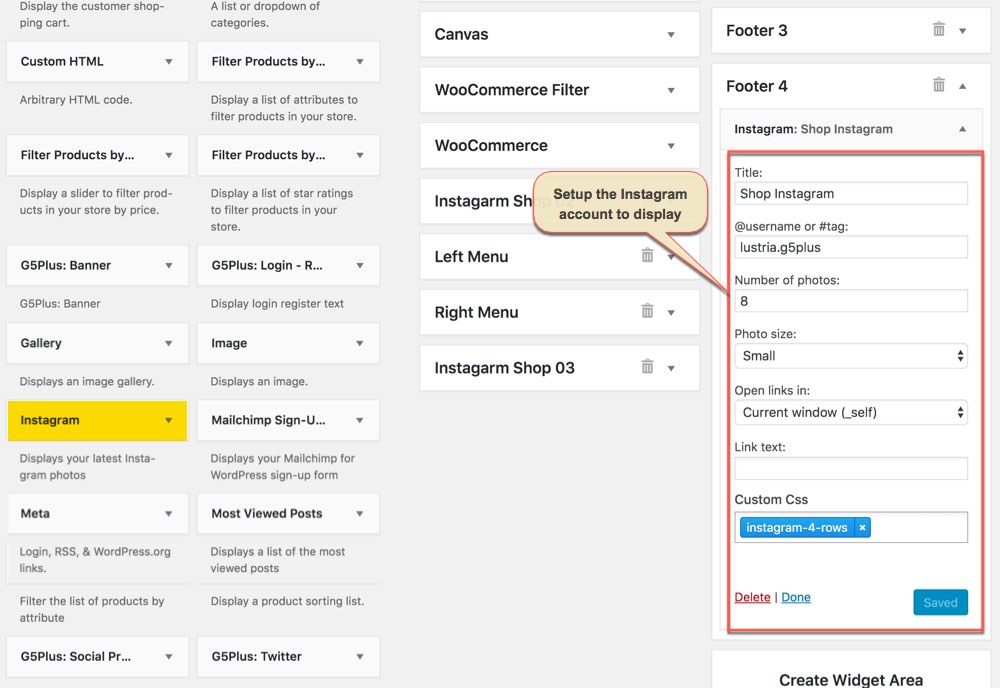
Add Instagram widget to FOOTER 4 sidebar
2. Settings Footer
Add New Content Block for Footer area
You can use WPBakery Page Builder elements/shortcodes/templates to build your Footer Area as your liking
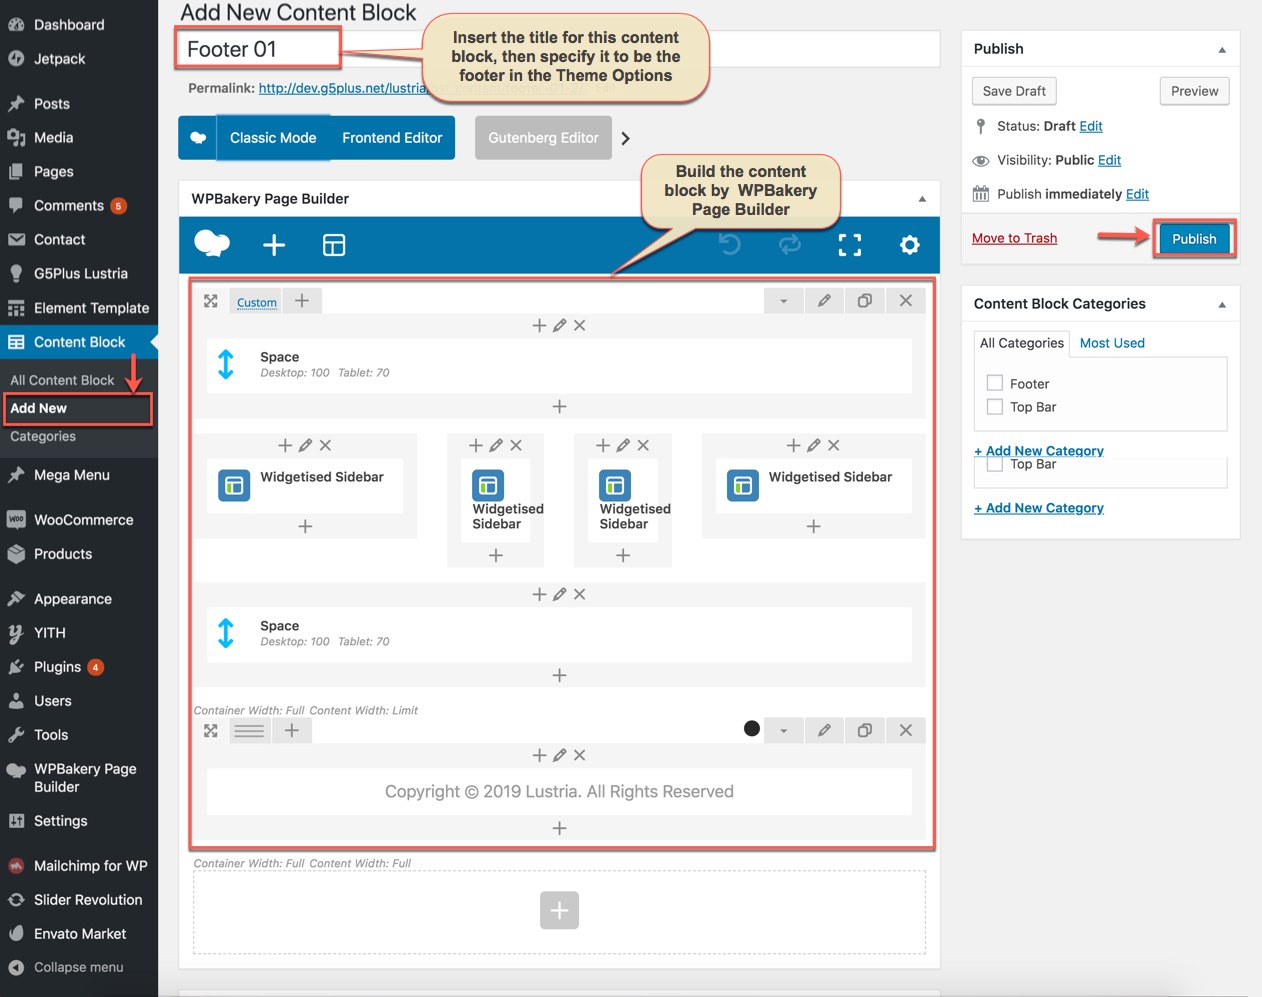
In this Content Block, We use shortcode of Widgetised Sidebar in WPBakery Page Builder to build Content Block and apply to Footer area.
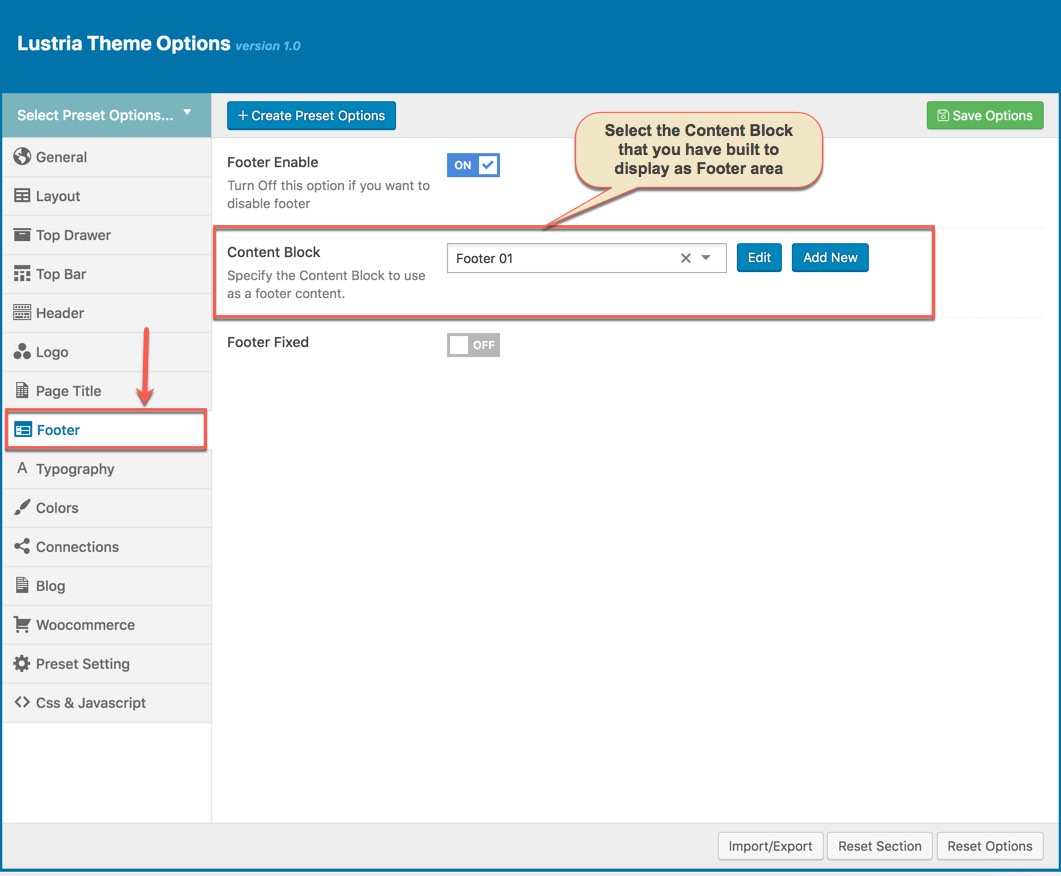
Specify the Content Block to use as a footer content in Theme Options
Go to Theme Options → Footer tab, then setup general options for Footer area and specify the Content Block to use as a footer content (In case you only want to apply this Footer for some pages/posts such as homepage, you need to create a new Preset then setup options for Footer Area as your liking as below. You can consult Preset Options section for more details in use Preset)
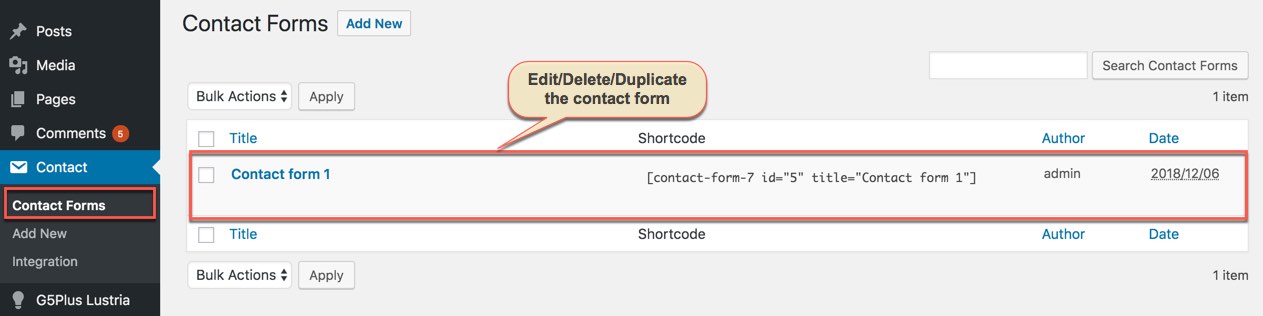
Contact form
Contact form 7 is used to create ‘easy to handle’ and ‘easy to customize’ forms. To get all forms, ‘Contact Form 7’ plugin must be installed and activated. You can add/edit/delete the contact form by following this documentation
You can do step by step as image below to build contact form:
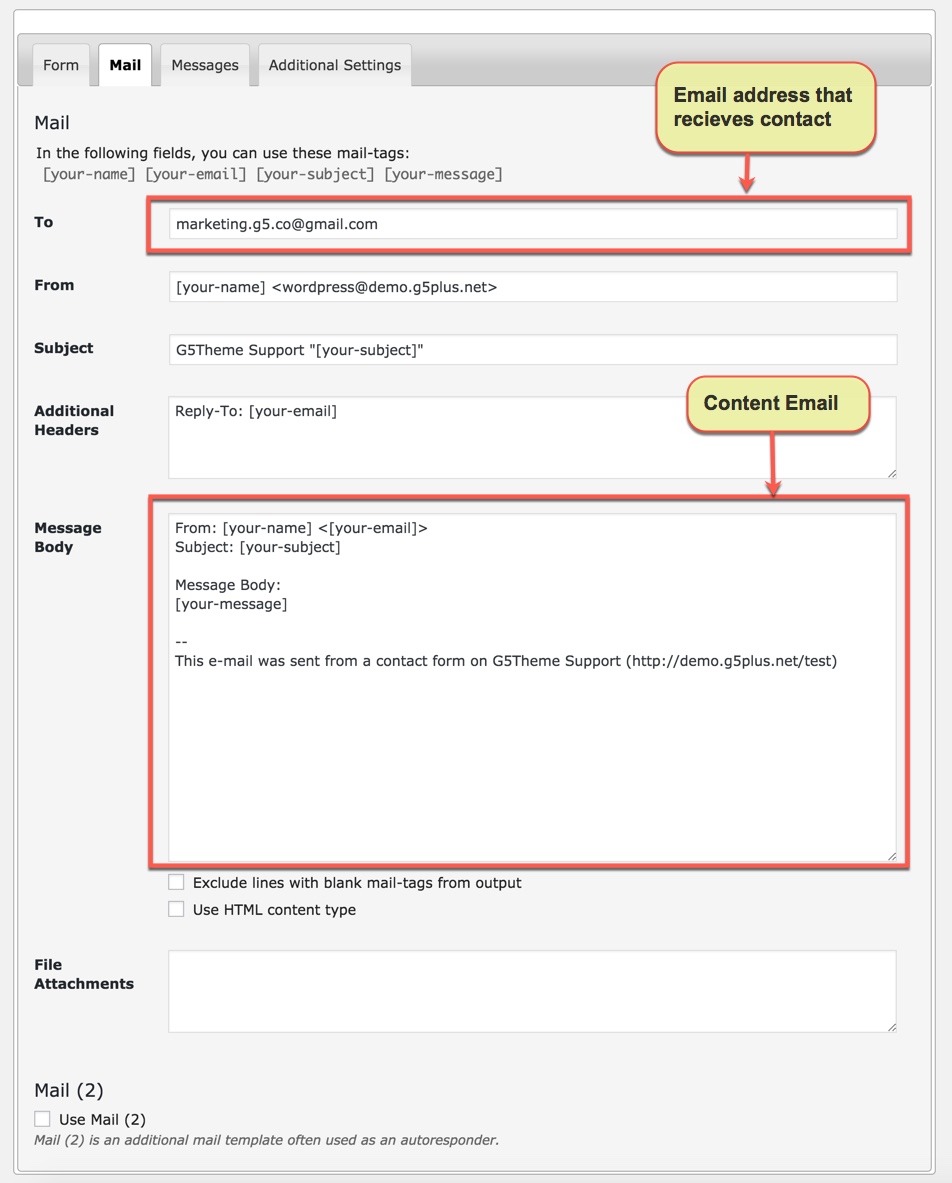
You can visit Contact Form 7 Plugin to further details. Or copy and paste content to Form field like this:
You can also add/edit/delete the contact form, in our demo data there are 4 pre-built forms:
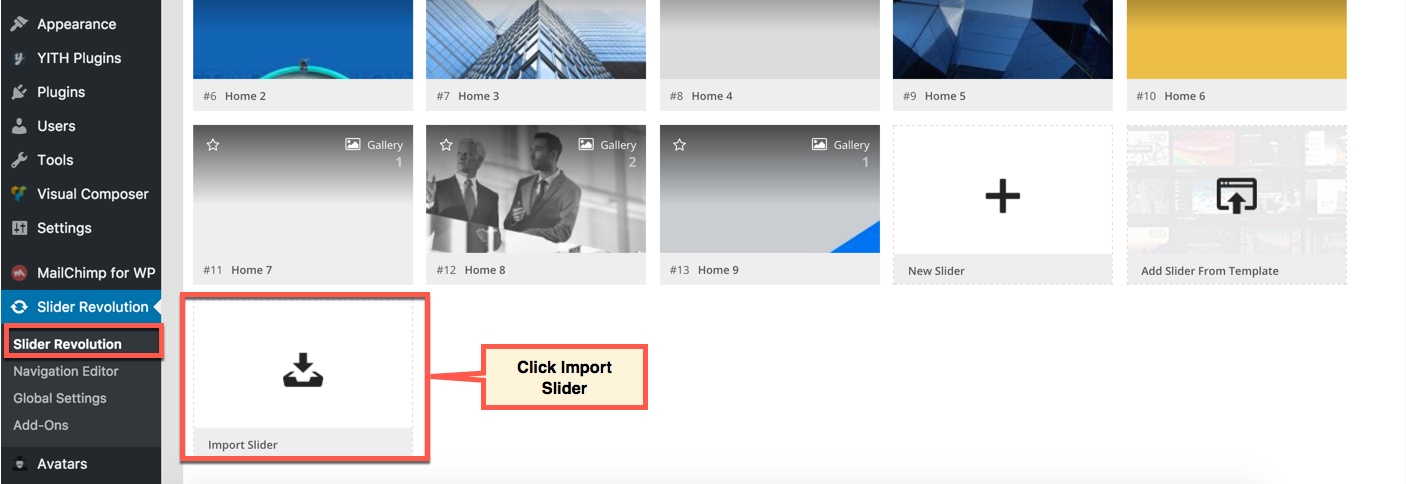
Import slider home page
After setting up the homepage, you need to setup the slider for homepage to make it display the same as in live preview. The download package contains the exported slider (Revolution Slider) that can be used as your slider template. Please follow the steps below to import it to your shop:
- Go to "Revolution Slider"
- Click "Import Slider" button
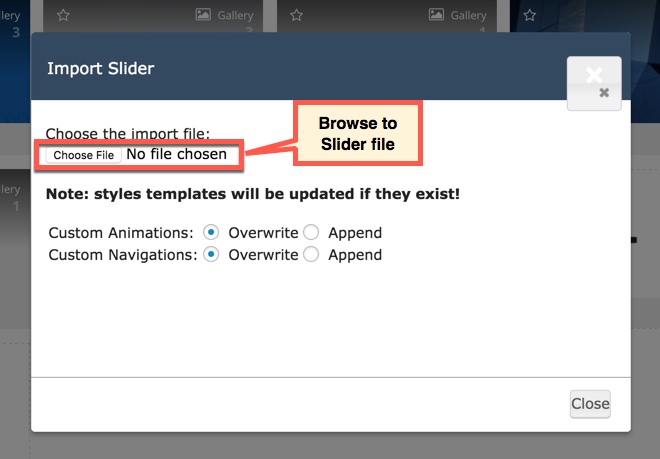
- When a popup appear, click "Browse" and select one of zip sliders(these files include in main file downloaded) file.
- Click "Import Slider" button to start import the selected slider
- Repeat the steps to import all
You could consult our video guide on How to Import Slider using Revolution Slider
Please note that these steps are to set up slider for homepage the same as in live demo. If you want to make your own slider, please follow the official Slider Revolution document.
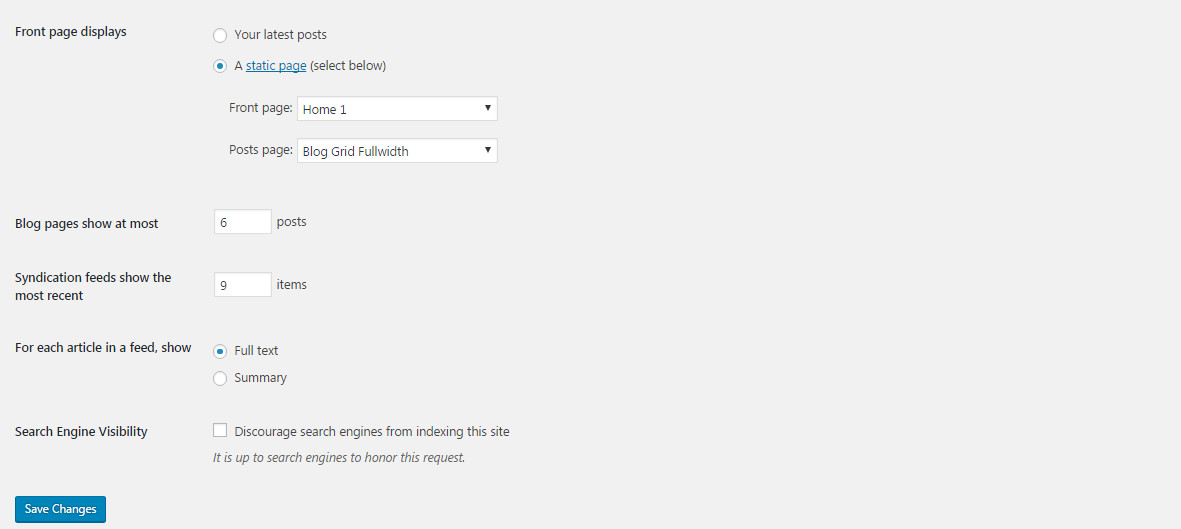
Setup homepage
If you installed Lustria demo Data, you don’t need to create a new Home Page, you just need to choose from the list Home Pages that were automatically created from the demo content, following these steps:
- Go to Settings → Reading.
- From dropdown, select which page you want to set as "Front Page" and which page you want as “blog posts” page. Default Front Page is ‘Home’ and default posts page is ‘Blog’.
- Click Save Changes
Save all your changes!
Translate theme
People all around the world use WordPress, around 44% of WordPress websites are written in a language other than English. We’re about to show you how to translate our themes. Using Make as an example, we’ll show you how to translate Lustria theme to Vietnamese, to be precise!
We will using Loco Translate plugin that provides in-browser editing of WordPress translation files.
- 1. Install and activate LOCO Translate plugin.
- 2. Create and update language files directly in your theme or plugin.
- 3. Saving custom translations.
Please confsult our video guide on How to translate G5THEME Theme using LOCO Translate plugin, We have been use Mowasalat theme for example and the process of Lustria theme translation is similar to this.
You can consult our guide here: http://support.g5plus.net/knowledge-base/how-to-create-a-multilingual-wordpress-website/ for further details about how to create a multilingual site.